
本文通过.NET Core 3.1 分享 Web API 基础知识,其他更新版本相差不离
一、前言
随着近几年前后端分离、微服务等模式的兴起,.NET Core 也似有如火如荼之势 ,自 16 年发布第一个版本到 19 年底的 3.1 LTS 版本,以及将发布的.NET 5,.NET Core 一路更迭,在部署和开发工具上也都支持了跨平台应用。一直对.NET Core 有所关注,但未涉及太多实际应用,经过一番学习和了解后,于是分享出来。本文主要以.NET Core Web API 为例,讲述.NET Core 的基本应用及注意事项,对于想通过 WebAPI 搭建接口应用的开发者,应该能提供一个系统的轮廓和认识,同时和更多的.NET Core 开发者交流互动,探本勘误,加强对知识的理解,并帮助更多的人。本文以贴近基本的实际操作为主,部分概念或基础步骤不再赘述,文中如有疏漏,还望不吝斧正。
二、Swagger 调试 Web API
开发环境:Visual Studio 2019
为解决前后端苦于接口文档与实际不一致、维护和更新文档的耗时费力等问题,swagger 应运而生,同时也解决了接口测试问题。话不多说,直接说明应用步骤。
- 新建一个 ASP.NET Core Web API 应用程序,版本选择.ASP.NET Core 3.1;
- 通过 NuGet 安装包:Swashbuckle.AspNetCore,当前示例版本 5.5.0;
- 在 Startup 类的 ConfigureServices 方法内添加以下注入代码:
services.AddSwaggerGen(c =>
{
    c.SwaggerDoc("v1", new OpenApiInfo
    {
        Title = "My API",
        Version = "v1",
        Description = "API文档描述",
        Contact = new OpenApiContact
        {
            Email = "5007032@qq.com",
            Name = "测试项目",
            //Url = new Uri("http://t.abc.com/")
        },
        License = new OpenApiLicense
        {
            Name = "BROOKE许可证",
            //Url = new Uri("http://t.abc.com/")
        }
    });

});
Startup 类的 Configure 方法添加如下代码:
//配置Swagger
            app.UseSwagger();
            app.UseSwaggerUI(c =>
            {
                c.SwaggerEndpoint("/swagger/v1/swagger.json", "My API V1");
                c.RoutePrefix = "api";// 如果设为空,访问路径就是根域名/index.html,设置为空,表示直接在根域名访问;想换一个路径,直接写名字即可,比如直接写c.RoutePrefix = "swagger"; 则访问路径为 根域名/swagger/index.html

            });
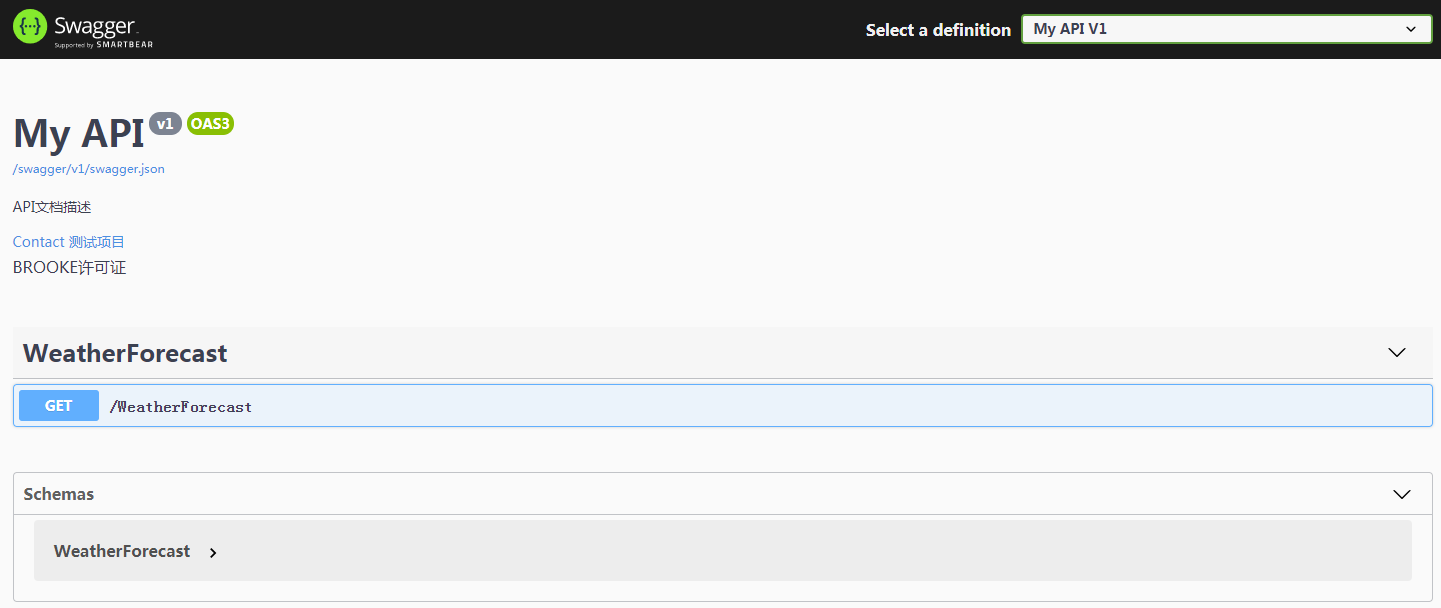
Ctrl+F5 进入浏览,按上述配置修改路径为:http://localhost:***/api/index.html,即可看到 Swagger 页面:
然而到这里还没完,相关接口的注释说明我们看不到,通过配置 XML 文件的方式继续调整代码如下,新增代码见加粗部分:
services.AddSwaggerGen(c =>
{
    c.SwaggerDoc("v1", new OpenApiInfo
    {
        Title = "My API",
        Version = "v1",
        Description = "API文档描述",
        Contact = new OpenApiContact
        {
            Email = "5007032@qq.com",
            Name = "测试项目",
            //Url = new Uri("http://t.abc.com/")
        },
        License = new OpenApiLicense
        {
            Name = "BROOKE许可证",
            //Url = new Uri("http://t.abc.com/")
        }
    });

    var xmlFile = $"{Assembly.GetExecutingAssembly().GetName().Name}.xml";
    var xmlPath = Path.Combine(AppContext.BaseDirectory, xmlFile);
    c.IncludeXmlComments(xmlPath);
});
上述代码通过反射生成与 Web API 项目相匹配的 XML 文件名,AppContext.BaseDirectory 属性用于构造 XML 文件的路径,关于 OpenApiInfo 内的配置参数用于文档的一些描述,在此不作过多说明。
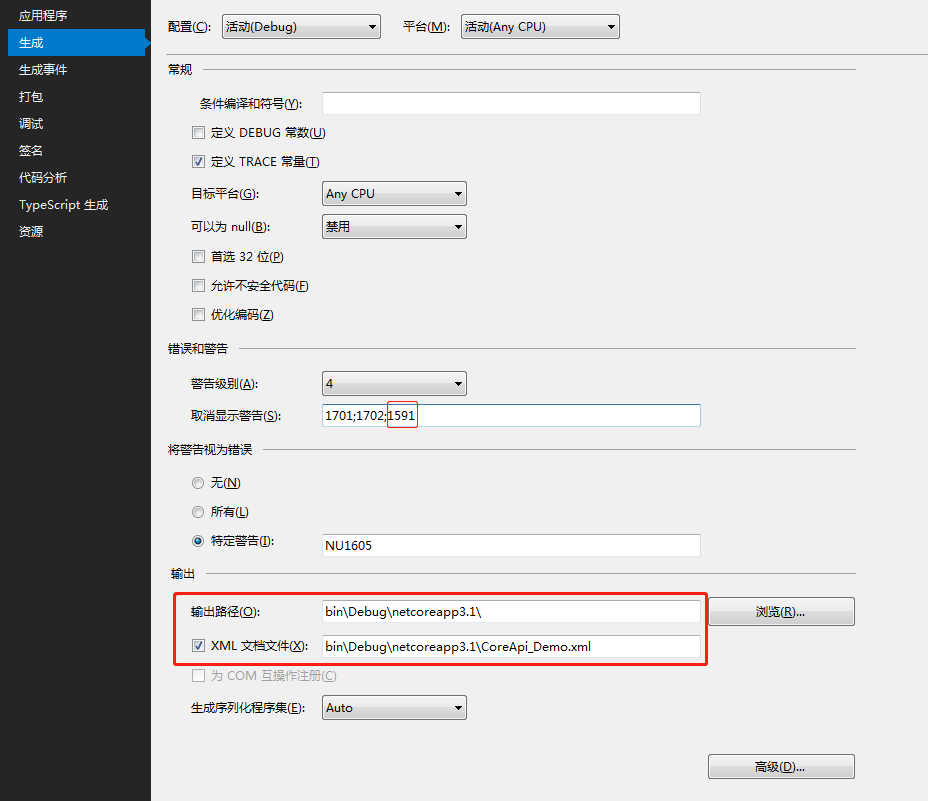
然后右键 Web API 项目、属性、生成,配置 XML 文档的输出路径,以及取消不必要的 XML 注释警告提醒(增加 1591):
这样,我们以三斜杠(///)方式给类方法属性等相关代码添加注释后,刷新 Swagger 页面,即可看到注释说明。
如果不想将 XML 文件输出为 debug 下的目录,譬如想要放在项目根目录(但不要修改成磁盘绝对路径),可调整相关代码如下,xml 文件的名字也可以改成自己想要的:
var basePath = Path.GetDirectoryName(typeof(Program).Assembly.Location);//获取应用程序所在目录
var xmlPath = Path.Combine(basePath, "CoreAPI_Demo.xml");
c.IncludeXmlComments(xmlPath, true);
同时,调整项目生成的 XML 文档文件路径为:..\CoreAPI_Demo\CoreAPI_Demo.xml
隐藏相关接口
对于不想暴漏给 Swagger 展示的接口,我们可以给相关 Controller 或 Action 头加上:[ApiExplorerSettings(IgnoreApi = true)]
调整系统默认输出路径
项目启动后,默认会访问自带的 weatherforecast,如果想调整为其他路径,譬如打开后直接访问 Swagger 文档,那么调整 Properties 目录下的 launchSettings.json 文件,修改 launchUrl 值为 api(前述配置的 RoutePrefix 值):
{
  "$schema": "http://json.schemastore.org/launchsettings.json",
  "iisSettings": {
    "windowsAuthentication": false,
    "anonymousAuthentication": true,
    "iisExpress": {
      "applicationUrl": "http://localhost:7864",
      "sslPort": 0
    }
  },
  "profiles": {
    "IIS Express": {
      "commandName": "IISExpress",
      "launchBrowser": true,
      "launchUrl": "api",
      "environmentVariables": {
        "ASPNETCORE_ENVIRONMENT": "Development"
      }
    },
    "CoreApi_Demo": {
      "commandName": "Project",
      "launchBrowser": true,
      "launchUrl": "api",
      "applicationUrl": "http://localhost:5000",
      "environmentVariables": {
        "ASPNETCORE_ENVIRONMENT": "Development"
      }
    }
  }
}
三、配置文件
以读取 appsettings.json 文件为例,当然你也定义其他名称的.json 文件进行读取,读取方式一致,该文件类似于 Web.config 文件。为方便示例,定义 appsettings.json 文件内容如下:
{
  "ConnString": "Data Source=(local);Initial Catalog=Demo;Persist Security Info=True;User ID=DemoUser;Password=123456;MultipleActiveResultSets=True;",
  "ConnectionStrings": {
    "MySQLConnection": "server=127.0.0.1;database=mydemo;uid=root;pwd=123456;charset=utf8;SslMode=None;"
  },
  "SystemConfig": {
    "UploadFile": "/Files",
    "Domain": "http://localhost:7864"
  },
  "JwtTokenConfig": {
    "Secret": "fcbfc8df1ee52ba127ab",
    "Issuer": "abc.com",
    "Audience": "Brooke.WebApi",
    "AccessExpiration": 30,
    "RefreshExpiration": 60
  },
  "Logging": {
    "LogLevel": {
      "Default": "Information",
      "Microsoft": "Warning",
      "Microsoft.Hosting.Lifetime": "Information"
    }
  },
  "AllowedHosts": "*"
}
- 配置文件的基本读取
public class Startup
{
    public Startup(IConfiguration configuration)
    {
        Configuration = configuration;
    }

    public IConfiguration Configuration { get; }

    // This method gets called by the runtime. Use this method to add services to the container.
    public void ConfigureServices(IServiceCollection services)
    {
        services.AddControllers();

        //读取方式一
        var ConnString = Configuration["ConnString"];
        var MySQLConnection = Configuration.GetSection("ConnectionStrings")["MySQLConnection"];
        var UploadPath = Configuration.GetSection("SystemConfig")["UploadPath"];
        var LogDefault = Configuration.GetSection("Logging").GetSection("LogLevel")["Default"];

        //读取方式二
        var ConnString2 = Configuration["ConnString"];
        var MySQLConnection2 = Configuration["ConnectionStrings:MySQLConnection"];
        var UploadPath2 = Configuration["SystemConfig:UploadPath"];
        var LogDefault2 = Configuration["Logging:LogLevel:Default"];

    }

}
以上介绍了 2 种读取配置信息的方式,如果要在 Controller 内使用,类似地,进行注入并调用如下:
public class ValuesController : ControllerBase
{
    private IConfiguration _configuration;

    public ValuesController(IConfiguration configuration)
    {
        _configuration = configuration;
    }

    // GET: api/<ValuesController>
    [HttpGet]
    public IEnumerable<string> Get()
    {
        var ConnString = _configuration["ConnString"];
        var MySQLConnection = _configuration.GetSection("ConnectionStrings")["MySQLConnection"];
        var UploadPath = _configuration.GetSection("SystemConfig")["UploadPath"];
        var LogDefault = _configuration.GetSection("Logging").GetSection("LogLevel")["Default"];
        return new string[] { "value1", "value2" };
    }
}
- 读取配置文件到自定义对象
以 SystemConfig 节点为例,定义类如下:
public class SystemConfig
{
    public string UploadPath { get; set; }
    public string Domain { get; set; }

}
调整代码如下:
public class Startup
{
    public Startup(IConfiguration configuration)
    {
        Configuration = configuration;
    }

    public IConfiguration Configuration { get; }

    // This method gets called by the runtime. Use this method to add services to the container.
    public void ConfigureServices(IServiceCollection services)
    {
        services.AddControllers();

        services.Configure<SystemConfig>(Configuration.GetSection("SystemConfig"));
    }

}
然后 Controller 内进行注入调用:
[Route("api/[controller]/[action]")]
[ApiController]
public class ValuesController : ControllerBase
{
    private SystemConfig _sysConfig;
    public ValuesController(IOptions<SystemConfig> sysConfig)
    {
        _sysConfig = sysConfig.Value;
    }

    [HttpGet]
    public IEnumerable<string> GetSetting()
    {
        var UploadPath = _sysConfig.UploadPath;
        var Domain = _sysConfig.Domain;
        return new string[] { "value1", "value2" };
    }
}
- 绑定到静态类方式读取
定义相关静态类如下:
public static class MySettings
{
    public static SystemConfig Setting { get; set; } = new SystemConfig();
}
调整 Startup 类构造函数如下:
public Startup(IConfiguration configuration, IWebHostEnvironment env)
{
    var builder = new ConfigurationBuilder()
        .SetBasePath(env.ContentRootPath)
        .AddJsonFile("appsettings.json", optional: true, reloadOnChange: true);

    Configuration = builder.Build();
    //Configuration = configuration;

    configuration.GetSection("SystemConfig").Bind(MySettings.Setting);//绑定静态配置类
}
接下来,诸如直接使用:MySettings.Setting.UploadPath 即可调用。
四、文件上传
接口一般少不了文件上传,相比.net framework 框架下 webapi 通过 byte 数组对象等复杂方式进行文件上传,.NET Core WebApi 有了很大变化,其定义了新的 IFormFile 对象来接收上传文件,直接上 Controller 代码:
后端代码
[Route("api/[controller]/[action]")]
[ApiController]
public class UploadController : ControllerBase
{
    private readonly IWebHostEnvironment _env;

    public UploadController(IWebHostEnvironment env)
    {
        _env = env;
    }

    public ApiResult UploadFile(List<IFormFile> files)
    {
        ApiResult result = new ApiResult();

       //注:参数files对象去也可以通过换成: var files = Request.Form.Files;来获取

        if (files.Count <= 0)
        {
            result.Message = "上传文件不能为空";
            return result;
        }

        #region 上传

        List<string> filenames = new List<string>();

        var webRootPath = _env.WebRootPath;
        var rootFolder = MySettings.Setting.UploadPath;

        var physicalPath = $"{webRootPath}/{rootFolder}/";

        if (!Directory.Exists(physicalPath))
        {
            Directory.CreateDirectory(physicalPath);
        }

        foreach (var file in files)
        {
            var fileExtension = Path.GetExtension(file.FileName);//获取文件格式,拓展名

            var saveName = $"{rootFolder}/{Path.GetRandomFileName()}{fileExtension}";
            filenames.Add(saveName);//相对路径

            var fileName = webRootPath + saveName;

            using FileStream fs = System.IO.File.Create(fileName);
            file.CopyTo(fs);
            fs.Flush();

        }
        #endregion


        result.IsSuccess = true;
        result.Data["files"] = filenames;

        return result;
    }
}
前端调用
接下来通过前端调用上述上传接口,在项目根目录新建 wwwroot 目录(.net core webapi 内置目录 ),添加相关 js 文件包,然后新建一个 index.html 文件,内容如下:
<!DOCTYPE html>
<html>
  <head>
    <meta charset="utf-8" />
    <title></title>
    <style type="text/css"></style>
    <script src="res/scripts/jquery-1.10.2.min.js"></script>
    <script src="res/scripts/jquery.form.js"></script>
    <script type="text/javascript">
      //方法1
      function AjaxUploadfile() {
        var upload = $("#files").get(0);
        var files = upload.files;
        var data = new FormData();
        for (var i = 0; i < files.length; i++) {
          data.append("files", files[i]);
        }

        //此处data的构建也可以换成:var data = new FormData(document.getElementById("myform"));

        $.ajax({
          type: "POST",
          url: "/api/upload/uploadfile",
          contentType: false,
          processData: false,
          data: data,
          success: function (result) {
            alert("success");
            $.each(result.data.files, function (i, filename) {
              $("#filePanel").append("<p>" + filename + "</p>");
            });
          },
          error: function () {
            alert("上传文件错误");
          },
        });
      }

      //方法2
      function AjaxUploadfile2() {
        $("#myform").ajaxSubmit({
          success: function (result) {
            if (result.isSuccess) {
              $.each(result.data.files, function (i, filename) {
                $("#filePanel").append("<p>" + filename + "</p>");
              });
            } else {
              alert(result.message);
            }
          },
        });
      }
    </script>
  </head>
  <body>
    <form
      id="myform"
      method="post"
      action="/api/upload/uploadfile"
      enctype="multipart/form-data"
    >
      <input type="file" id="files" name="files" multiple /> <br /><br />
      <input
        type="button"
        value="FormData Upload"
        onclick="AjaxUploadfile();"
      /><br /><br />
      <input
        type="button"
        value="ajaxSubmit Upload"
        onclick="AjaxUploadfile2();"
      /><br /><br />
      <div id="filePanel"></div>
    </form>

    <script type="text/javascript">
      $(function () {});
    </script>
  </body>
</html>
上述通过构建 FormData 和 ajaxSubmit 两种方式进行上传,需要注意的是 contentType 和 processData 两个参数的设置;另外允许一次上传多个文件,需设置 multipart 属性。
在访问 wwwroot 下的静态文件之前,必须先在 Startup 类的 Configure 方法下进行注册:
public void Configure(IApplicationBuilder app)
{
    app.UseStaticFiles();//用于访问wwwroot下的文件
}
启动项目,通过访问路径:http://localhost:***/index.html,进行上传测试,成功后,将在 wwwroot 下的 Files 目录下看到上传的文件。
五、统一 WebApi 数据返回格式
定义统一返回格式
为了方便前后端使用约定好的数据格式,通常我们会定义统一的数据返回,其包括是否成功、返回状态、具体数据等;为便于说明,定义一个数据返回类如下:
public class ApiResult
{
    public bool IsSuccess { get; set; }
    public string Message { get; set; }
    public string Code { get; set; }
    public Dictionary<string, object> Data { get; set; } = new Dictionary<string, object>();
}
这样,我们将每一个 action 接口操作封装为 ApiResult 格式进行返回。新建一个 ProductController 示例如下:
[Produces("application/json")]
[Route("api/[controller]")]
[ApiController]
public class ProductController : ControllerBase
{
    [HttpGet]
    public ApiResult Get()
    {
        var result = new ApiResult();

        var rd = new Random();

        result.Data["dataList"] = Enumerable.Range(1, 5).Select(index => new
        {
            Name = $"商品-{index}",
            Price = rd.Next(100, 9999)
        });

        result.IsSuccess = true;
        return result;
    }
}
- Produces:定义数据返回的方式,给每个 Controller 打上[Produces("application/json")]标识,即表示以 json 方式进行数据输出。
- ApiController:确保每个 Controller 有 ApiController 标识,通常,我们会定义一个基类如:BaseController,其继承自 ControllerBase,并将其打上[ApiController]标识,新建的 controller 都继承该类;
- Route:路由访问方式,如不喜欢 RESTful 方式,可加上 Action,即:[Route("api/[controller]/[action]")];
- HTTP 请求:结合前面配置的 Swagger,必须确保每个 Action 都有具体的请求方式,即必须是 HttpGet、HttpPost、HttpPut、HttpDelete 中的一种,通常情况下,我们使用 HttpGet、HttpPost 足以。
如此,即完成的数据返回的统一。
解决 T 时间格式
.NET Core Web Api 默认以首字母小写的类驼峰式命名返回,但遇到 DateTime 类型的数据,会返回 T 格式时间,如要解决 T 时间格式,定义一个时间格式转换类如下:
public class DatetimeJsonConverter : JsonConverter<DateTime>
{
    public override DateTime Read(ref Utf8JsonReader reader, Type typeToConvert, JsonSerializerOptions options)
    {
        if (reader.TokenType == JsonTokenType.String)
        {
            if (DateTime.TryParse(reader.GetString(), out DateTime date))
                return date;
        }
        return reader.GetDateTime();
    }

    public override void Write(Utf8JsonWriter writer, DateTime value, JsonSerializerOptions options)
    {
        writer.WriteStringValue(value.ToString("yyyy-MM-dd HH:mm:ss"));
    }
}
然后在 Startup 类的 ConfigureServices 中调整 services.AddControllers 代码如下:
services.AddControllers()
    .AddJsonOptions(configure =>
    {
        configure.JsonSerializerOptions.Converters.Add(new DatetimeJsonConverter());
    });
六、模型验证
模型验证在 ASP.NET MVC 已存在,使用方式基本一致。指对向接口提交过来的数据进行参数校验,包括必填项、数据格式、字符长度、范围等等。一般的,我们会将 POST 提交过来的对象定义为一个实体类进行接收,譬如定义一个注册类如下:
public class RegisterEntity
{
    /// <summary>
    /// 手机号
    /// </summary>
    [Display(Name = "手机号")]
    [Required(ErrorMessage = "{0}不能为空")]
    [StringLength(11, ErrorMessage = "{0}最多{1}个字符")]
    public string Mobile { get; set; }

    /// <summary>
    /// 验证码
    /// </summary>
    [Display(Name = "验证码")]
    [Required(ErrorMessage = "{0}不能为空")]
    [StringLength(6, ErrorMessage = "{0}最多{1}个字符")]
    public string Code { get; set; }

    /// <summary>
    /// 密码
    /// </summary>
    [Display(Name = "密码")]
    [Required(ErrorMessage = "{0}不能为空")]
    [StringLength(16, ErrorMessage = "{0}最多{1}个字符")]
    public string Pwd { get; set; }
}
Display 标识提示字段的名称,Required 表示必填,StringLength 限制字段的长度,当然还有其他一些内置特性,具体可参考官方文档,列举一些常见的验证特性如下:
- [CreditCard]:验证属性是否具有信用卡格式。 需要 JQuery 验证其他方法。
- [Compare]:验证模型中的两个属性是否匹配。
- [EmailAddress]:验证属性是否具有电子邮件格式。
- [Phone]:验证属性是否具有电话号码格式。
- [Range]:验证属性值是否在指定的范围内。
- [RegularExpression]:验证属性值是否与指定的正则表达式匹配。
- [Required]:验证字段是否不为 null。 有关此属性的行为的详细信息,请参阅 [Required] 特性。
- [StringLength]:验证字符串属性值是否不超过指定长度限制。
- [Url]:验证属性是否具有 URL 格式。
- [Remote]:通过在服务器上调用操作方法来验证客户端上的输入。
上述说明了基本的模型验证使用方法,以这种方式,同时结合 T4 模板,通过表对象生成模型验证实体,省却了在 action 中编写大量验证代码的工作。当然,一些必要的较为复杂的验证,或结合数据库操作的验证,则单独写到 action 或其他应用模块中。
那么上述模型验证在 Web API 中是怎么工作的呢?在 Startup 类的 ConfigureServices 添加如下代码:
//模型参数验证
services.Configure<ApiBehaviorOptions>(options =>
{
options.InvalidModelStateResponseFactory = (context) =>
{
    var error = context.ModelState.FirstOrDefault().Value;
    var message = error.Errors.FirstOrDefault(p => !string.IsNullOrWhiteSpace(p.ErrorMessage))?.ErrorMessage;

    return new JsonResult(new ApiResult { Message = message });
};
});
添加注册示例 Action 代码:
/// <summary>
/// 注册
/// </summary>
/// <param name="model"></param>
/// <returns></returns>
[HttpPost]
public async Task<ApiResult> Register(RegisterEntity model)
{
    ApiResult result = new ApiResult();

    var _code = CacheHelper.GetCache(model.Mobile);
    if (_code == null)
    {
        result.Message = "验证码过期或不存在";
        return result;
    }
    if (!model.Code.Equals(_code.ToString()))
    {
        result.Message = "验证码错误";
        return result;
    }

    /**
    相关逻辑代码
    **/
    return result;
}
如此,通过配置 ApiBehaviorOptions 的方式,并读取验证错误信息的第一条信息并返回,即完成了 Web API 中 Action 对请求参数的验证工作,关于错误信息 Message 的返回,也可略作封装,在此略。
七、日志使用
虽然.NET Core WebApi 有自带的日志管理功能,但不一定能较容易地满足我们的需求,通常会采用第三方日志框架,典型的如:NLog、Log4Net,简单介绍 NLog 日志组件的使用;
NLog 的使用
① 通过 NuGet 安装包:NLog.Web.AspNetCore,当前项目版本 4.9.2;
② 项目根目录新建一个 NLog.config 文件,关键 NLog.config 的其他详细配置,可参考官方文档,这里作简要配置如下;
<?xml version="1.0" encoding="utf-8"?>
<nlog xmlns="http://www.nlog-project.org/schemas/NLog.xsd"
      xmlns:xsi="http://www.w3.org/2001/XMLSchema-instance"
      autoReload="true"
      throwExceptions="false"
      internalLogLevel="Off"
      internalLogFile="NlogRecords.log">
  <!--Nlog内部日志记录为Off关闭-->
  <extensions>
    <add assembly="NLog.Web.AspNetCore" />
  </extensions>
  <targets>
    <target name="log_file" xsi:type="File" fileName="${basedir}/logs/${shortdate}.log"
            layout="${longdate} | ${level:uppercase=false} | ${message} ${onexception:${exception:format=tostring} ${newline} ${stacktrace} ${newline}" />
  </targets>

  <rules>
    <!--跳过所有级别的Microsoft组件的日志记录-->
    <logger name="Microsoft.*" final="true" />
    <!--<logger name="logdb" writeTo="log_database" />-->
    <logger name="*" minlevel="Trace" writeTo="log_file" />

  </rules>
</nlog>

<!--https://github.com/NLog/NLog/wiki/Getting-started-with-ASP.NET-Core-3-->
③ 调整 Program.cs 文件如下;
public class Program
{
    public static void Main(string[] args)
    {
        //CreateHostBuilder(args).Build().Run();

        var logger = NLog.Web.NLogBuilder.ConfigureNLog("nlog.config").GetCurrentClassLogger();
        try
        {
            logger.Debug("init main");
            CreateHostBuilder(args).Build().Run();
        }
        catch (Exception exception)
        {
            //NLog: catch setup errors
            logger.Error(exception, "Stopped program because of exception");
            throw;
        }
        finally
        {
            // Ensure to flush and stop internal timers/threads before application-exit (Avoid segmentation fault on Linux)
            NLog.LogManager.Shutdown();
        }
    }

    public static IHostBuilder CreateHostBuilder(string[] args) =>
        Host.CreateDefaultBuilder(args)
            .ConfigureWebHostDefaults(webBuilder =>
            {
                webBuilder.UseStartup<Startup>();
            }).ConfigureLogging(logging => {
                logging.ClearProviders();
                logging.SetMinimumLevel(Microsoft.Extensions.Logging.LogLevel.Trace);
            }).UseNLog();//依赖注入Nlog;
}
其中 Main 函数里的捕获异常代码配置省略也是可以的,CreateHostBuilder 下的 UseNLog 为必设项。
Controller 通过注入调用如下:
public class WeatherForecastController : ControllerBase
{
    private static readonly string[] Summaries = new[]
    {
        "Freezing", "Bracing", "Chilly", "Cool", "Mild", "Warm", "Balmy", "Hot", "Sweltering", "Scorching"
    };

    private readonly ILogger<WeatherForecastController> _logger;

    public WeatherForecastController(ILogger<WeatherForecastController> logger)
    {
        _logger = logger;
    }

    [HttpGet]
    public IEnumerable<WeatherForecast> Get()
    {
        _logger.LogInformation("测试一条日志");

        var rng = new Random();
        return Enumerable.Range(1, 5).Select(index => new WeatherForecast
        {
            Date = DateTime.Now.AddDays(index),
            TemperatureC = rng.Next(-20, 55),
            Summary = Summaries[rng.Next(Summaries.Length)]
        })
        .ToArray();
    }
本地测试后,即可在 debug 下看到 logs 目录下生成的日志文件。
八、依赖注入
使用.NET Core 少不了和依赖注入打交道,这也是.NET Core 的设计思想之一,关于什么是依赖注入(DI),以及为什么要使用依赖注入,这里不再赘述,先来看一个简单示例的依赖注入。
public interface IProductRepository
{
    IEnumerable<Product> GetAll();
}

public class ProductRepository : IProductRepository
{
    public IEnumerable<Product> GetAll()
    {

    }
}
Startup 类进行注册:
public void ConfigureServices(IServiceCollection services)
{
    services.AddScoped<IProductRepository, ProductRepository>();
}
请求 IProductRepository 服务并用于调用 GetAll 方法:
public class ProductController : ControllerBase
{
    private readonly IProductRepository _productRepository;
   public ProductController(IProductRepository productRepository)
    {
        _productRepository = productRepository;
    }

    public IEnumerable<Product> Get()
    {
        return _productRepository.GetAll();
    }
}
通过使用 DI 模式,来实现 IProductRepository 接口。其实前述已多次出现通过构造函数进行注入调用的示例。
生命周期
services.AddScoped<IMyDependency, MyDependency>();
services.AddTransient<IMyDependency, MyDependency>();
services.AddSingleton<IMyDependency, MyDependency>();
- Transient:每一次请求都会创建一个新实例;
- Scoped:每个作用域生成周期内创建一个实例;
- Singleton:单例模式,整个应用程序生命周期内只创建一个实例;
这里,需要根据具体的业务逻辑场景需求选择注入相应的生命周期服务。
实际应用中,我们会有很多个服务需要注册到 ConfigureServices 内,一个个写入显然繁琐,而且容易忘记漏写,一般地,我们可能会想到利用反射进行批量注入,并通过扩展的方式进行注入,譬如:
public static class AppServiceExtensions
{
    /// <summary>
    /// 注册应用程序域中的服务
    /// </summary>
    /// <param name="services"></param>
    public static void AddAppServices(this IServiceCollection services)
    {
        var ts = System.Reflection.Assembly.Load("CoreAPI.Data").GetTypes().Where(s => s.Name.EndsWith("Repository") || s.Name.EndsWith("Service")).ToArray();
        foreach (var item in ts.Where(s => !s.IsInterface))
        {
            var interfaceType = item.GetInterfaces();
            foreach (var typeArray in interfaceType)
            {
                services.AddTransient(typeArray, item);
            }
        }
    }
}
public void ConfigureServices(IServiceCollection services)
{
    services.AddAppServices();//批量注册服务
}
诚然,这样配合系统自带 DI 注入是能完成我们的批量注入需求的。但其实也有更多选择,来帮我们简化 DI 注册,譬如选择其他第三方组件:Scrutor、Autofac…
- Scrutor 的使用
Scrutor 是基于微软注入组件的一个扩展库,简单示例如下:
services.Scan(scan => scan
    .FromAssemblyOf<Startup>()
        .AddClasses(classes => classes.Where(s => s.Name.EndsWith("Repository") || s.Name.EndsWith("Service")))
        .AsImplementedInterfaces()
        .WithTransientLifetime()
    );
以上代码通过 Scan 方式批量注册了以 Repository、Service 结尾的接口服务,其生命周期为 Transient,该方式等同于前述的以反射方式的批量注册服务。
关于 Scrutor 的其他用法,大家可以参见官方文档,这里只做下引子。
- Autofac
一般情况下,使用 MS 自带的 DI 或采用 Scrutor,即可满足实际需要,如果有更高的应用需求,如要求属性注入、甚至接管或取代 MS 自带的 DI,那么你可以选择 Autofac,关于 Autofac 的具体使用,在此不作详叙。
九、缓存
MemoryCache 使用
按官方说明,开发人员需合理说用缓存,以及限制缓存大小,Core 运行时不会根据内容压力限制缓存大小。对于使用方式,依旧还是先行注册,然后控制器调用:
public void ConfigureServices(IServiceCollection services)
{
    services.AddMemoryCache();//缓存中间件
}
public class ProductController : ControllerBase
    {
        private IMemoryCache _cache;

        public ProductController(IMemoryCache memoryCache)
        {
            _cache = memoryCache;
        }

        [HttpGet]
        public DateTime GetTime()
        {
            string key = "_timeKey";

            // Look for cache key.
            if (!_cache.TryGetValue(key, out DateTime cacheEntry))
            {
                // Key not in cache, so get data.
                cacheEntry = DateTime.Now;

                // Set cache options.
                var cacheEntryOptions = new MemoryCacheEntryOptions()
                    // Keep in cache for this time, reset time if accessed.
                    .SetSlidingExpiration(TimeSpan.FromSeconds(3));

                // Save data in cache.
                _cache.Set(key, cacheEntry, cacheEntryOptions);
            }

            return cacheEntry;
        }
    }
上述代码缓存了一个时间,并设置了滑动过期时间(指最后一次访问后的过期时间)为 3 秒;如果需要设置绝对过期时间,将 SetSlidingExpiration 改为 SetAbsoluteExpiration 即可。浏览刷新,每 3 秒后时间将更新。
附一个封装好的 Cache 类如下:
public class CacheHelper
{
    public static IMemoryCache _memoryCache = new MemoryCache(new MemoryCacheOptions());

    /// <summary>
    /// 缓存绝对过期时间
    /// </summary>
    ///<param name="key">Cache键</param>
    ///<param name="value">缓存的值</param>
    ///<param name="minute">minute分钟后绝对过期</param>
    public static void SetChache(string key, object value, int minute)
    {
        if (value == null) return;
        _memoryCache.Set(key, value, new MemoryCacheEntryOptions()
                .SetAbsoluteExpiration(TimeSpan.FromMinutes(minute)));
    }

    /// <summary>
    /// 缓存相对过期,最后一次访问后minute分钟后过期
    /// </summary>
    ///<param name="key">Cache键</param>
    ///<param name="value">缓存的值</param>
    ///<param name="minute">滑动过期分钟</param>
    public static void SetChacheSliding(string key, object value, int minute)
    {
        if (value == null) return;
        _memoryCache.Set(key, value, new MemoryCacheEntryOptions()
                .SetSlidingExpiration(TimeSpan.FromMinutes(minute)));
    }

    /// <summary>
    ///设置缓存,如果不主动清空,会一直保存在内存中.
    /// </summary>
    ///<param name="key">Cache键值</param>
    ///<param name="value">给Cache[key]赋的值</param>
    public static void SetChache(string key, object value)
    {
        _memoryCache.Set(key, value);
    }

    /// <summary>
    ///清除缓存
    /// </summary>
    ///<param name="key">cache键</param>
    public static void RemoveCache(string key)
    {
        _memoryCache.Remove(key);
    }

    /// <summary>
    ///根据key值,返回Cache[key]的值
    /// </summary>
    ///<param name="key"></param>
    public static object GetCache(string key)
    {
        //return _memoryCache.Get(key);
        if (key != null && _memoryCache.TryGetValue(key, out object val))
        {
            return val;
        }
        else
        {
            return default;
        }
    }

    /// <summary>
    /// 通过Key值返回泛型对象
    /// </summary>
    /// <typeparam name="T"></typeparam>
    /// <param name="key"></param>
    /// <returns></returns>
    public static T GetCache<T>(string key)
    {
        if (key != null && _memoryCache.TryGetValue<T>(key, out T val))
        {
            return val;
        }
        else
        {
            return default;
        }
    }

}
十、异常处理
定义异常处理中间件
这里主要针对全局异常进行捕获处理并记录日志,并以统一的 json 格式返回给接口调用者;说异常处理前先提下中间件,关于什么是中间件,在此不在赘述,一个中间件其基本的结构如下:
public class CustomMiddleware
{
    private readonly RequestDelegate _next;

    public CustomMiddleware(RequestDelegate next)
    {
        _next = next;
    }

    public async Task Invoke(HttpContext httpContext)
    {
        await _next(httpContext);
    }
}
下面我们定义自己的全局异常处理中间件,代码如下:
public class CustomExceptionMiddleware
{
    private readonly RequestDelegate _next;
    private readonly ILogger<CustomExceptionMiddleware> _logger;

    public CustomExceptionMiddleware(RequestDelegate next, ILogger<CustomExceptionMiddleware> logger)
    {
        _next = next;
        _logger = logger;
    }

    public async Task Invoke(HttpContext httpContext)
    {
        try
        {
            await _next(httpContext);
        }
        catch (Exception ex)
        {
            _logger.LogError(ex,"Unhandled exception...");
            await HandleExceptionAsync(httpContext, ex);
        }
    }

    private Task HandleExceptionAsync(HttpContext httpContext, Exception ex)
    {
        var result = JsonConvert.SerializeObject(new { isSuccess = false, message = ex.Message });
        httpContext.Response.ContentType = "application/json;charset=utf-8";
        return httpContext.Response.WriteAsync(result);
    }
}

/// <summary>
/// 以扩展方式添加中间件
/// </summary>
public static class CustomExceptionMiddlewareExtensions
{
    public static IApplicationBuilder UseCustomExceptionMiddleware(this IApplicationBuilder builder)
    {
        return builder.UseMiddleware<CustomExceptionMiddleware>();
    }
}
然后在 Startup 类的 Configure 方法里添加上述扩展的中间件,见加粗部分:
public void Configure(IApplicationBuilder app, IWebHostEnvironment env)
{
    if (env.IsDevelopment())
    {
        app.UseDeveloperExceptionPage();
    }

    //全局异常处理
    app.UseCustomExceptionMiddleware();
}
在 HandleExceptionAsync 方法中,为方便开发和测试,这里将系统的错误返回给了接口调用者,实际生产环境中可统一返回固定的错误 Message 消息。
异常状态码的处理
关于 http 状态码,常见的如正常返回的 200,其他 401、403、404、502 等等等等,因为系统有时候并不总是返回 200 成功,对于返回非 200 的异常状态码,WebApi 也要做到相应的处理,以便接口调用者能正确接收,譬如紧接下来的JWT认证,当认证令牌过期或没有权限时,系统实际会返回 401、403,但接口并不提供有效的可接收的返回,因此,这里列举一些常见的异常状态码,并以 200 方式提供给接口调用者,在 Startup 类的 Configure 方法里添加代码如下:
app.UseStatusCodePages(async context =>
{
    //context.HttpContext.Response.ContentType = "text/plain";
    context.HttpContext.Response.ContentType = "application/json;charset=utf-8";

    int code = context.HttpContext.Response.StatusCode;
    string message =
        code switch
        {
            401 => "未登录",
            403 => "访问拒绝",
            404 => "未找到",
            _ => "未知错误",
        };

    context.HttpContext.Response.StatusCode = StatusCodes.Status200OK;
    await context.HttpContext.Response.WriteAsync(Newtonsoft.Json.JsonConvert.SerializeObject(new
    {
        isSuccess = false,
        code,
        message
    }));

});
代码很简单,这里使用系统自带的异常处理中间件 UseStatusCodePages,当然,你还可以自定义过滤器处理异常,不过不推荐,简单高效直接才是需要的。
关于.NET Core 的异常处理中间件,还有其他诸如 UseExceptionHandler、UseStatusCodePagesWithRedirects 等等,不同的中间件有其适用的环境,有的可能更适用于 MVC 或其他应用场景上,找到合适的即可。
题外话:大家也可以将 UseStatusCodePages 处理异常状态码的操作封装到前述的全局异常处理中间件中。
十一、应用安全与 JWT 认证
关于什么是 JWT,在此不作赘述。实际应用中,为了部分接口的安全性,譬如需要身份认证才能访问的接口资源,对于 Web API 而言,一般会采用 token 令牌进行认证,服务端结合缓存来实现。
那为什么要选择 JWT 认证呢?原因无外乎以下:服务端不进行保存、无状态、适合移动端、适合分布式、标准化等等。关于 JWT 的使用如下:
通过 NuGget 安装包:Microsoft.AspNetCore.Authentication.JwtBearer,当前示例版本 3.1.5;
ConfigureServices 进行注入,默认以 Bearer 命名,这里你也可以改成其他名字,保持前后一致即可,注意加粗部分,代码如下:
appsettings.json 添加 JWT 配置节点(见前述【配置文件】),添加 JWT 相关认证类:
public static class JwtSetting
{
    public static JwtConfig Setting { get; set; } = new JwtConfig();
}

public class JwtConfig
{
    public string Secret { get; set; }
    public string Issuer { get; set; }
    public string Audience { get; set; }
    public int AccessExpiration { get; set; }
    public int RefreshExpiration { get; set; }
}
采用前述绑定静态类的方式读取 JWT 配置,并进行注入:
public Startup(IConfiguration configuration, IWebHostEnvironment env)
{
    //Configuration = configuration;

    var builder = new ConfigurationBuilder()
        .SetBasePath(env.ContentRootPath)
        .AddJsonFile("appsettings.json", optional: true, reloadOnChange: true);

    Configuration = builder.Build();

    configuration.GetSection("SystemConfig").Bind(MySettings.Setting);//绑定静态配置类
    configuration.GetSection("JwtTokenConfig").Bind(JwtSetting.Setting);//同上

}

public IConfiguration Configuration { get; }

// This method gets called by the runtime. Use this method to add services to the container.
public void ConfigureServices(IServiceCollection services)
{

    #region JWT认证注入

    JwtSecurityTokenHandler.DefaultInboundClaimTypeMap.Clear();
    services.AddAuthentication("Bearer")
        .AddJwtBearer("Bearer", options =>
        {
            options.RequireHttpsMetadata = false;

            options.TokenValidationParameters = new TokenValidationParameters
            {
                ValidateIssuer = true,
                ValidateAudience = true,
                ValidateLifetime = true,
                ValidateIssuerSigningKey = true,
                ValidIssuer = JwtSetting.Setting.Issuer,
                ValidAudience = JwtSetting.Setting.Audience,
                IssuerSigningKey = new SymmetricSecurityKey(System.Text.Encoding.UTF8.GetBytes(JwtSetting.Setting.Secret))
            };
        });

    #endregion

}
给 Swagger 添加 JWT 认证支持,完成后,Swagger 页面会出现锁的标识,获取 token 后填入 Value(Bearer token 形式)项进行 Authorize 登录即可,Swagger 配置 JWT 见加粗部分:
services.AddSwaggerGen(c =>
{
    c.SwaggerDoc("v1", new OpenApiInfo
    {
        Title = "My API",
        Version = "v1",
        Description = "API文档描述",
        Contact = new OpenApiContact
        {
            Email = "5007032@qq.com",
            Name = "测试项目",
            //Url = new Uri("http://t.abc.com/")
        },
        License = new OpenApiLicense
        {
            Name = "BROOKE许可证",
            //Url = new Uri("http://t.abc.com/")
        }
    });


    // 为 Swagger JSON and UI设置xml文档注释路径
    //var basePath = Path.GetDirectoryName(typeof(Program).Assembly.Location);//获取应用程序所在目录(不受工作目录影响)
    //var xmlPath = Path.Combine(basePath, "CoreAPI_Demo.xml");
    //c.IncludeXmlComments(xmlPath, true);

    var xmlFile = $"{Assembly.GetExecutingAssembly().GetName().Name}.xml";
    var xmlPath = Path.Combine(AppContext.BaseDirectory, xmlFile);
    c.IncludeXmlComments(xmlPath);

    #region JWT认证Swagger授权

    c.AddSecurityDefinition("Bearer", new OpenApiSecurityScheme
    {
        Description = "JWT授权(数据将在请求头header中进行传输) 直接在下框中输入Bearer {token}(中间是空格)",
        Name = "Authorization",
        In = ParameterLocation.Header,
        Type = SecuritySchemeType.ApiKey,
        BearerFormat = "JWT",
        Scheme = "Bearer"
    });

    c.AddSecurityRequirement(new OpenApiSecurityRequirement()
    {
        {
            new OpenApiSecurityScheme
            {
                Reference = new OpenApiReference {
                    Type = ReferenceType.SecurityScheme,
                    Id = "Bearer"
                }
            },
            new string[] { }
        }
    });

    #endregion

});
Starup 类添加 Configure 注册,注意,需放到 app.UseAuthorization();前面:
public void Configure(IApplicationBuilder app, IWebHostEnvironment env)
{
    app.UseAuthentication();//jwt认证

    app.UseAuthorization();

}
这样,JWT 就基本配置完毕,接下来实施认证登录和授权,模拟操作如下:
[HttpPost]
public async Task<ApiResult> Login(LoginEntity model)
{
    ApiResult result = new ApiResult();

    //验证用户名和密码
    var userInfo = await _memberService.CheckUserAndPwd(model.User, model.Pwd);
    if (userInfo == null)
    {
        result.Message = "用户名或密码不正确";
        return result;
    }
    var claims = new Claim[]
    {
        new Claim(ClaimTypes.Name,model.User),
        new Claim(ClaimTypes.Role,"User"),
        new Claim(JwtRegisteredClaimNames.Sub,userInfo.MemberID.ToString()),

    };

    var key = new SymmetricSecurityKey(System.Text.Encoding.UTF8.GetBytes(JwtSetting.Setting.Secret));
    var expires = DateTime.Now.AddDays(1);
    var token = new JwtSecurityToken(
                issuer: JwtSetting.Setting.Issuer,
                audience: JwtSetting.Setting.Audience,
                claims: claims,
                notBefore: DateTime.Now,
                expires: expires,
                signingCredentials: new SigningCredentials(key, SecurityAlgorithms.HmacSha256));

    //生成Token
    string jwtToken = new JwtSecurityTokenHandler().WriteToken(token);

    //更新最后登录时间
    await _memberService.UpdateLastLoginTime(userInfo.MemberID);

    result.IsSuccess= 1;
    result.ResultData["token"] = jwtToken;
    result.Message = "授权成功!";
    return result;

}
上述代码模拟登录操作(账号密码登录,成功后设置有效期一天),生成 token 并返回,前端调用者拿到 token 后以诸如 localstorage 方式进行存储,调取授权接口时,添加该 token 到 header(Bearer token)进行接口请求。接下来,给需要身份授权的 Controller 或 Action 打上 Authorize 标识:
[Authorize]
[Route("api/[controller]/[action]")]
public class UserController : ControllerBase
{
}
如果要添加基于角色的授权,可限制操作如下:
[Authorize(Roles = "user")]
[Route("api/[controller]/[action]")]
public class UserController : ControllerBase
{
}

//多个角色也可以逗号分隔
[Authorize(Roles = "Administrator,Finance")]
[Route("api/[controller]/[action]")]
public class UserController : ControllerBase
{
}
不同的角色信息,可通过登录设置 ClaimTypes.Role 进行配置;当然,这里只是简单的示例说明角色服务的应用,复杂的可通过注册策略服务,并结合数据库进行动态配置。
这样,一个简单的基于 JWT 认证授权的工作就完成了。
十二、跨域
前后端分离,会涉及到跨域问题,简单的支持跨域操作如下:
添加扩展支持
public static class CrosExtensions
{
    public static void ConfigureCors(this IServiceCollection services)
    {

        services.AddCors(options => options.AddPolicy("CorsPolicy",
            builder =>
            {
                builder.AllowAnyMethod()
                    .SetIsOriginAllowed(_ => true)
                    .AllowAnyHeader()
                    .AllowCredentials();
            }));

        //services.AddCors(options => options.AddPolicy("CorsPolicy",
        //builder =>
        //{
        //    builder.WithOrigins(new string[] { "http://localhost:13210" })
        //        .AllowAnyMethod()
        //        .AllowAnyHeader()
        //        .AllowCredentials();
        //}));


    }
}
Startup 类添加相关注册如下:
public void ConfigureServices(IServiceCollection services)
{
    services.ConfigureCors();
}
public void Configure(IApplicationBuilder app, IWebHostEnvironment env)
{
    app.UseCors("CorsPolicy");//跨域
}
这样,一个简单跨域操作就完成了,你也可以通过设置 WithOrigins、WithMethods 等方法限制请求地址来源和请求方式。
至此,全篇结束,本篇涉及到的源码地址:https://github.com/Brooke181/CoreAPI_Demo
下一篇介绍 Dapper 在.NET Core 中的使用,谢谢支持!