

本文来自转载
原文作者:RyzenAdorer
原文标题:.NET Core 3 WPF MVVM 框架 Prism 系列之命令
原文链接:https://www.cnblogs.com/ryzen/p/12143825.html
本文将介绍如何在.NET Core3 环境下使用 MVVM 框架 Prism 的命令的用法
一.创建 DelegateCommand 命令
我们在上一篇.NET Core 3 WPF MVVM 框架 Prism 系列之数据绑定中知道 prism 实现数据绑定的方式,我们按照标准的写法来实现,我们分别创建 Views 文件夹和 ViewModels 文件夹,将 MainWindow 放在 Views 文件夹下,再在 ViewModels 文件夹下面创建 MainWindowViewModel 类,如下:

xaml 代码如下:
<Window
  x:Class="CommandSample.Views.MainWindow"
  xmlns="http://schemas.microsoft.com/winfx/2006/xaml/presentation"
  xmlns:x="http://schemas.microsoft.com/winfx/2006/xaml"
  xmlns:prism="http://prismlibrary.com/"
  xmlns:i="http://schemas.microsoft.com/expression/2010/interactivity"
  xmlns:d="http://schemas.microsoft.com/expression/blend/2008"
  xmlns:mc="http://schemas.openxmlformats.org/markup-compatibility/2006"
  xmlns:local="clr-namespace:CommandSample"
  mc:Ignorable="d"
  Title="MainWindow"
  Height="350"
  Width="450"
  prism:ViewModelLocator.AutoWireViewModel="True"
>
  <StackPanel>
    <TextBox Margin="10" Text="{Binding CurrentTime}" FontSize="32" />
    <button
      x:Name="mybtn"
      FontSize="30"
      Content="Click Me"
      Margin="10"
      Height="60"
      Command="{Binding GetCurrentTimeCommand}"
    />
    <Viewbox Height="80">
      <CheckBox
        IsChecked="{Binding IsCanExcute}"
        Content="CanExcute"
        Margin="10"
        HorizontalAlignment="Center"
        VerticalAlignment="Center"
      />
    </Viewbox>
  </StackPanel>
</Window>
MainWindowViewModel 类代码如下:
using Prism.Commands;
using Prism.Mvvm;
using System;
using System.Windows.Controls;

namespace CommandSample.ViewModels
{
   public class MainWindowViewModel: BindableBase
    {
        private bool _isCanExcute;
        public bool IsCanExcute
        {
            get { return _isCanExcute; }
            set
            {
                SetProperty(ref _isCanExcute, value);
                GetCurrentTimeCommand.RaiseCanExecuteChanged();
            }
        }

        private string _currentTime;
        public string CurrentTime
        {
            get { return _currentTime; }
            set { SetProperty(ref _currentTime, value); }
        }

        private DelegateCommand _getCurrentTimeCommand;
        public DelegateCommand GetCurrentTimeCommand =>
            _getCurrentTimeCommand ?? (_getCurrentTimeCommand = new DelegateCommand(ExecuteGetCurrentTimeCommand, CanExecuteGetCurrentTimeCommand));

        void ExecuteGetCurrentTimeCommand()
        {
            this.CurrentTime = DateTime.Now.ToString();
        }

        bool CanExecuteGetCurrentTimeCommand()
        {
            return IsCanExcute;
        }
    }
}
运行效果如下:
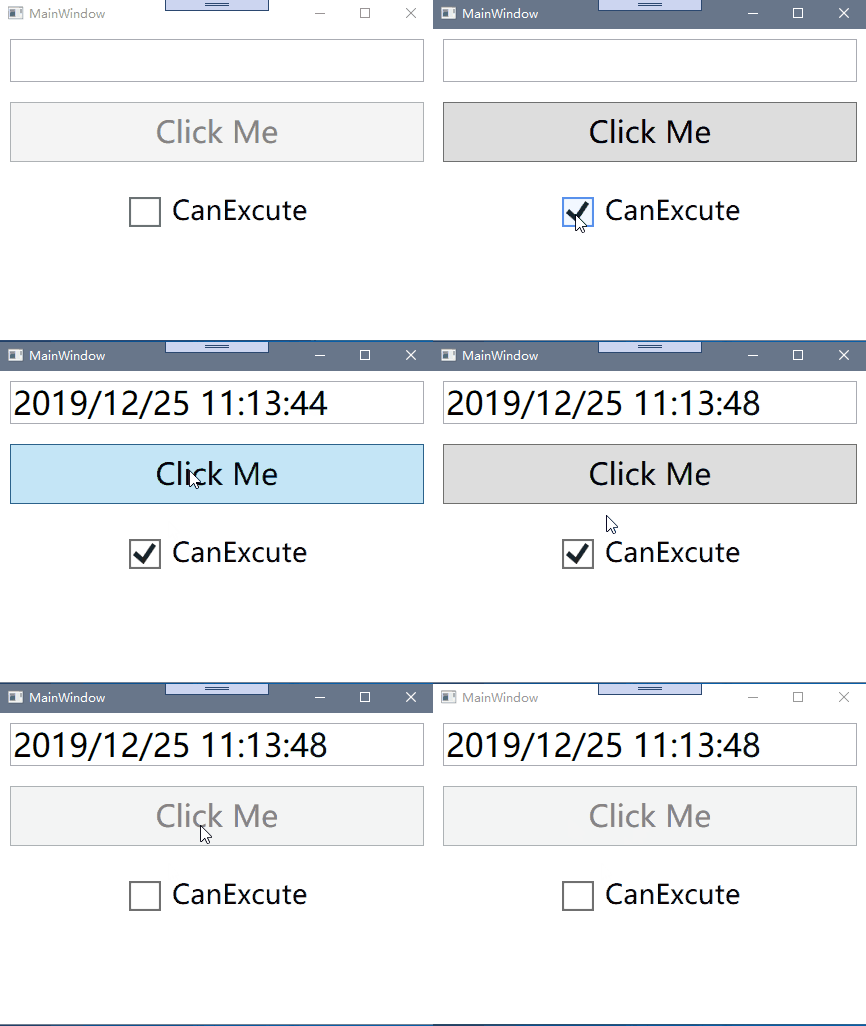
在代码中,我们通过 using Prism.Mvvm 引入继承 BindableBase,因为我们要用到属性改变通知方法 SetProperty,这在我们上一篇就知道了,再来我们 using Prism.Commands,我们所定义的 DelegateCommand 类型就在该命名空间下,我们知道,ICommand 接口是有三个函数成员的,事件 CanExecuteChanged,一个返回值 bool 的,且带一个参数为 object 的 CanExecute 方法,一个无返回值且带一个参数为 object 的 Execute 方法,很明显我们实现的 GetCurrentTimeCommand 命令就是一个不带参数的命令
还有一个值得注意的是,我们通过 Checkbox 的 IsChecked 绑定了一个 bool 属性 IsCanExcute,且在 CanExecute 方法中 return IsCanExcute,我们都知道 CanExecute 控制着 Execute 方法的是否能够执行,也控制着 Button 的 IsEnable 状态,而在 IsCanExcute 的 set 方法我们增加了一句:
GetCurrentTimeCommand.RaiseCanExecuteChanged();
其实通过 prism 源码我们可以知道 RaiseCanExecuteChanged 方法就是内部调用 ICommand 接口下的 CanExecuteChanged 事件去调用 CanExecute 方法
public void RaiseCanExecuteChanged()
{
    OnCanExecuteChanged();
}

protected virtual void OnCanExecuteChanged()
{
    EventHandler handler = this.CanExecuteChanged;
    if (handler != null)
    {
        if (_synchronizationContext != null && _synchronizationContext != SynchronizationContext.Current)
        {
            _synchronizationContext.Post(delegate
            {
                handler(this, EventArgs.Empty);
            }, null);
        }
        else
        {
            handler(this, EventArgs.Empty);
        }
    }
}
其实上述 prism 还提供了一个更简洁优雅的写法:
private bool _isCanExcute;
 public bool IsCanExcute
 {
    get { return _isCanExcute; }
    set { SetProperty(ref _isCanExcute, value);}
 }

 private DelegateCommand _getCurrentTimeCommand;
 public DelegateCommand GetCurrentTimeCommand =>
    _getCurrentTimeCommand ?? (_getCurrentTimeCommand = new  DelegateCommand(ExecuteGetCurrentTimeCommand).ObservesCanExecute(()=> IsCanExcute));

 void ExecuteGetCurrentTimeCommand()
 {
    this.CurrentTime = DateTime.Now.ToString();
 }
其中用了 ObservesCanExecute 方法,其实在该方法内部中也是会去调用 RaiseCanExecuteChanged 方法
我们通过上面代码我们可以会引出两个问题:
- 如何创建带参数的 DelegateCommand?
- 假如控件不包含依赖属性 Command,我们要用到该控件的事件,如何转为命令?
二. 创建 DelegateCommand 带参命令
在创建带参的命令之前,我们可以来看看 DelegateCommand 的继承链和暴露出来的公共方法,详细的实现可以去看下源码

那么,其实已经很明显了,我们之前创建 DelegateCommand 不是泛型版本,当创建一个泛型版本的DelegateCommand<T>,那么 T 就是我们要传入的命令参数的类型,那么,我们现在可以把触发命令的 Button 本身作为命令参数传入
xaml 代码如下:
<button
  x:Name="mybtn"
  FontSize="30"
  Content="Click Me"
  Margin="10"
  Height="60"
  Command="{Binding GetCurrentTimeCommand}"
  CommandParameter="{Binding RelativeSource={RelativeSource Mode=Self}}"
/>
GetCurrentTimeCommand 命令代码改为如下:
private DelegateCommand<object> _getCurrentTimeCommand;
public DelegateCommand<object> GetCurrentTimeCommand =>
    _getCurrentTimeCommand ?? (_getCurrentTimeCommand = new DelegateCommand<object>(ExecuteGetCurrentTimeCommand).ObservesCanExecute(()=> IsCanExcute));

 void ExecuteGetCurrentTimeCommand(object parameter)
 {
    this.CurrentTime =((Button)parameter)?.Name+ DateTime.Now.ToString();
 }
我们来看看执行效果:

三. 事件转命令
在我们大多数拥有 Command 依赖属性的控件,大多数是由于继承了 ICommandSource 接口,ICommandSource 接口拥有着三个函数成员 ICommand 接口类型属性 Command,object 类型属性 CommandParameter,IInputElement 类型属性 CommandTarget,而基本继承着 ICommandSource 接口这两个基础类的就是 ButtonBase 和 MenuItem,因此像 Button,Checkbox,RadioButton 等继承自 ButtonBase 拥有着 Command 依赖属性,而 MenuItem 也同理。但是我们常用的 Textbox 那些就没有。
现在我们有这种需求,我们要在这个界面基础上新增第二个 Textbox,当 Textbox 的文本变化时,需要将按钮的 Name 和第二个 Textbox 的文本字符串合并更新到第一个 Textbox 上,我们第一直觉肯定会想到用 Textbox 的 TextChanged 事件,那么如何将 TextChanged 转为命令?
首先我们在 xaml 界面引入:
xmlns:i="http://schemas.microsoft.com/expression/2010/interactivity"
该程序集 System.Windows.Interactivity dll 是在 Expression Blend SDK 中的,而 Prism 的包也也将其引入包含在内了,因此我们可以直接引入,然后我们新增第二个 Textbox 的代码:
<TextBox
  Margin="10"
  FontSize="32"
  Text="{Binding Foo,UpdateSourceTrigger=PropertyChanged}"
>
  <i:Interaction.Triggers>
    <i:EventTrigger EventName="TextChanged">
      <i:InvokeCommandAction
        Command="{Binding TextChangedCommand}"
        CommandParameter="{Binding ElementName=mybtn}"
      />
    </i:EventTrigger>
  </i:Interaction.Triggers>
</TextBox>
MainWindowViewModel 新增代码:
private string _foo;
public string Foo
{
     get { return _foo; }
     set { SetProperty(ref _foo, value); }
}

private DelegateCommand<object> _textChangedCommand;
public DelegateCommand<object> TextChangedCommand =>
  _textChangedCommand ?? (_textChangedCommand = new DelegateCommand<object>(ExecuteTextChangedCommand));

void ExecuteTextChangedCommand(object parameter)
{
  this.CurrentTime = Foo + ((Button)parameter)?.Name;
}
执行效果如下:
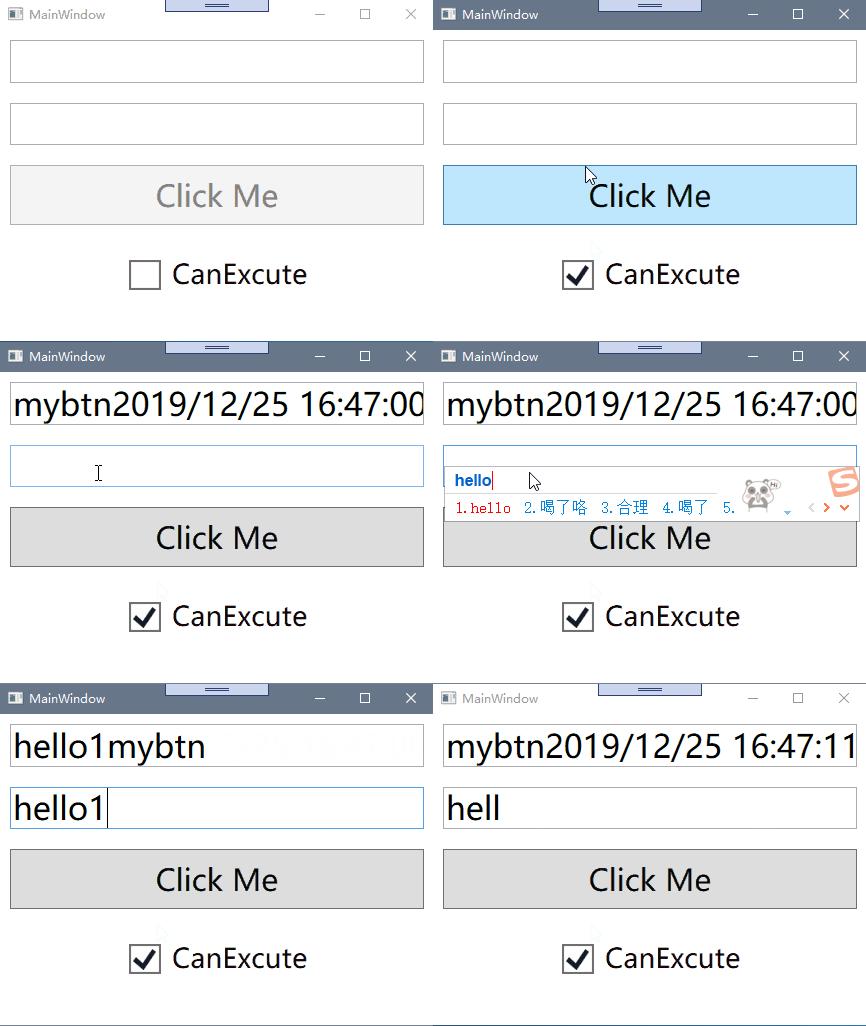
上面我们在 xaml 代码就是添加了对 TextBox 的 TextChanged 事件的 Blend EventTrigger 的侦听,每当触发该事件,InvokeCommandAction 就会去调用 TextChangedCommand 命令
3.1. 将 EventArgs 参数传递给命令#
我们知道,TextChanged 事件是有个 RoutedEventArgs 参数 TextChangedEventArgs,假如我们要拿到该 TextChangedEventArgs 或者是 RoutedEventArgs 参数里面的属性,那么该怎么拿到,我们使用 System.Windows.Interactivity 的 NameSpace 下的 InvokeCommandAction 是不能做到的,这时候我们要用到 prism 自带的 InvokeCommandAction 的 TriggerParameterPath 属性,我们现在有个要求,我们要在第一个 TextBox,显示我们第二个 TextBox 输入的字符串加上触发该事件的控件的名字,那么我们可以用到其父类 RoutedEventArgs 的 Soucre 属性,而激发该事件的控件就是第二个 TextBox
xaml 代码修改如下:
<TextBox
  x:Name="myTextBox"
  Margin="10"
  FontSize="32"
  Text="{Binding Foo,UpdateSourceTrigger=PropertyChanged}"
  TextChanged="TextBox_TextChanged"
>
  <i:Interaction.Triggers>
    <i:EventTrigger EventName="TextChanged">
      <prism:InvokeCommandAction
        Command="{Binding TextChangedCommand}"
        TriggerParameterPath="Source"
      />
    </i:EventTrigger>
  </i:Interaction.Triggers>
</TextBox>
MainWindowViewModel 修改如下:
void ExecuteTextChangedCommand(object parameter)
{
    this.CurrentTime = Foo + ((TextBox)parameter)?.Name;
}
实现效果:
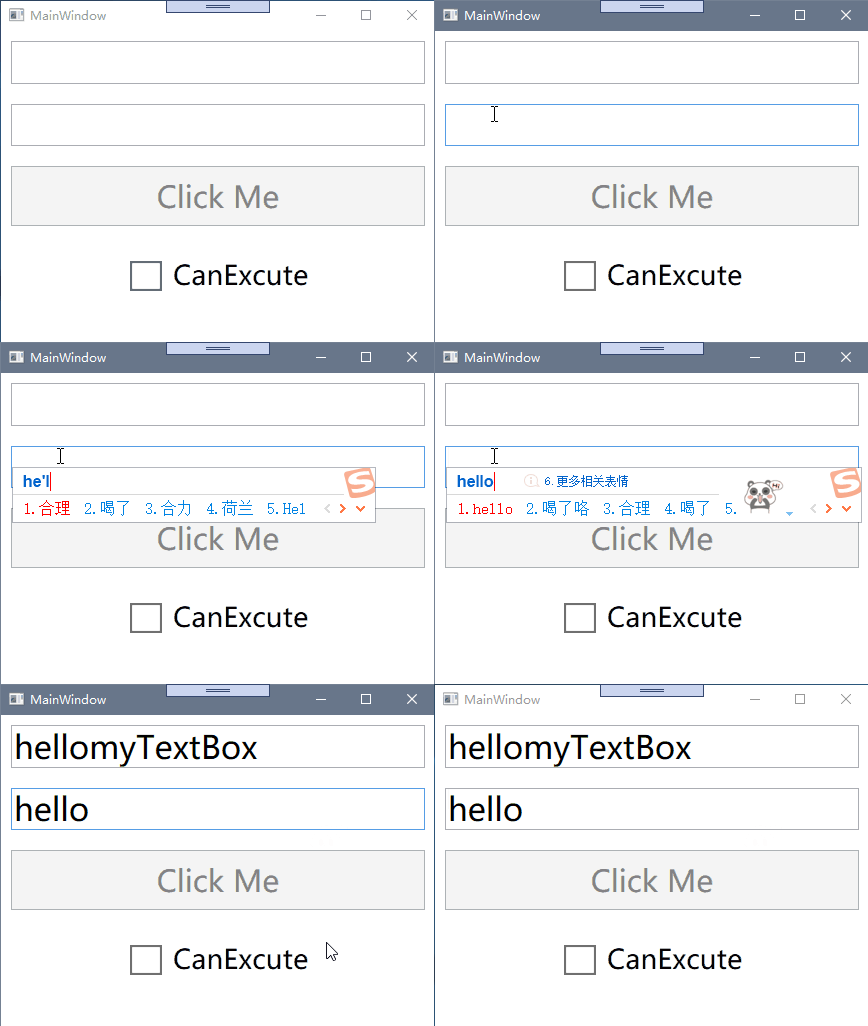
还有一个很有趣的现象,假如上述 xaml 代码将 TriggerParameterPath 去掉,我们其实拿到的是 TextChangedEventArgs
四.实现基于 Task 的命令
首先我们在界面新增一个新的按钮,用来绑定新的基于 Task 的命令,我们将要做的就是点击该按钮后,第一个 Textbox 的在 5 秒后显示"Hello Prism!",且期间 UI 界面不阻塞
xaml 界面新增按钮代码如下:
<button
  x:Name="mybtn1"
  FontSize="30"
  Content="Click Me 1"
  Margin="10"
  Height="60"
  Command="{Binding AsyncCommand}"
/>
MainWindowViewModel 新增代码:
private DelegateCommand _asyncCommand;
  public DelegateCommand AsyncCommand =>
     _asyncCommand ?? (_asyncCommand = new DelegateCommand(ExecuteAsyncCommand));

  async void ExecuteAsyncCommand()
  {
     await ExampleMethodAsync();
  }

  async Task ExampleMethodAsync()
  {
     await Task.Run(()=>
     {
        Thread.Sleep(5000);
        this.CurrentTime = "Hello Prism!";
     } );
  }
也可以更简洁的写法:
private DelegateCommand _asyncCommand;
 public DelegateCommand AsyncCommand =>
    _asyncCommand ?? (_asyncCommand = new DelegateCommand( async()=>await ExecuteAsyncCommand()));

 Task ExecuteAsyncCommand()
 {
    return Task.Run(() =>
    {
       Thread.Sleep(5000);
       this.CurrentTime = "Hello Prism!";
    });
  }
直接看效果:

五. 创建复合命令
prism 提供 CompositeCommand 类支持复合命令,什么是复合命令,我们可能有这种场景,一个主界面的不同子窗体都有其各自的业务,假如我们可以将上面的例子稍微改下,我们分为三个不同子窗体,三个分别来显示当前年份,月日,时分秒,我们希望在主窗体提供一个按钮,点击后能够使其同时显示,这时候就有一种关系存在了,主窗体按钮依赖于三个子窗体的按钮,而子窗体的按钮不依赖于主窗体的按钮
下面是创建和使用一个 prism 标准复合命令的流程:
- 创建一个全局的复合命令
- 通过 IOC 容器注册其为单例
- 给复合命令注册子命令
- 绑定复合命令
5.1. 创建一个全局的复合命令
首先,我们创建一个类库项目,新增 ApplicationCommands 类作为全局命令类,代码如下:
public interface IApplicationCommands
{
    CompositeCommand GetCurrentAllTimeCommand { get; }
}

public class ApplicationCommands : IApplicationCommands
{
   private CompositeCommand _getCurrentAllTimeCommand = new CompositeCommand();
   public CompositeCommand GetCurrentAllTimeCommand
   {
        get { return _getCurrentAllTimeCommand; }
   }
}
其中我们创建了 IApplicationCommands 接口,让 ApplicationCommands 实现了该接口,目的是为了下一步通过 IOC 容器注册其为全局的单例接口
5.2. 通过 IOC 容器注册其为单例
我们创建一个新的项目作为主窗体,用来显示子窗体和使用复合命令,关键部分代码如下:
App.cs 代码:
using Prism.Unity;
using Prism.Ioc;
using System.Windows;
using CompositeCommandsSample.Views;
using Prism.Modularity;
using CompositeCommandsCore;

namespace CompositeCommandsSample
{

 public partial class App : PrismApplication
 {
     protected override Window CreateShell()
     {
         return Container.Resolve<MainWindow>();
     }

     //通过IOC容器注册IApplicationCommands为单例
     protected override void RegisterTypes(IContainerRegistry containerRegistry)
     {
        containerRegistry.RegisterSingleton<IApplicationCommands, ApplicationCommands>();
     }

     //注册子窗体模块
     protected override void ConfigureModuleCatalog(IModuleCatalog moduleCatalog)
     {
        moduleCatalog.AddModule<CommandSample.CommandSampleMoudle>();
     }
  }
}
5.3. 给复合命令注册子命令
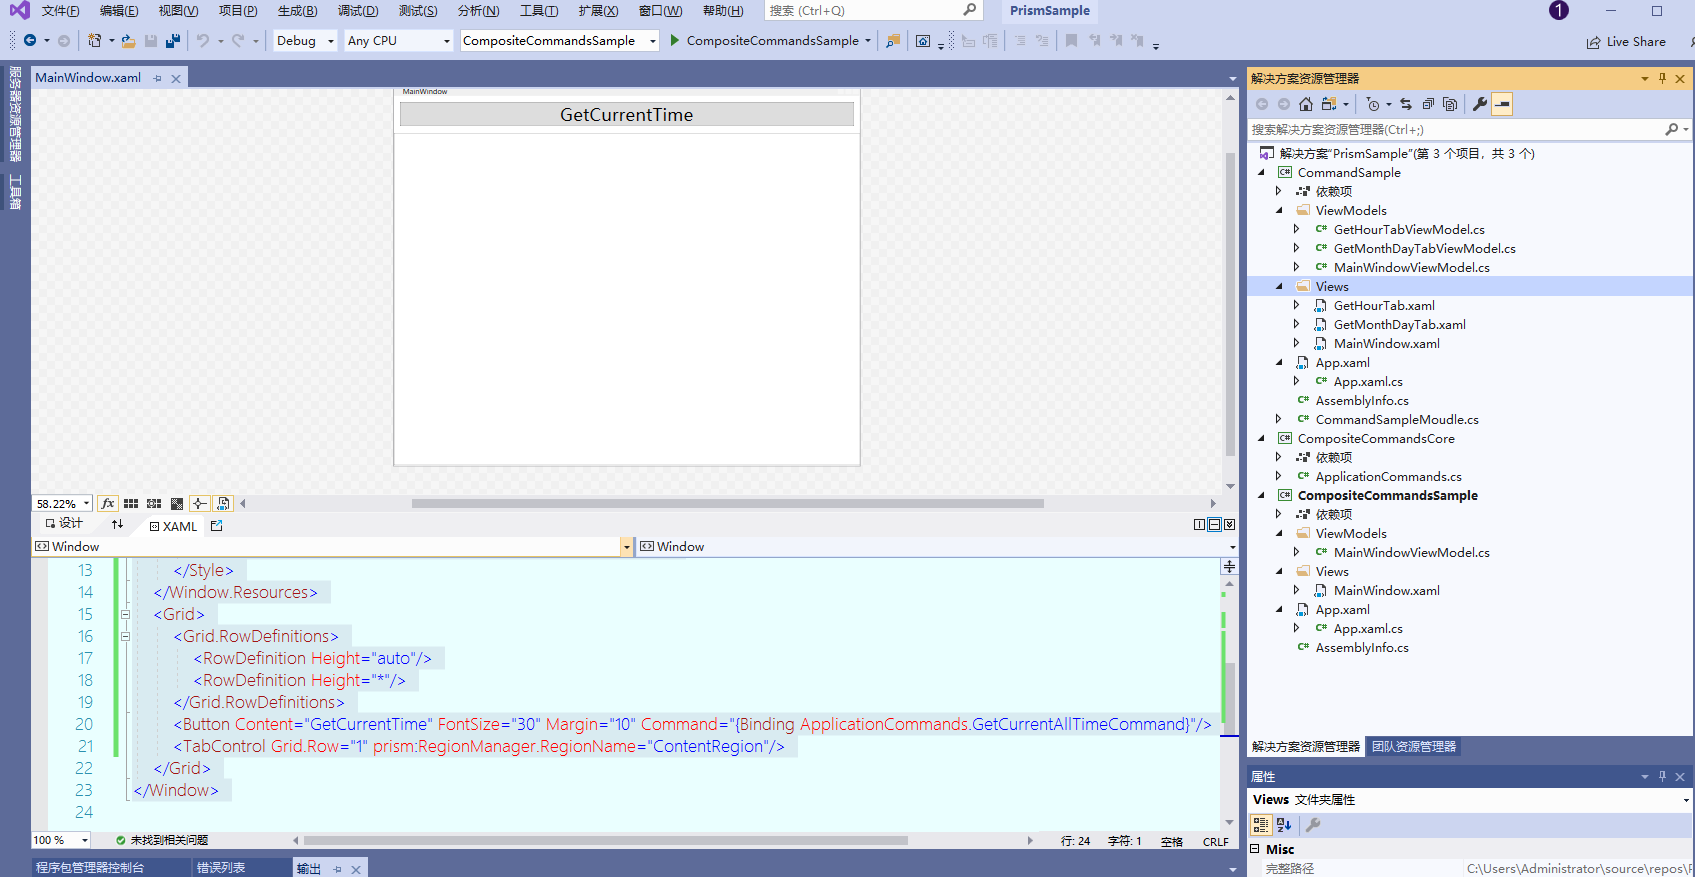
我们在之前的 CommandSample 解决方案下面的 Views 文件夹下新增两个 UserControl,分别用来显示月日和时分秒,在其 ViewModels 文件夹下面新增两个 UserControl 的 ViewModel,并且将之前的 MainWindow 也改为 UserControl,大致结构如下图:
关键部分代码:
GetHourTabViewModel.cs:
IApplicationCommands _applicationCommands;

public GetHourTabViewModel(IApplicationCommands applicationCommands)
{
    _applicationCommands = applicationCommands;
    //给复合命令GetCurrentAllTimeCommand注册子命令GetHourCommand
    _applicationCommands.GetCurrentAllTimeCommand.RegisterCommand(GetHourCommand);
}

private DelegateCommand _getHourCommand;
public DelegateCommand GetHourCommand =>
   _getHourCommand ?? (_getHourCommand = new DelegateCommand(ExecuteGetHourCommand).ObservesCanExecute(() => IsCanExcute));

void ExecuteGetHourCommand()
{
   this.CurrentHour = DateTime.Now.ToString("HH:mm:ss");
}
GetMonthDayTabViewModel.cs:
IApplicationCommands _applicationCommands;

 public GetMonthDayTabViewModel(IApplicationCommands applicationCommands)
 {
     _applicationCommands = applicationCommands;
     //给复合命令GetCurrentAllTimeCommand注册子命令GetMonthCommand
     _applicationCommands.GetCurrentAllTimeCommand.RegisterCommand(GetMonthCommand);
 }

 private DelegateCommand _getMonthCommand;
 public DelegateCommand GetMonthCommand =>
      _getMonthCommand ?? (_getMonthCommand = new DelegateCommand(ExecuteCommandName).ObservesCanExecute(()=>IsCanExcute));

 void ExecuteCommandName()
 {
    this.CurrentMonthDay = DateTime.Now.ToString("MM:dd");
 }
MainWindowViewModel.cs:
IApplicationCommands _applicationCommands;

public MainWindowViewModel(IApplicationCommands applicationCommands)
{
    _applicationCommands = applicationCommands;
    //给复合命令GetCurrentAllTimeCommand注册子命令GetYearCommand
    _applicationCommands.GetCurrentAllTimeCommand.RegisterCommand(GetYearCommand);
}

private DelegateCommand _getYearCommand;
public DelegateCommand GetYearCommand =>
   _getYearCommand ?? (_getYearCommand = new DelegateCommand(ExecuteGetYearCommand).ObservesCanExecute(()=> IsCanExcute));

void ExecuteGetYearCommand()
{
   this.CurrentTime =DateTime.Now.ToString("yyyy");
}
CommandSampleMoudle.cs:
using CommandSample.ViewModels;
using CommandSample.Views;
using Prism.Ioc;
using Prism.Modularity;
using Prism.Regions;

namespace CommandSample
{
  public class CommandSampleMoudle : IModule
  {
    public void OnInitialized(IContainerProvider containerProvider)
    {
       var regionManager = containerProvider.Resolve<IRegionManager>();
       IRegion region= regionManager.Regions["ContentRegion"];

       var mainWindow = containerProvider.Resolve<MainWindow>();
       (mainWindow.DataContext as MainWindowViewModel).Title = "GetYearTab";
       region.Add(mainWindow);

       var getMonthTab = containerProvider.Resolve<GetMonthDayTab>();
       (getMonthTab.DataContext as GetMonthDayTabViewModel).Title = "GetMonthDayTab";
       region.Add(getMonthTab);

       var getHourTab = containerProvider.Resolve<GetHourTab>();
       (getHourTab.DataContext as GetHourTabViewModel).Title = "GetHourTab";
       region.Add(getHourTab);
    }

    public void RegisterTypes(IContainerRegistry containerRegistry)
    {

    }
  }
}
5.4. 绑定复合命令
主窗体 xaml 代码:
<Window
  x:Class="CompositeCommandsSample.Views.MainWindow"
  xmlns="http://schemas.microsoft.com/winfx/2006/xaml/presentation"
  xmlns:x="http://schemas.microsoft.com/winfx/2006/xaml"
  xmlns:d="http://schemas.microsoft.com/expression/blend/2008"
  xmlns:mc="http://schemas.openxmlformats.org/markup-compatibility/2006"
  xmlns:prism="http://prismlibrary.com/"
  xmlns:local="clr-namespace:CompositeCommandsSample"
  mc:Ignorable="d"
  prism:ViewModelLocator.AutoWireViewModel="True"
  Title="MainWindow"
  Height="650"
  Width="800"
>
  <Window.Resources>
    <style TargetType="TabItem">
      <Setter Property="Header" Value="{Binding DataContext.Title}"/>
    </style>
  </Window.Resources>
  <Grid>
    <Grid.RowDefinitions>
      <RowDefinition Height="auto" />
      <RowDefinition Height="*" />
    </Grid.RowDefinitions>
    <button
      Content="GetCurrentTime"
      FontSize="30"
      Margin="10"
      Command="{Binding ApplicationCommands.GetCurrentAllTimeCommand}"
    />
    <TabControl Grid.Row="1" prism:RegionManager.RegionName="ContentRegion" />
  </Grid>
</Window>
MainWindowViewModel.cs:
using CompositeCommandsCore;
using Prism.Mvvm;

namespace CompositeCommandsSample.ViewModels
{
  public  class MainWindowViewModel:BindableBase
  {
    private IApplicationCommands _applicationCommands;
    public IApplicationCommands  ApplicationCommands
    {
       get { return _applicationCommands; }
       set { SetProperty(ref _applicationCommands, value); }
    }

    public MainWindowViewModel(IApplicationCommands applicationCommands)
    {
        this.ApplicationCommands = applicationCommands;
    }
  }
}
最后看看实际的效果如何:
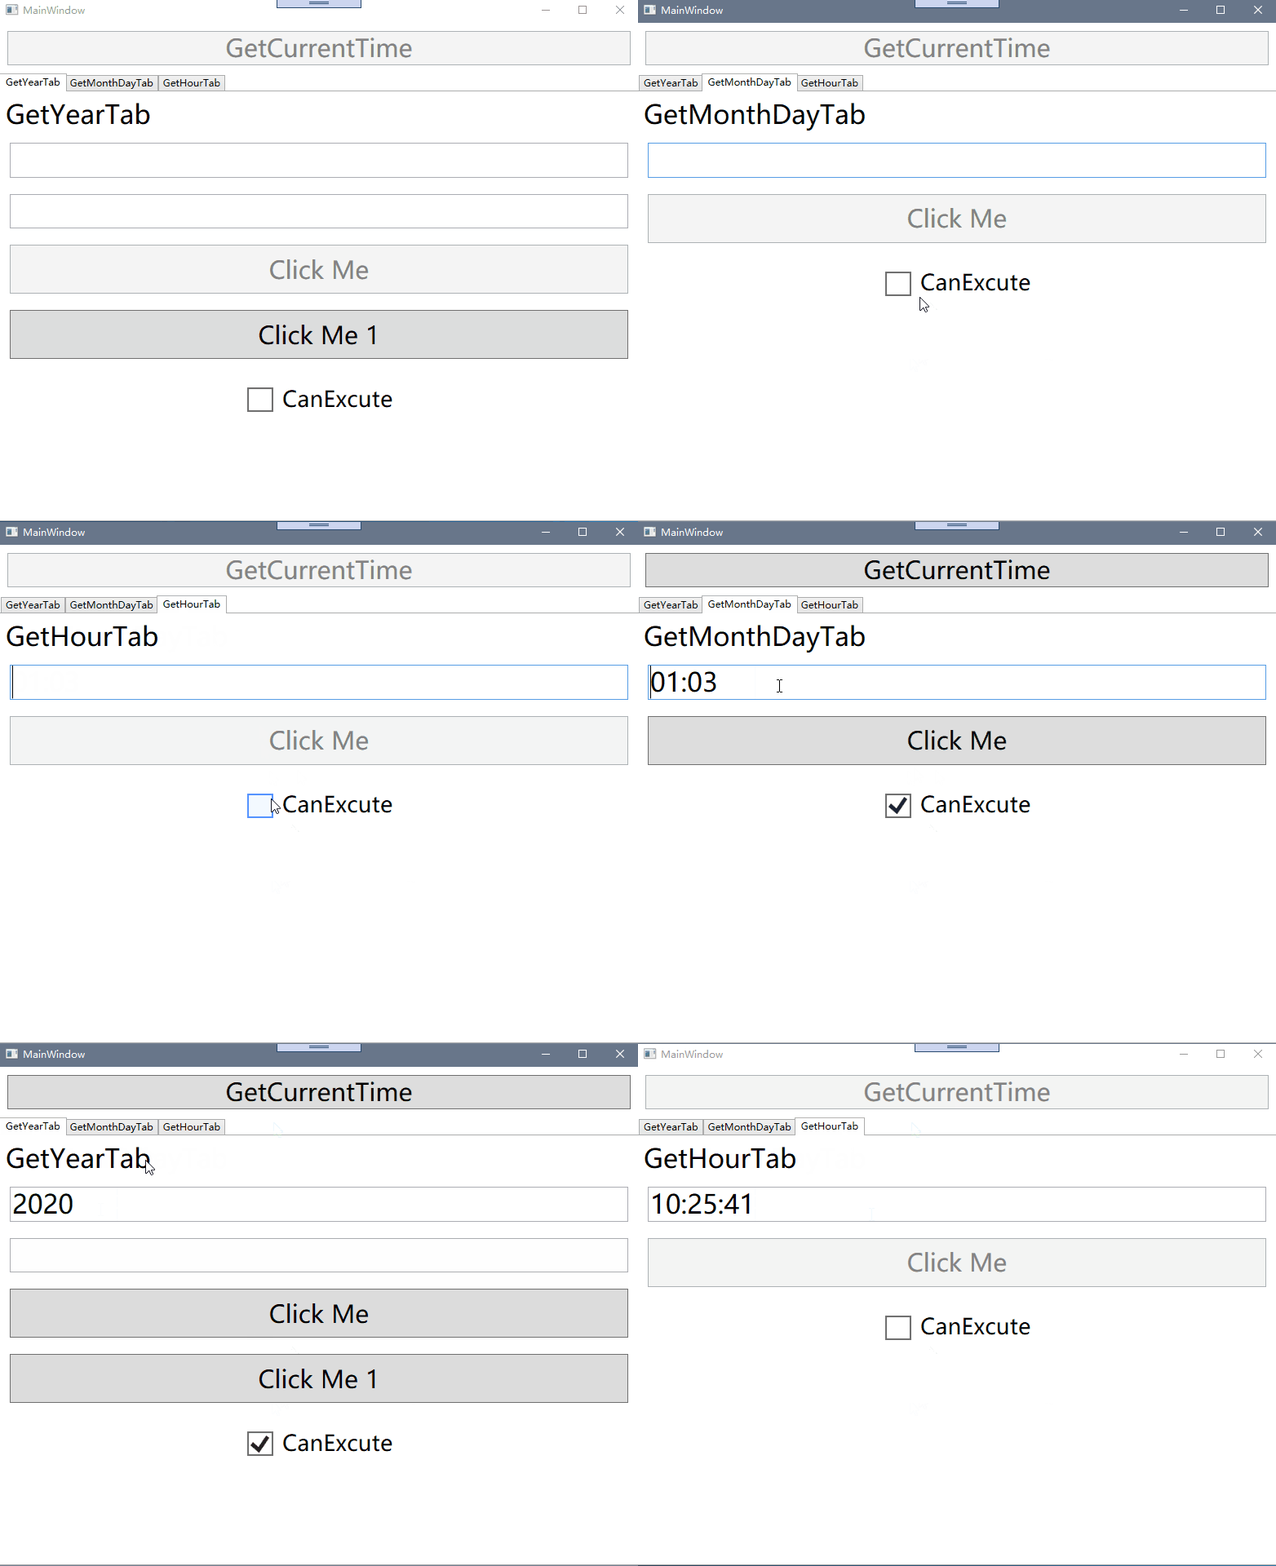
最后,其中复合命令也验证我们一开始说的关系,复合命令依赖于子命令,但子命令不依赖于复合命令,因此,只有当三个子命令的都为可执行的时候才能执行复合命令,其中用到的 prism 模块化的知识,我们下一篇会仔细探讨