

原文作者:Jay Krishna Reddy
原文链接:https://www.c-sharpcorner.com/article/upload-and-download-multiple-files-using-web-api/
翻译:沙漠尽头的狼(谷歌翻译加持,文中版本使用.NET 6 升级)
---正文开始---
今天,我们将通过一个简单的过程介绍使用 ASP.NET Core 6.0 Web API 上传和下载多个文件。
步骤
首先在 Visual Studio 中创建一个空的 Web API 项目,目标框架选择.NET 6.0。
此项目中没有使用外部包。
创建一个 Services 文件夹,并在其中创建一个 FileService 类和 IFileService 接口。
我们在这个 FileService.cs 中使用了三个方法
- UploadFile
- DownloadFile
- SizeConverter
由于我们需要一个文件夹来存储这些上传文件,因此我们在这里添加了一个参数来将文件夹名称作为字符串传递,它将存储所有上传的这些文件。
FileService.cs
using System.IO.Compression;

namespace FileUploadAndDownload.Services;

public class FileService : IFileService
{
    #region Property

    private readonly IWebHostEnvironment _webHostEnvironment;

    #endregion

    #region Constructor

    public FileService(IWebHostEnvironment webHostEnvironment)
    {
        _webHostEnvironment = webHostEnvironment;
    }

    #endregion

    #region Upload File

    public void UploadFile(List<IFormFile> files, string subDirectory)
    {
        subDirectory = subDirectory ?? string.Empty;
        var target = Path.Combine(_webHostEnvironment.ContentRootPath, subDirectory);

        Directory.CreateDirectory(target);

        files.ForEach(async file =>
        {
            if (file.Length <= 0) return;
            var filePath = Path.Combine(target, file.FileName);
            await using var stream = new FileStream(filePath, FileMode.Create);
            await file.CopyToAsync(stream);
        });
    }

    #endregion

    #region Download File

    public (string fileType, byte[] archiveData, string archiveName) DownloadFiles(string subDirectory)
    {
        var zipName = $"archive-{DateTime.Now:yyyy_MM_dd-HH_mm_ss}.zip";

        var files = Directory.GetFiles(Path.Combine(_webHostEnvironment.ContentRootPath, subDirectory)).ToList();

        using var memoryStream = new MemoryStream();
        using (var archive = new ZipArchive(memoryStream, ZipArchiveMode.Create, true))
        {
            files.ForEach(file =>
            {
                var theFile = archive.CreateEntry(Path.GetFileName(file));
                using var binaryWriter = new BinaryWriter(theFile.Open());
                binaryWriter.Write(File.ReadAllBytes(file));
            });
        }

        return ("application/zip", memoryStream.ToArray(), zipName);
    }

    #endregion

    #region Size Converter

    public string SizeConverter(long bytes)
    {
        var fileSize = new decimal(bytes);
        var kilobyte = new decimal(1024);
        var megabyte = new decimal(1024 * 1024);
        var gigabyte = new decimal(1024 * 1024 * 1024);

        return fileSize switch
        {
            _ when fileSize < kilobyte => "Less then 1KB",
            _ when fileSize < megabyte =>
                $"{Math.Round(fileSize / kilobyte, 0, MidpointRounding.AwayFromZero):##,###.##}KB",
            _ when fileSize < gigabyte =>
                $"{Math.Round(fileSize / megabyte, 2, MidpointRounding.AwayFromZero):##,###.##}MB",
            _ when fileSize >= gigabyte =>
                $"{Math.Round(fileSize / gigabyte, 2, MidpointRounding.AwayFromZero):##,###.##}GB",
            _ => "n/a"
        };
    }

    #endregion
}
SizeConverter 函数用于获取我们上传文件到服务器的实际大小。
IFileService.cs
namespace FileUploadAndDownload.Services;

public interface IFileService
{
    void UploadFile(List<IFormFile> files, string subDirectory);
    (string fileType, byte[] archiveData, string archiveName) DownloadFiles(string subDirectory);
    string SizeConverter(long bytes);
}
让我们在 Program.cs 文件中添加这个服务依赖项
Program.cs
using FileUploadAndDownload.Services;

var builder = WebApplication.CreateBuilder(args);

// Add services to the container.

builder.Services.AddControllers();
// Learn more about configuring Swagger/OpenAPI at https://aka.ms/aspnetcore/swashbuckle
builder.Services.AddEndpointsApiExplorer();
builder.Services.AddSwaggerGen();

// 主要是添加下面这句代码,注入文件服务
builder.Services.AddTransient<IFileService, FileService>();

var app = builder.Build();

// Configure the HTTP request pipeline.
if (app.Environment.IsDevelopment())
{
    app.UseSwagger();
    app.UseSwaggerUI();
}

app.UseHttpsRedirection();

app.UseAuthorization();

app.MapControllers();

app.Run();
创建一个 FileController,并 FileController 中的构造函数注入 IFileService。
FileController.cs
using FileUploadAndDownload.Services;
using Microsoft.AspNetCore.Mvc;
using System.ComponentModel.DataAnnotations;

namespace FileUploadAndDownload.Controllers;

[Route("api/[controller]")]
[ApiController]
public class FileController : ControllerBase
{
    private readonly IFileService _fileService;

    public FileController(IFileService fileService)
    {
        _fileService = fileService;
    }

    [HttpPost(nameof(Upload))]
    public IActionResult Upload([Required] List<IFormFile> formFiles, [Required] string subDirectory)
    {
        try
        {
            _fileService.UploadFile(formFiles, subDirectory);

            return Ok(new { formFiles.Count, Size = _fileService.SizeConverter(formFiles.Sum(f => f.Length)) });
        }
        catch (Exception ex)
        {
            return BadRequest(ex.Message);
        }
    }

    [HttpGet(nameof(Download))]
    public IActionResult Download([Required] string subDirectory)
    {
        try
        {
            var (fileType, archiveData, archiveName) = _fileService.DownloadFiles(subDirectory);

            return File(archiveData, fileType, archiveName);
        }
        catch (Exception ex)
        {
            return BadRequest(ex.Message);
        }
    }
}
我们可以在 swagger 和 postman 中测试我们的 API。
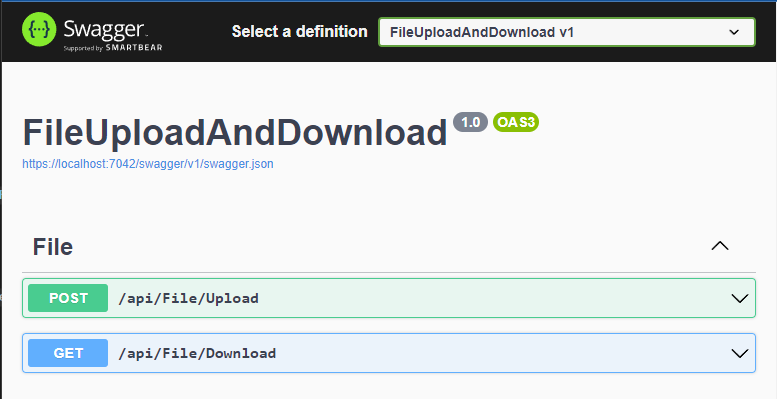
在这里,我们看到了我们创建的用于上传和下载的两个 API,因此让我们分别测试它们中的每一个。
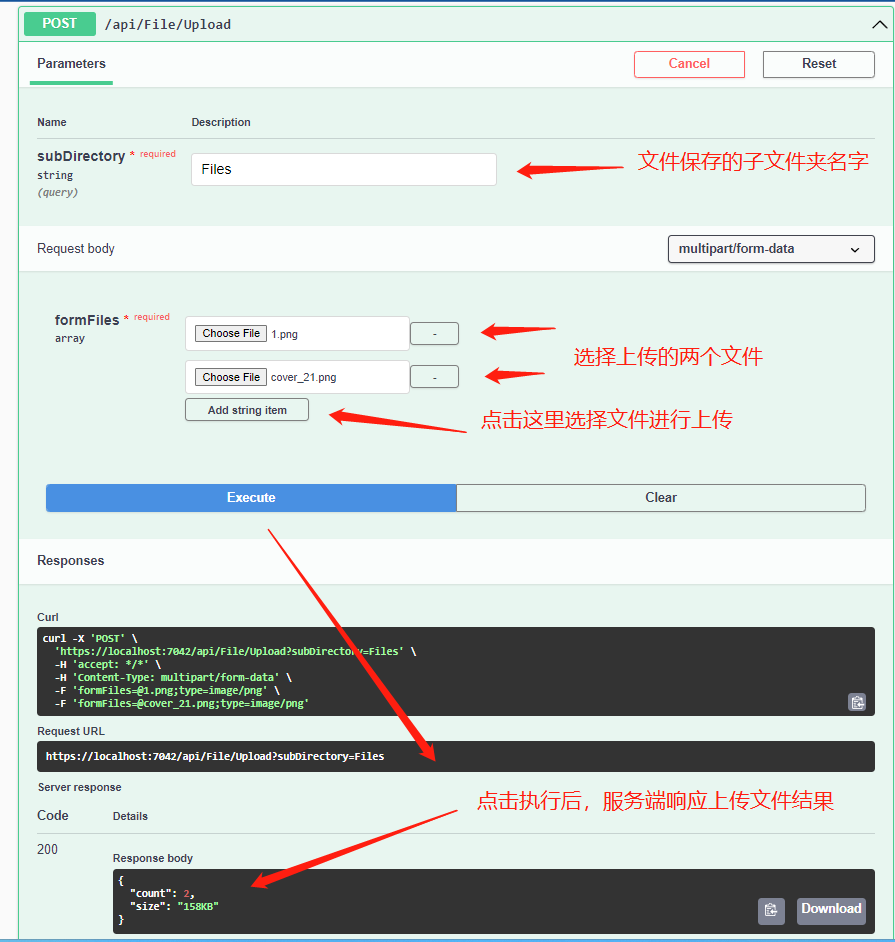
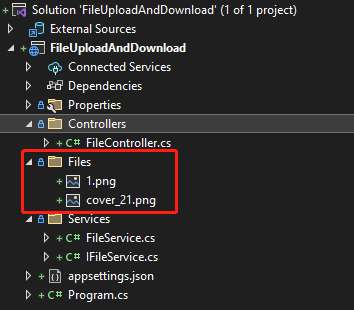
在 subDirectory字段中 输入文件保存的文件夹名称,并在下面添加文件用于保存在服务器对应的子文件夹名称下。作为响应,我们会看到文件的总数和所有上传文件的总实际大小。
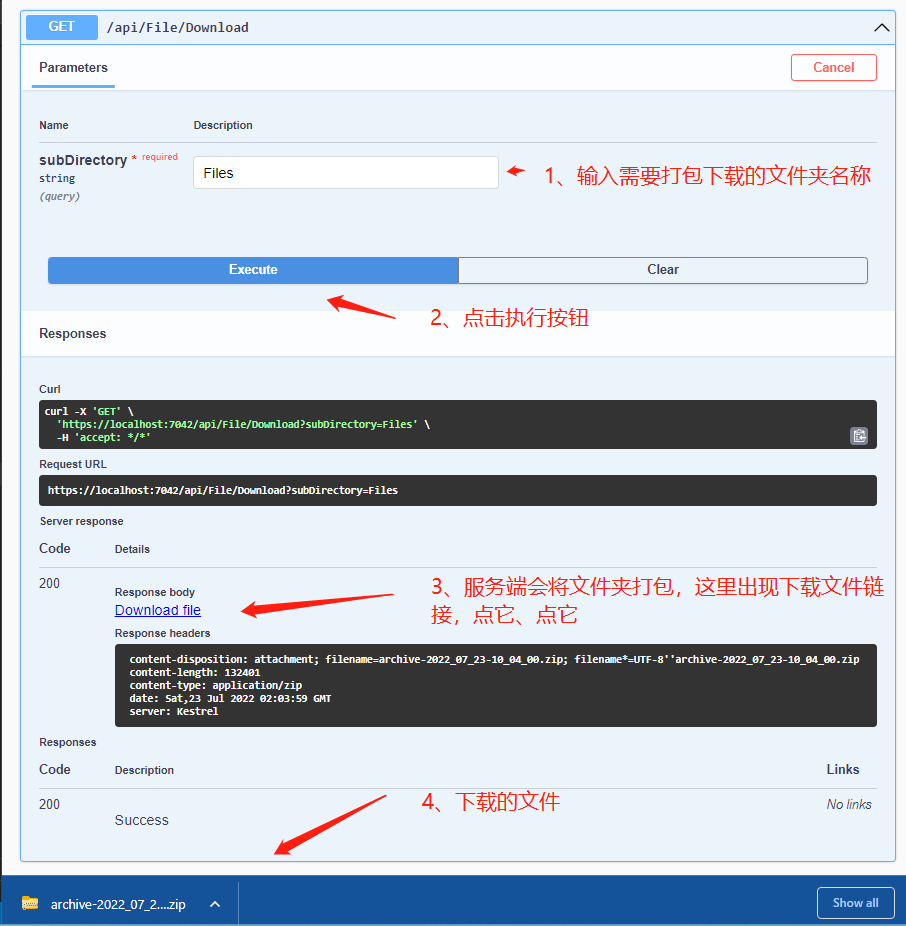
现在将检查下载 API。由于我们的文件夹中有多个文件,它将作为Zip 文件下载,我们需要将其解压缩以检查文件。
总结
使用 Web API 接口的方式上传和下载文件,适用于 Blazor Server、Blazor Client、MAUI、Winform、WPF 等客户端程序,后面有空写写客户端怎么调用这些接口。
.... 保持学习 !!!