
本文來自轉載
原文作者:RyzenAdorer
原文標題:.NET Core 3 WPF MVVM 框架 Prism 系列之模組化
原文連結:https://www.cnblogs.com/ryzen/p/12185054.html
本文將介紹如何在.NET Core3 環境下使用 MVVM 框架 Prism 的應用程式的模組化
1. 前言
我們都知道,為了構成一個低耦合、高內聚的應用程式,我們會分層。拿一個 WPF 程式來說,我們透過 MVVM 模式去將一個應用程式分成 View-ViewModel-Model,大大消除之前業務邏輯和介面元素之間存在的高耦合,使我們後端開發人員可以將重點更放在業務邏輯層面上,屬於 UI 介面的則可以交給更專業的 UI 人員。
但是一個應用程式是由不同的業務模組來組合而成,我們理想狀態下,每個業務模組擁有著能夠獨立的功能,並且和其他業務模組之間是低耦合關係的,且每個業務模組可以單獨用來開發、測試和部署,這樣組成的應用程式是非常容易擴展、測試和維護的,而 Prism 提供將應用程式模組化的功能。
我們先來看一個小 Demo
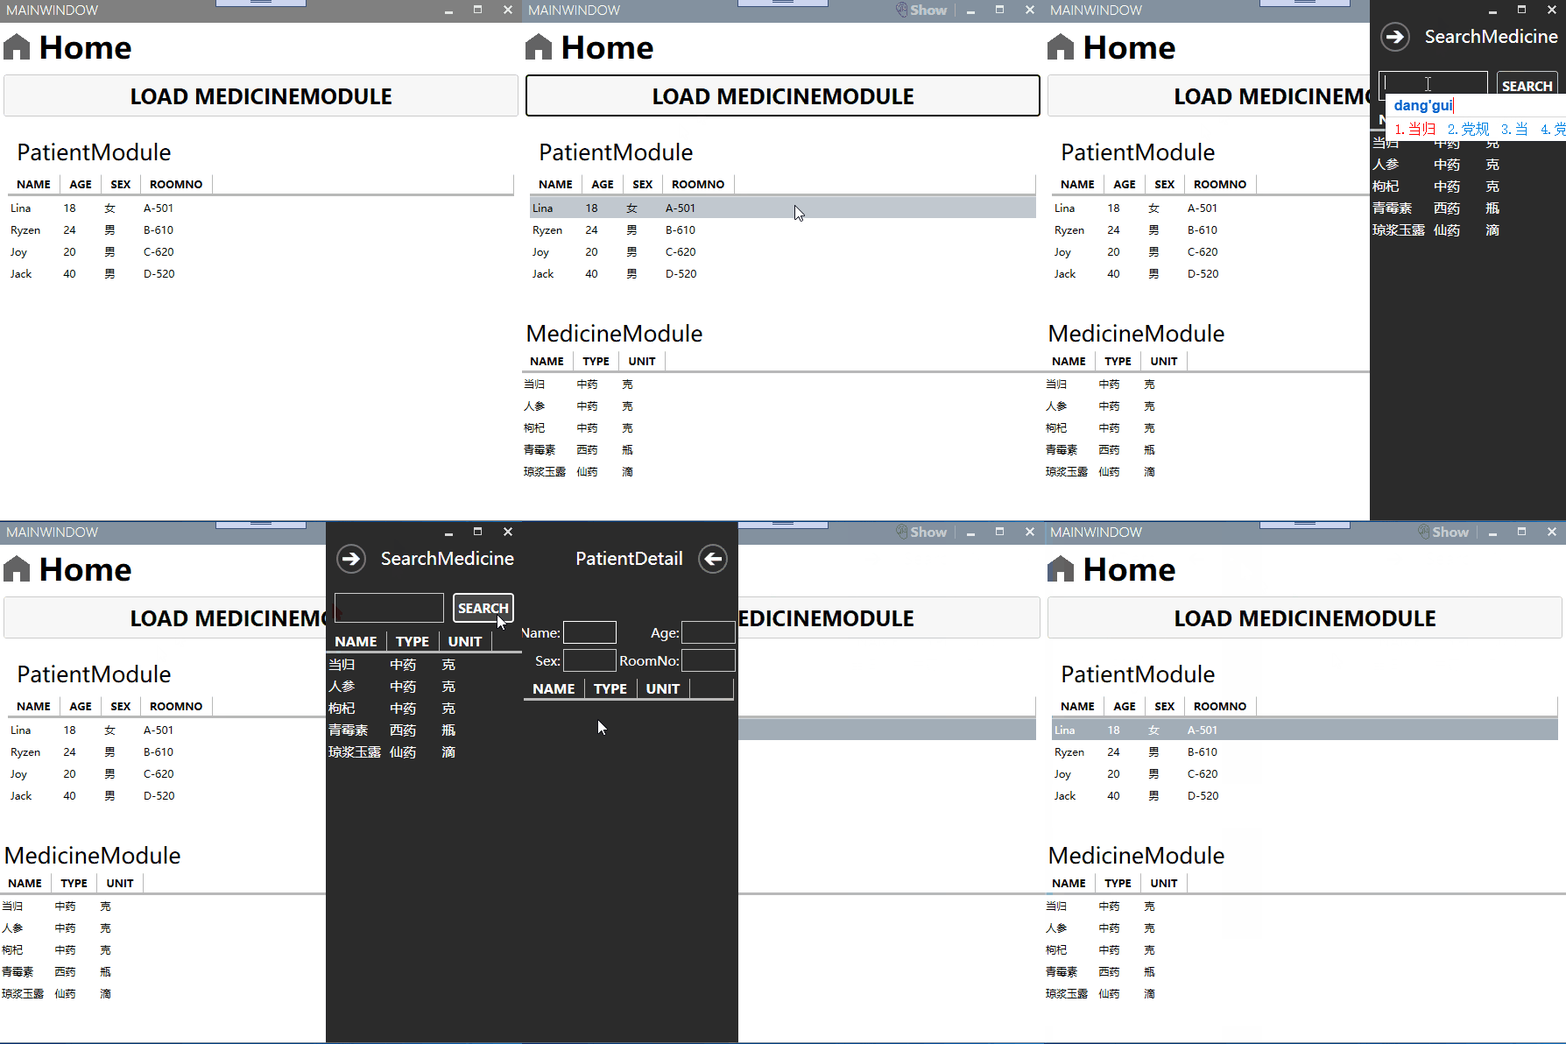
再來看看解決方案的專案:
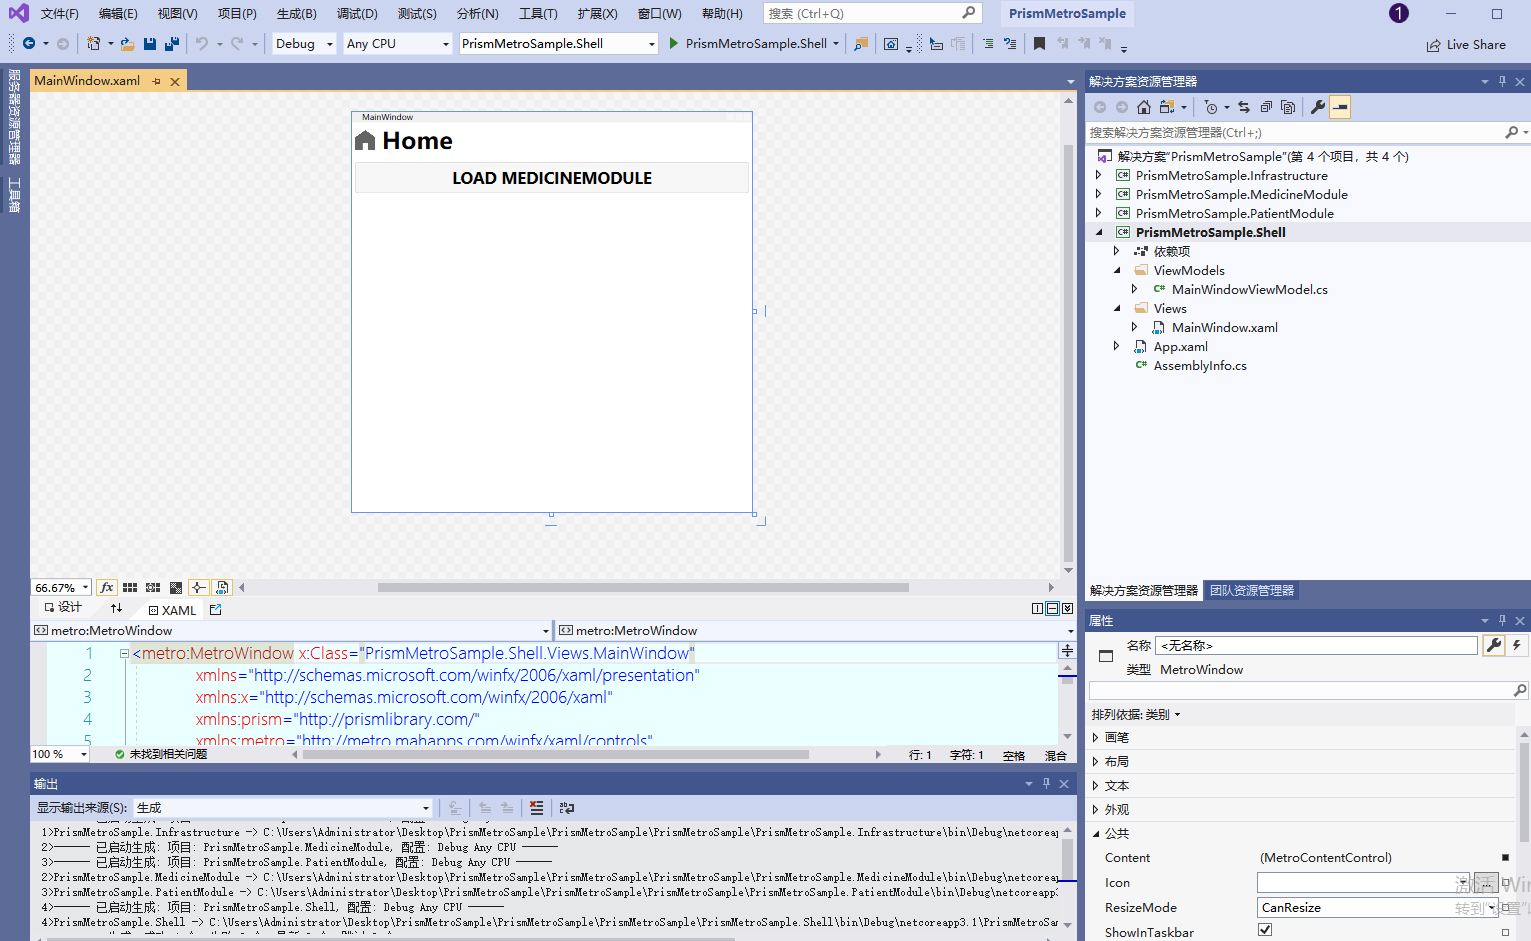
我將該小 demo,分為四個專案,其中 Shell 為主視窗專案,然後 MedicineModule 和 PatientModule 為我們分割開的業務模組,最後 Infrastructure 則為我們的公共共享專案,我們將一步步講解該 demo 如何進行模組化的。
首先,我們引用官方的一個圖,大致講解了建立載入模組的流程:
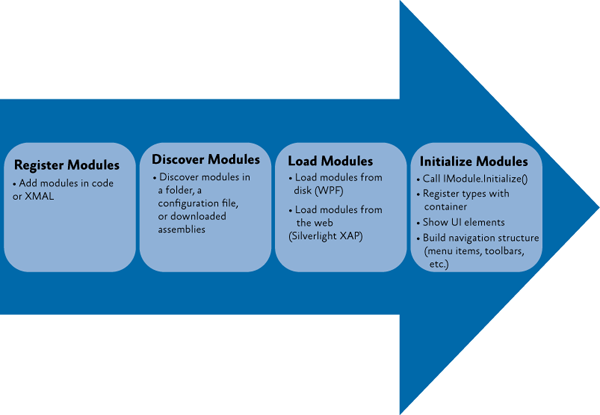
- 註冊/發現模組
- 載入模組
- 初始化模組
我們就根據這個流程來看看 demo 是如何進行模組化的?
2. 註冊/發現模組
2.1. 註冊模組
prism 註冊模組有三種方式:
- 程式碼註冊
- 目錄檔案掃描註冊
- 設定檔 App.config 註冊
我們先用程式碼註冊的方式,首先我們要先定義模組,我們分別在 PrismMetroSample.MedicineModule 和 PrismMetroSample.PatientModule 兩個專案中建立 MedicineModule 類別和 PatientModule 類別,程式碼如下:
MedicineModule.cs:
public class MedicineModule : IModule
 {
     public void OnInitialized(IContainerProvider containerProvider)
     {
         var regionManager = containerProvider.Resolve<IRegionManager>();


         //MedicineMainContent
         regionManager.RegisterViewWithRegion(RegionNames.MedicineMainContentRegion, typeof(MedicineMainContent));

         //SearchMedicine-Flyout
         regionManager.RegisterViewWithRegion(RegionNames.FlyoutRegion, typeof(SearchMedicine));

         //rightWindowCommandsRegion
         regionManager.RegisterViewWithRegion(RegionNames.ShowSearchPatientRegion, typeof(ShowSearchPatient));
        }

     public void RegisterTypes(IContainerRegistry containerRegistry)
     {

     }
 }
PatientModule.cs:
public class PatientModule : IModule
 {
     public void OnInitialized(IContainerProvider containerProvider)
     {
         var regionManager = containerProvider.Resolve<IRegionManager>();

         //PatientList
         regionManager.RegisterViewWithRegion(RegionNames.PatientListRegion, typeof(PatientList));
         //PatientDetail-Flyout
         regionManager.RegisterViewWithRegion(RegionNames.FlyoutRegion, typeof(PatientDetail));

     }

     public void RegisterTypes(IContainerRegistry containerRegistry)
     {

     }
 }
2.1.1. 程式碼註冊
然後我們在 PrismMetroSample.Shell 主視窗的專案分別引用 PrismMetroSample.MedicineModule 和 PrismMetroSample.PatientModule 組件,之後在 App.xaml.cs 中程式碼註冊:
protected override void ConfigureModuleCatalog(IModuleCatalog moduleCatalog)
{
   moduleCatalog.AddModule<PrismMetroSample.PatientModule.PatientModule>();

    //將MedicineModule模組設定為按需載入
   var MedicineModuleType = typeof(PrismMetroSample.MedicineModule.MedicineModule);
   moduleCatalog.AddModule(new ModuleInfo()
   {
        ModuleName= MedicineModuleType.Name,
        ModuleType=MedicineModuleType.AssemblyQualifiedName,
        InitializationMode=InitializationMode.OnDemand
    });

 }
註:程式碼註冊是沒有所謂的發現模組部分,是直接註冊部分
2.1.2.目錄檔案掃描註冊
2.1.2.1. 註冊模組
首先我們先在 MedicineModule 加上特性,OnDemand 為 true 為「按需」載入,而 PatientModule 預設載入則可以不加
[Module(ModuleName = "MedicineModule", OnDemand =true)]
 public class MedicineModule : IModule
然後我們將 PrismMetroSample.MedicineModule 專案和 PrismMetroSample.PatientModule 專案設定產生事件 dll 複製到 PrismMetroSample.Shell 專案 bin\Debug 下的 Modules 資料夾下
產生事件命令列如下:
xcopy "$(TargetDir)$(TargetName)*$(TargetExt)" "$(SolutionDir)\PrismMetroSample.Shell\bin\Debug\netcoreapp3.1\Modules\" /Y /S
2.1.2.2. 發現模組
然後我們在 App.xaml.cs 覆載實現該函式:
protected override IModuleCatalog CreateModuleCatalog()
{
   //取得該路徑下的資料夾的模組目錄
   return new DirectoryModuleCatalog() { ModulePath = @".\Modules" };
}
2.1.3. 使用設定檔 App.config 註冊
2.1.3.1. 註冊模組
我們在主視窗專案 PrismMetroSample.Shell 加入一個 App.config 檔案:
App.config:
<?xml version="1.0" encoding="utf-8" ?>
<configuration>
  <configSections>
    <section name="modules" type="Prism.Modularity.ModulesConfigurationSection, Prism.Wpf"/>
  </configSections>
  <modules>
    <!--註冊PatientModule模組-->
    <module assemblyFile="PrismMetroSample.PatientModule.dll" moduleType="PrismMetroSample.PatientModule.PatientModule, PrismMetroSample.PatientModule, Version=1.0.0.0, Culture=neutral, PublicKeyToken=null" moduleName="PatientModule" startupLoaded="True" />
    <!--註冊MedicineModule模組-->
    <module assemblyFile="PrismMetroSample.MedicineModule.dll" moduleType="PrismMetroSample.MedicineModule.MedicineModule, PrismMetroSample.MedicineModule, Version=1.0.0.0, Culture=neutral, PublicKeyToken=null" moduleName="MedicineModule" startupLoaded="false" />
  </modules>
</configuration>
其中 startupLoaded 為 true 則設定自動載入,為「可用時」模組,為 false 則不載入,設定為「按需」模組
2.1.3.2. 發現模組
修改 App.xaml.cs 的 CreateModuleCatalog 函式:
App.xaml.cs:
protected override IModuleCatalog CreateModuleCatalog()
 {
    return new ConfigurationModuleCatalog();//載入設定檔模組目錄
 }
3. 載入模組
prism 應用程式載入模組有兩種方式:
- 載入「可用時」的模組(預設方式)
- 根據情況載入「按需」模組
在程式碼註冊時候,我將透過預設方式註冊了 PatientModule,然後註冊 MedicineModule 將其設定為「按需」載入。「按需」載入有個好處就是,應用程式執行初始化後,MedicineModule 模組是不載入到記憶體的,這樣就提供了很大的靈活空間,預設我們可以載入一些「可用」的模組,然後我們可以根據自身要求去「按需」載入我們所需要的模組。
這裡可以講解下按需載入 MedicineModule 的程式碼實現,首先我們已經在 App.cs 中將 MedicineModule 設定為「按需」載入,然後我們在主視窗透過一個按鈕去載入 MedicineModule,程式碼如下:
MainWindowViewModle.cs:
public class MainWindowViewModel : BindableBase
 {
    IModuleManager _moduleManager;
    public MainWindowViewModel(IModuleManager moduleManager)
    {
       _moduleManager = moduleManager;
    }

    private DelegateCommand _loadPatientModuleCommand;
    public DelegateCommand LoadPatientModuleCommand =>
        _loadPatientModuleCommand ?? (_loadPatientModuleCommand = new DelegateCommand(ExecuteLoadPatientModuleCommand));

    void ExecuteLoadPatientModuleCommand()
    {
       _moduleManager.LoadModule("MedicineModule");
    }
 }
我們還可以去偵測載入模組完成事件,我們 MainWindowViewModle 中加上這幾句:
IModuleManager _moduleManager;
public MainWindowViewModel(IModuleManager moduleManager)
{
   _moduleManager = moduleManager;
   _moduleManager.LoadModuleCompleted += _moduleManager_LoadModuleCompleted;
}

private void _moduleManager_LoadModuleCompleted(object sender, LoadModuleCompletedEventArgs e)
{
   MessageBox.Show($"{e.ModuleInfo.ModuleName}模組被載入了");
}
效果如下:
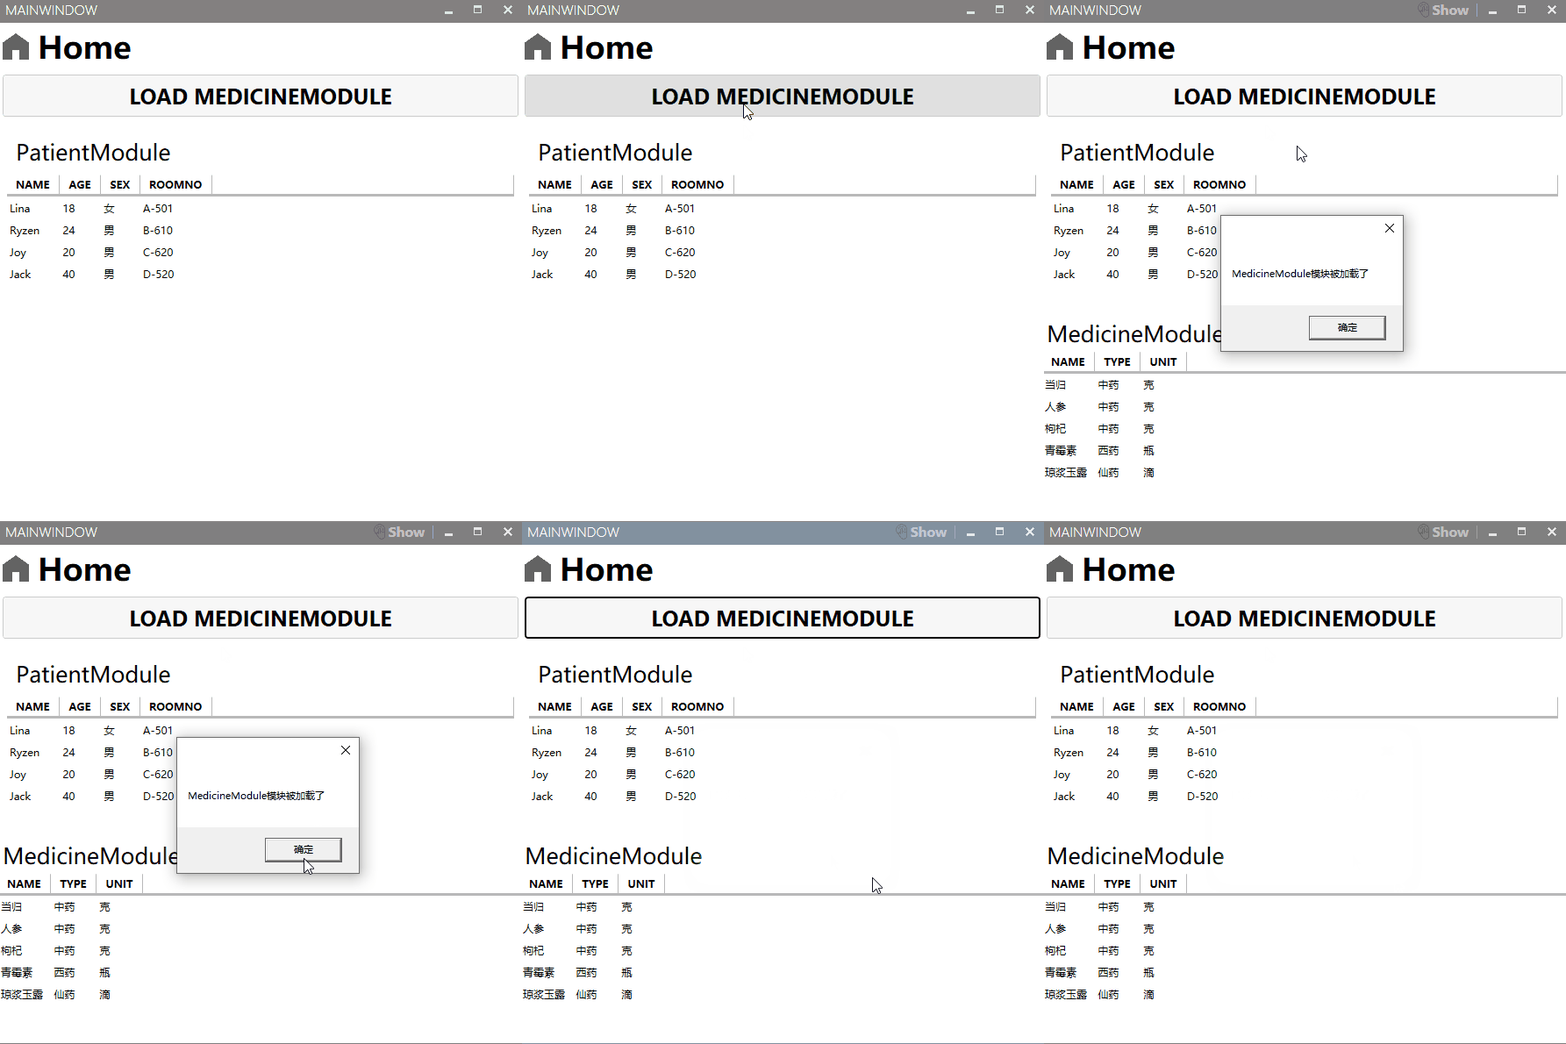
4. 初始化模組
載入模組後,模組就會進行初始化,我們以 MedicineModule 為例子,先來看看程式碼:
public class MedicineModule : IModule
 {
     public void OnInitialized(IContainerProvider containerProvider)
     {
         var regionManager = containerProvider.Resolve<IRegionManager>();


         //MedicineMainContent
         regionManager.RegisterViewWithRegion(RegionNames.MedicineMainContentRegion, typeof(MedicineMainContent));

         //SearchMedicine-Flyout
         regionManager.RegisterViewWithRegion(RegionNames.FlyoutRegion, typeof(SearchMedicine));

         //rightWindowCommandsRegion
         regionManager.RegisterViewWithRegion(RegionNames.ShowSearchPatientRegion, typeof(ShowSearchPatient));
        }

     public void RegisterTypes(IContainerRegistry containerRegistry)
     {

     }
 }
其中,IModule 介面定義了兩個函式 OnInitialized 和 RegisterTypes,其中初始化順序是 RegisterTypes->OnInitialized,也就是 RegisterTypes 函式會先於 OnInitialized 函式。雖然這裡我沒在 RegisterTypes 寫程式碼,但是這裡可以透過依賴注入到容器,給 MedicineModule 模組使用的。而 OnInitialized 我們通常會註冊模組檢視,或者訂閱應用程式層級的事件和服務,這裡我是將三個 View 分別分區域註冊模組檢視。
最後,其實一開始我們看到 Demo 示範,點擊病人列表,出來的病人詳細頁是沒有資料的,這涉及到視窗之間的通訊。病人列表和病人詳細頁屬於同一模組,這很好辦。如何我要將搜尋到的藥物加到當前病人詳細頁的藥物列表裡面,這就涉及到不同模組視窗之間的通訊,處理不好是會造成模組之間的強耦合。下篇我們會講到如何使用事件聚合器來實現同一模組不同視窗的通訊和不同模組不同視窗的通訊,而完整的 Demo 也會在下一篇放出。