一、需求分析與方案設計
背景問題
在車水馬龍的現代都市,停車難題如影隨形,移車也成為廣大車主們日常面臨的困擾之一。過去,為了方便他人聯絡移車,大家常常會在車內顯眼位置放置寫有電話號碼的紙條,或是擺放刻有手機號碼的移車擺件。這種傳統方式看似簡單直接,卻藏著不少隱患。
首先是隱私洩露問題,如今個人資訊安全至關重要,在公共場所隨意暴露電話號碼,就如同將自己的隱私大門敞開。不法分子會利用這些資訊進行惡意騷擾,推銷電話、詐騙簡訊接踵而至,讓人不堪其擾。曾經就有新聞報導,某些「抄號族」穿梭於停車場,專門收集移車電話,再將這些資訊批量出售給行銷公司或詐騙集團,導致車主們的生活被各種垃圾資訊充斥。
除了隱私洩露,移車號碼被濫用的情況也屢見不鮮。有時明明只是臨時停車一小會兒,卻頻繁接到移車電話,甚至還有人在非緊急情況下隨意撥打,耽誤車主時間。更嚴重的是,有心懷不軌之人可能利用移車電話實施詐騙,以車輛違規、事故等虛假理由,誘導車主點擊連結或轉帳,致使車主遭受財產損失。
解決方案
為了解決上述問題,我們開發了一個簡單實用的移車 QR 碼生成工具,實現以下功能:
- 快速生成包含車主聯絡方式的 QR 碼
- 透過掃碼即可一鍵撥打車主電話
- 支援自訂移車提示文字
- 手機號碼經過加密處理,保護車主隱私
- 提供離線桌面版和線上網頁版兩種使用方式
與傳統的直接展示電話號碼不同,我們的移車 QR 碼工具採用了加密技術,確保車主的手機號碼不會直接暴露。同時,透過掃碼跳轉專門的移車頁面,不僅提升了使用體驗,也降低了號碼被濫用的風險。本文將詳細介紹這兩種實現方式:基於 C# 和 Avalonia 的桌面應用版本,以及基於 Blazor 前端和 .NET Web API 的線上網頁版本。
效果如下,微信掃碼彈出詳細頁面:
 |
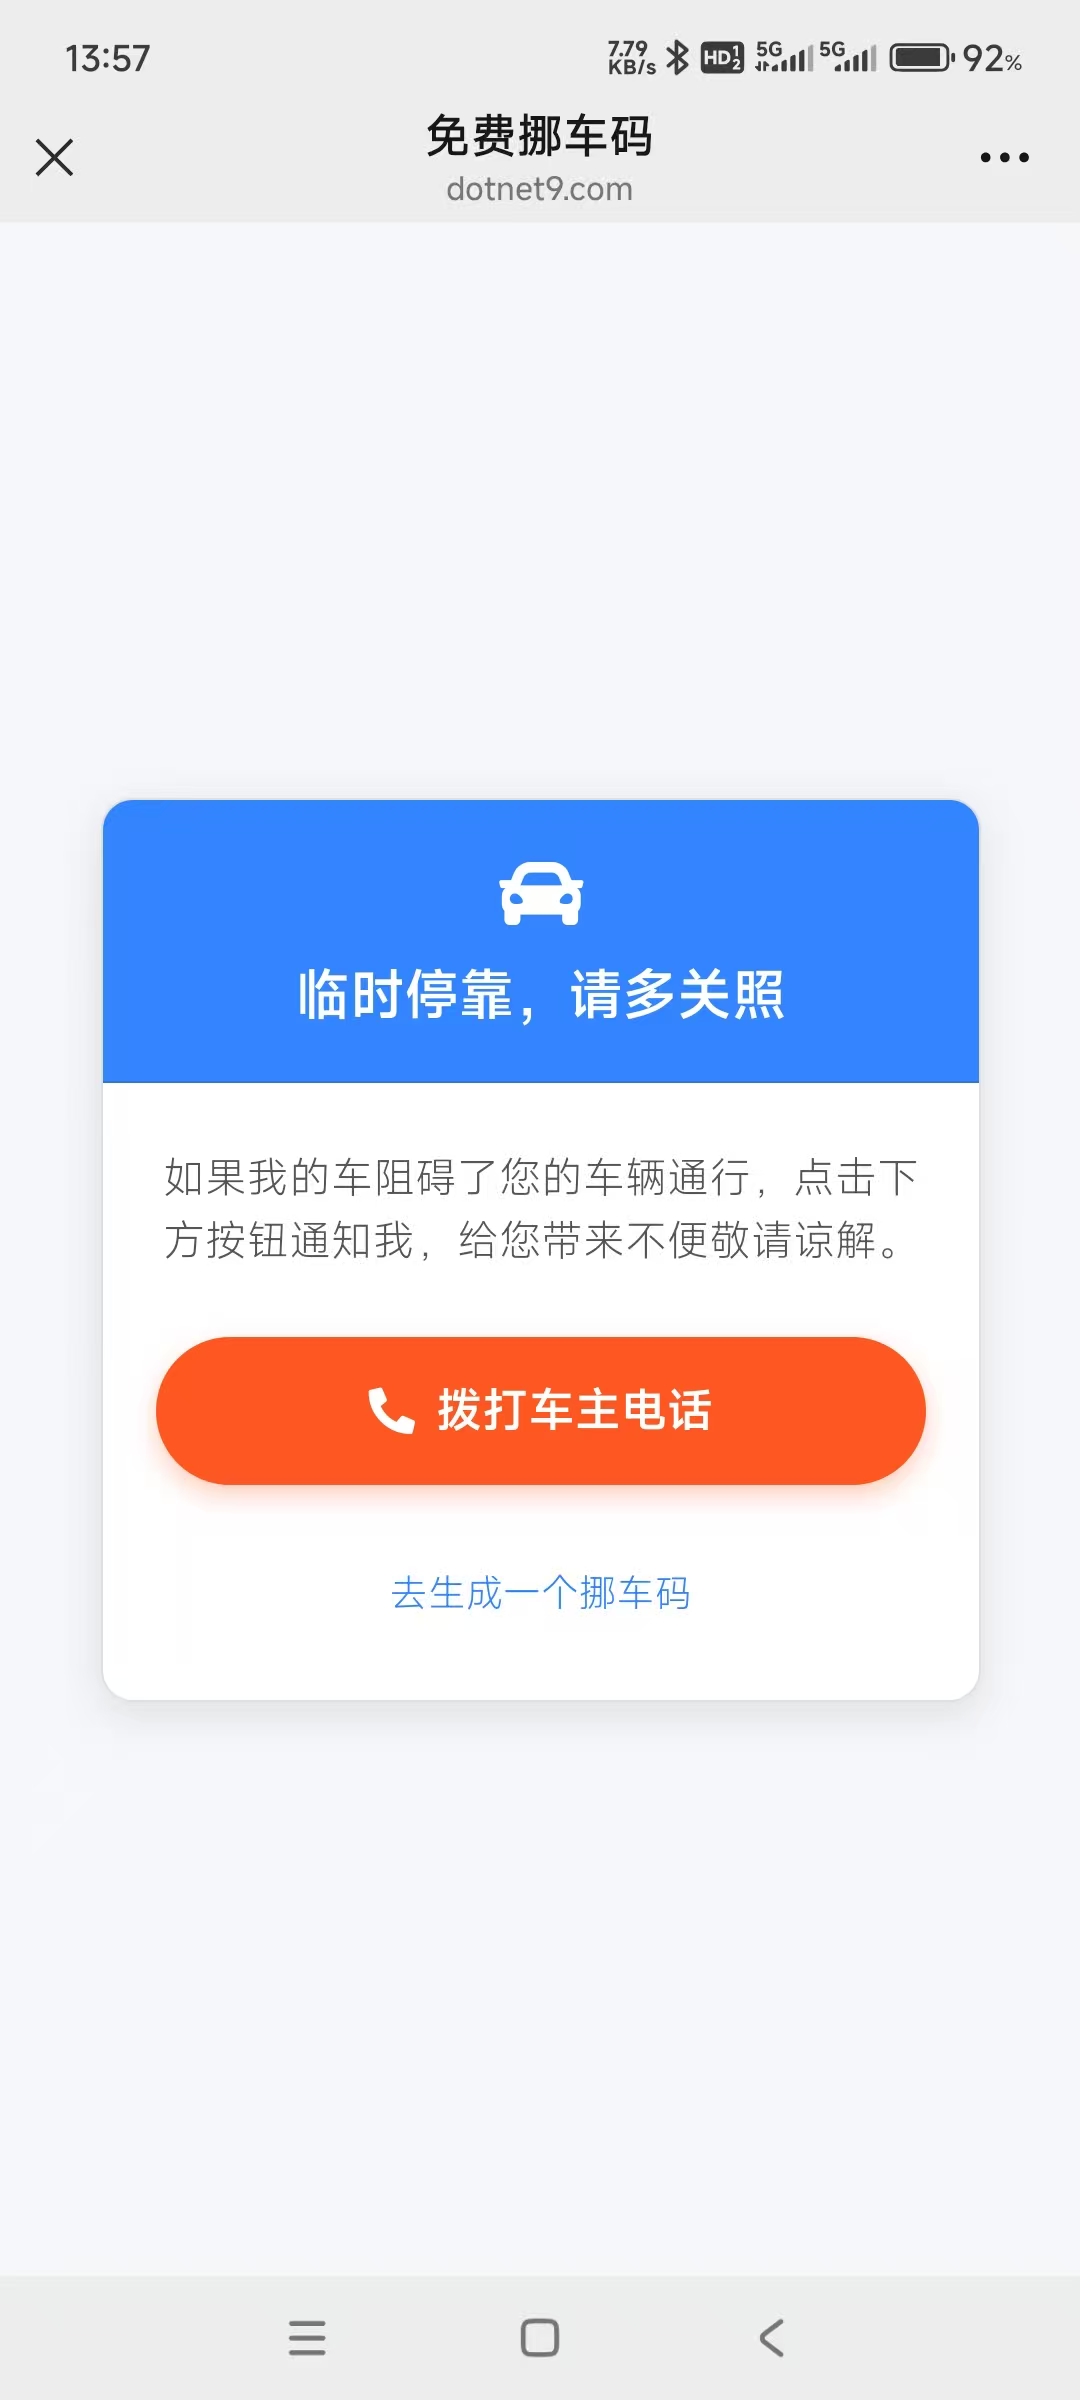 |
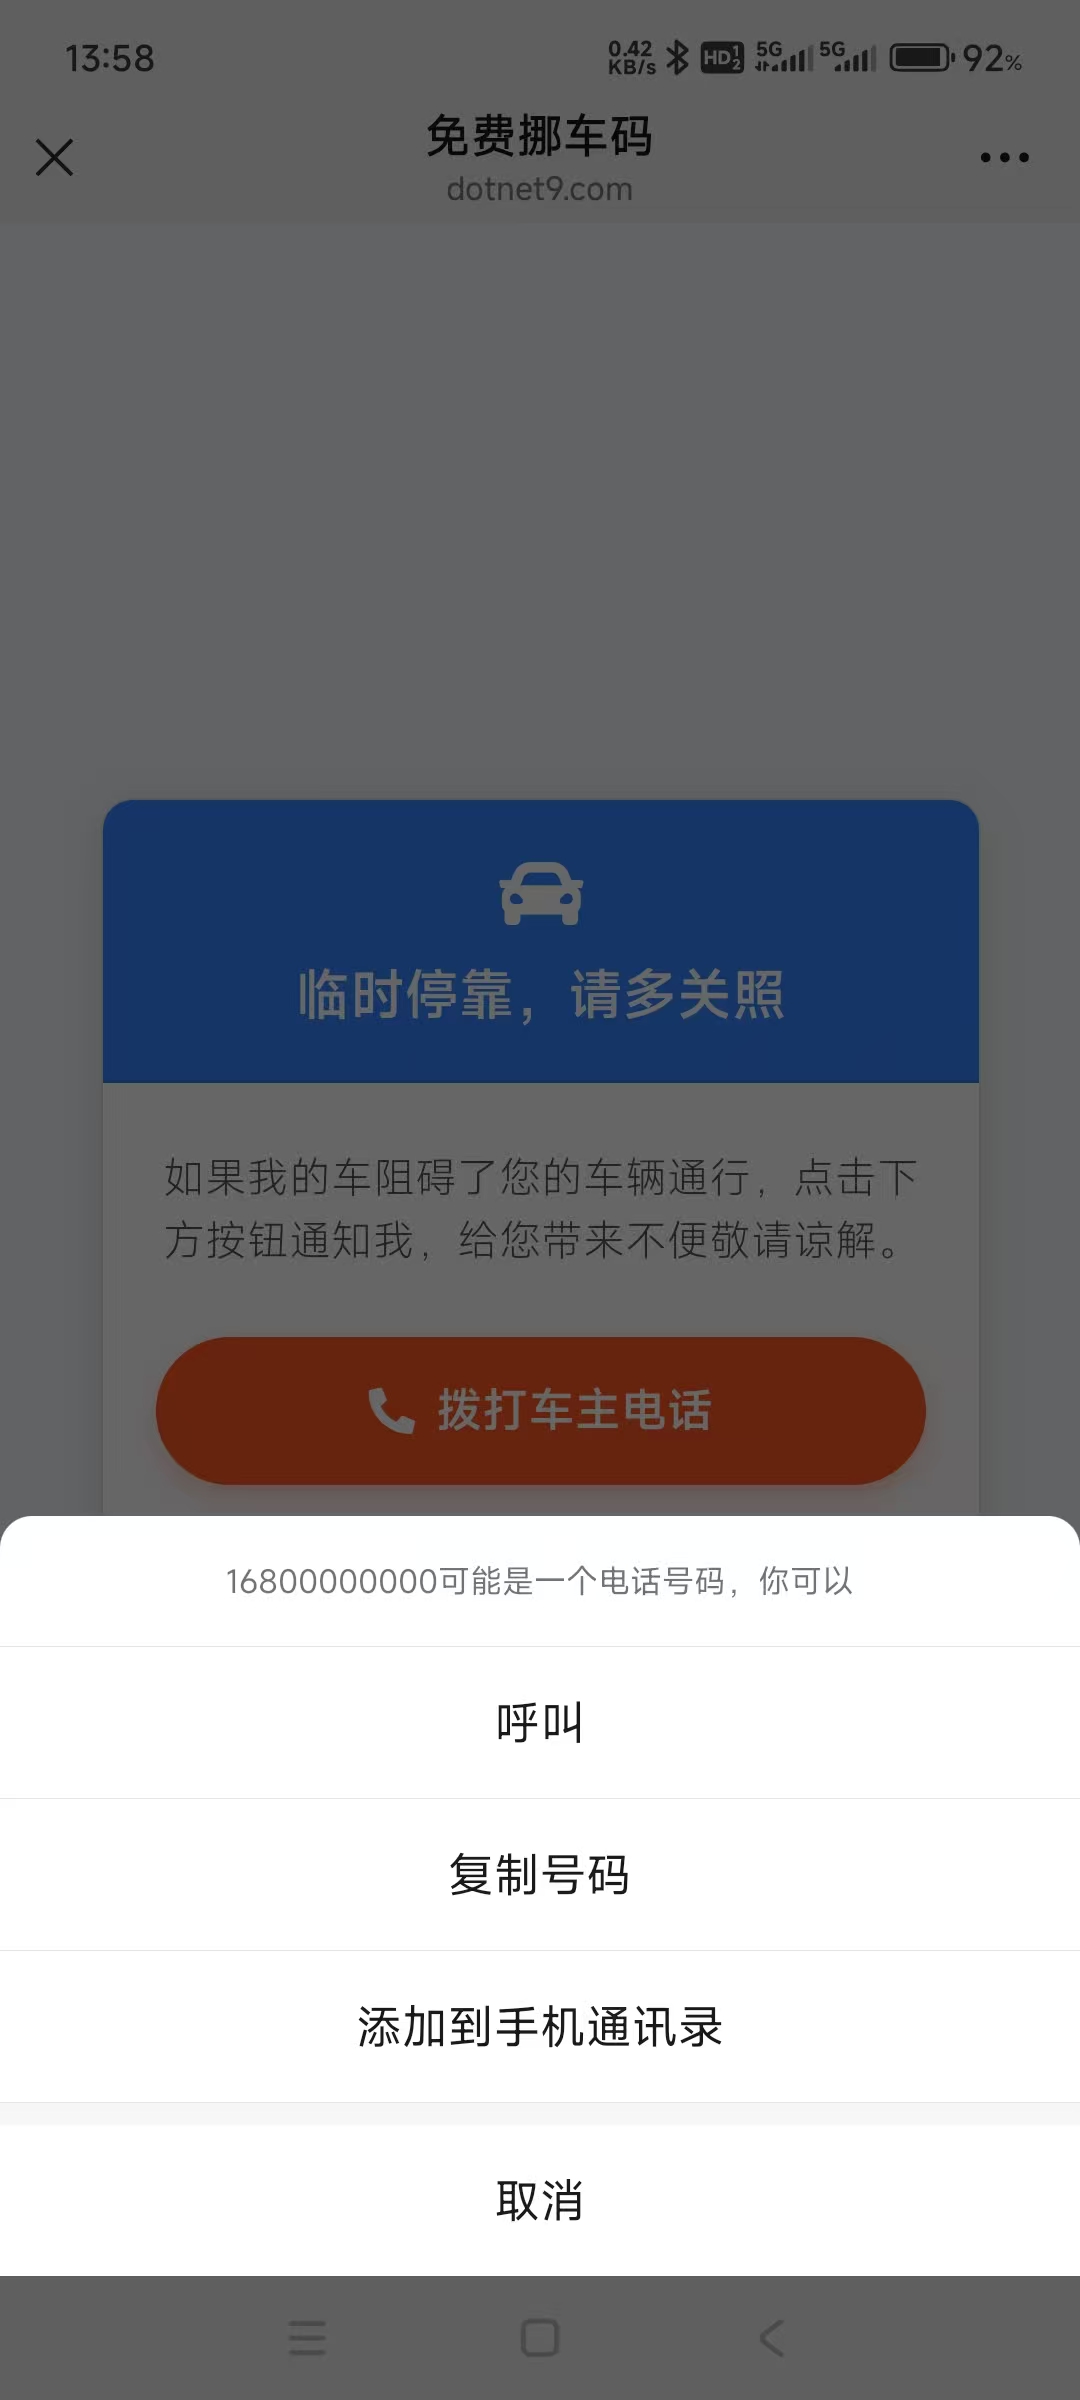
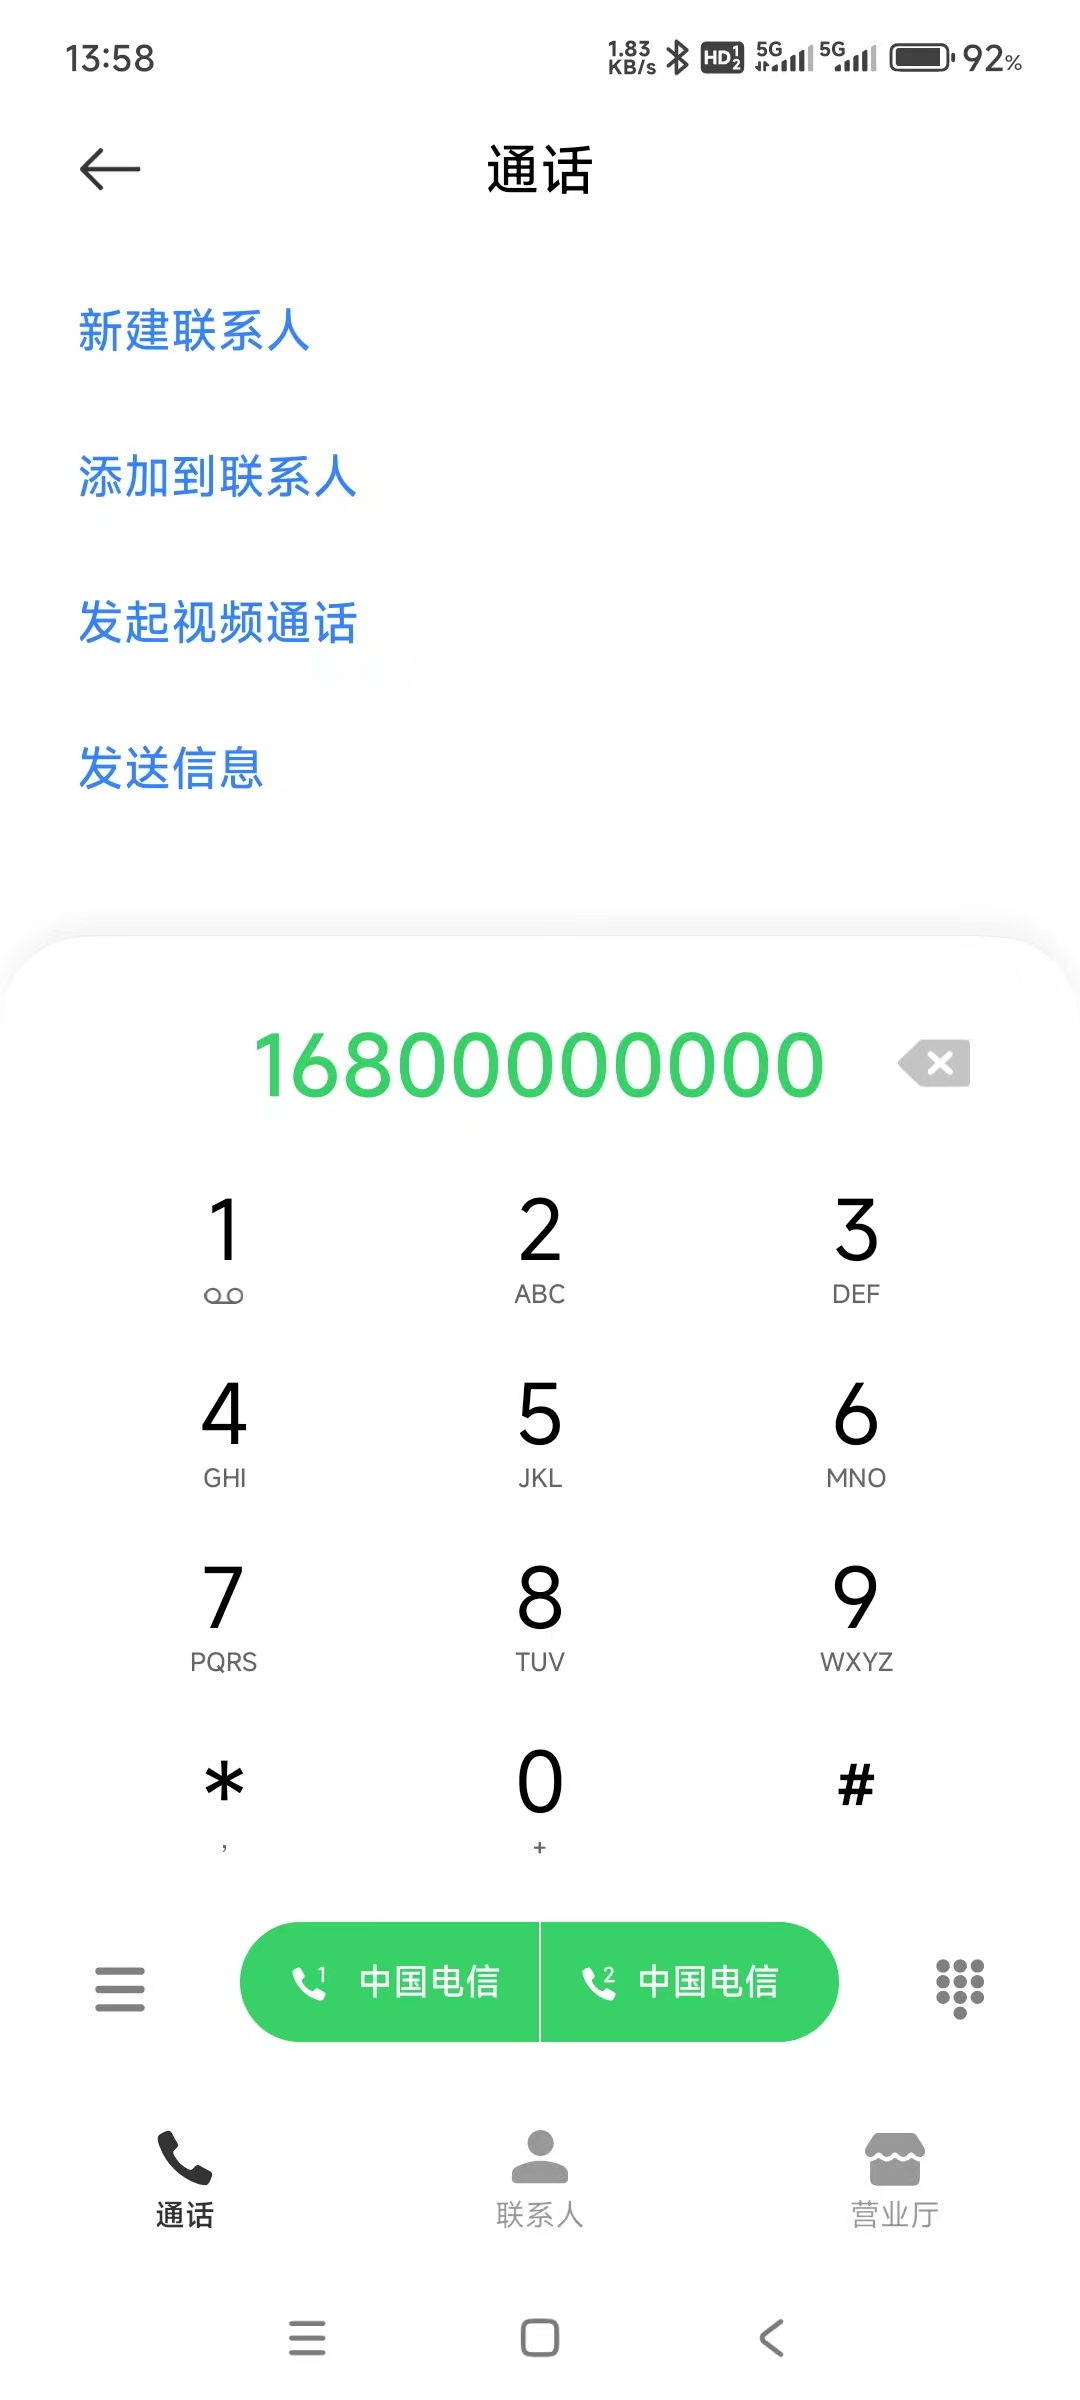
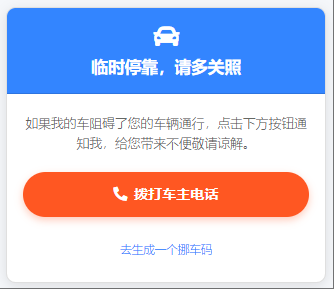
在詳細頁面,可點擊撥打車主電話或點擊綠色超連結去生成一個移車碼:
|
 |
 |
二、核心 QR 碼生成程式碼
首先,讓我們看一下核心的 QR 碼生成邏輯。這部分程式碼封裝在 CodeWF.Tools 專案的 QrCodeGenerator 類別中:
using ImageMagick;
using ImageMagick.Drawing;
using ZXing;
using ZXing.QrCode;

namespace CodeWF.Tools.Image;

public static class QrCodeGenerator
{
    public static void GenerateQrCode(string title, string content, string imagePath, string? subTitle = "")
    {
        var qrCodeWriter = new BarcodeWriterPixelData
        {
            Format = BarcodeFormat.QR_CODE,
            Options = new QrCodeEncodingOptions
            {
                Width = 400,
                Height = 400,
                Margin = 1,
                ErrorCorrection = ZXing.QrCode.Internal.ErrorCorrectionLevel.H,
                CharacterSet = "UTF-8",
                DisableECI = true
            }
        };

        var pixelData = qrCodeWriter.Write(content);

        using var qrCodeImage = new MagickImage();
        var settings = new PixelReadSettings((uint)pixelData.Width, (uint)pixelData.Height, StorageType.Char, PixelMapping.RGBA);
        qrCodeImage.ReadPixels(pixelData.Pixels, settings);

        var backgroundHeight = string.IsNullOrWhiteSpace(subTitle) ? 600u : 630u;
        using var background = new MagickImage(MagickColors.White, 500, backgroundHeight);

        background.BorderColor = new MagickColor("#2888E2");
        background.Border(8);

        var titleText = new Drawables()
            .Font("SimHei")
            .FontPointSize(95)
            .FillColor(new MagickColor("#FF5722"))
            .TextAlignment(TextAlignment.Center)
            .Text(250, 120, title);
        background.Draw(titleText);

        background.Composite(qrCodeImage, 50, 170, CompositeOperator.Over);

        if (!string.IsNullOrWhiteSpace(subTitle))
        {
            var subTitleText = new Drawables()
                .Font("SimHei")
                .FontPointSize(20)
                .FillColor(new MagickColor("#333333"))
                .TextAlignment(TextAlignment.Center)
                .Text(250, 600, subTitle);
            background.Draw(subTitleText);
        }

        //using var logo = new MagickImage("logo.png");
        //logo.Resize(100, 100);
        //background.Composite(logo, 250, 250, CompositeOperator.Over);

        background.Quality = 100;
        background.Write(imagePath);
    }
}
上面程式碼使用了 NuGet 套件:ZXing.Net.Bindings.Magick。ZXing.NET 用於生成 QR 碼矩陣資料,而 Magick.NET 則用於影像處理和合成,實現了以下功能:
- 建立高品質的 QR 碼,設定了較高的糾錯等級(H 等級),即使 QR 碼部分被遮擋也能正常識別
- 生成一個白底藍邊的背景圖片
- 在頂部加入自訂的標題文字
- 將 QR 碼影像合成到背景上
- 在 QR 碼底部可加入自訂的小標題文字
- 儲存為高品質 PNG 影像
這種設計讓最終生成的移車 QR 碼既美觀又實用。
三、離線桌面版實現
1. 使用者介面設計
使用 Avalonia 框架設計使用者介面,介面定義在 NuoCheView.axaml 檔案中:
<UserControl xmlns="https://github.com/avaloniaui"
             xmlns:x="http://schemas.microsoft.com/winfx/2006/xaml"
             xmlns:d="http://schemas.microsoft.com/expression/blend/2008"
             xmlns:mc="http://schemas.openxmlformats.org/markup-compatibility/2006"
             xmlns:vm="clr-namespace:CodeWF.Modules.Converter.ViewModels"
             xmlns:prism="http://prismlibrary.com/"
             xmlns:u="https://irihi.tech/ursa"
             xmlns:i18n="https://codewf.com"
             xmlns:language="clr-namespace:Localization"
             prism:ViewModelLocator.AutoWireViewModel="True"
             x:CompileBindings="True"
             x:DataType="vm:NuoCheViewModel"
             d:DesignHeight="450"
             d:DesignWidth="800"
             x:Class="CodeWF.Modules.Converter.Views.NuoCheView"
             mc:Ignorable="d">
    <StackPanel Margin="10" HorizontalAlignment="Center">
        <u:Form LabelPosition="Left" LabelWidth="*">
            <TextBox Width="300" u:FormItem.Label="{i18n:I18n {x:Static language:NuoCheView.InputPhoneNumber}}"
                     u:FormItem.IsRequired="True" Text="{Binding PhoneNumber}" />
            <TextBox Width="300" u:FormItem.Label="{i18n:I18n {x:Static language:NuoCheView.InputTitle}}"
                     u:FormItem.IsRequired="True" Text="{Binding InputTitle}" />
            <StackPanel Orientation="Horizontal" u:FormItem.Label="{i18n:I18n {x:Static language:NuoCheView.EnableSubTitle}}">
                <CheckBox IsChecked="{Binding EnableSubTitle}" Command="{Binding EnableSubTitleHandler}" VerticalAlignment="Center" Content="顯示" Margin="5 0" />
                <TextBox Width="300" Text="{Binding SubTitle}" IsEnabled="{Binding EnableSubTitle}" VerticalAlignment="Center" />
            </StackPanel>
        </u:Form>

        <StackPanel Orientation="Horizontal" Spacing="10" Margin="0,0,0,10">
            <Button Content="{i18n:I18n {x:Static language:NuoCheView.CreateButtonContent}}"
                    Command="{Binding GenerateQrCode}" />
            <Button Content="{i18n:I18n {x:Static language:NuoCheView.SaveQrCodeFileTitle}}"
                    Command="{Binding SaveQrCode}" />
            <HyperlinkButton Content="{i18n:I18n {x:Static language:NuoCheView.PreviewNuoCheUrl}}"
                             NavigateUri="{Binding GeneratedUrl}" Classes="WithIcon Underline"
                             VerticalAlignment="Center" />
        </StackPanel>

        <Image Source="{Binding QrCodeImage}" Width="340" Height="340" DragDrop.AllowDrop="True">
            <Interaction.Behaviors>
                <EventTriggerBehavior EventName="PointerPressed">
                    <InvokeCommandAction Command="{Binding RaisePointerPressed}" PassEventArgsToCommand="True" />
                </EventTriggerBehavior>
            </Interaction.Behaviors>
        </Image>
    </StackPanel>
</UserControl>
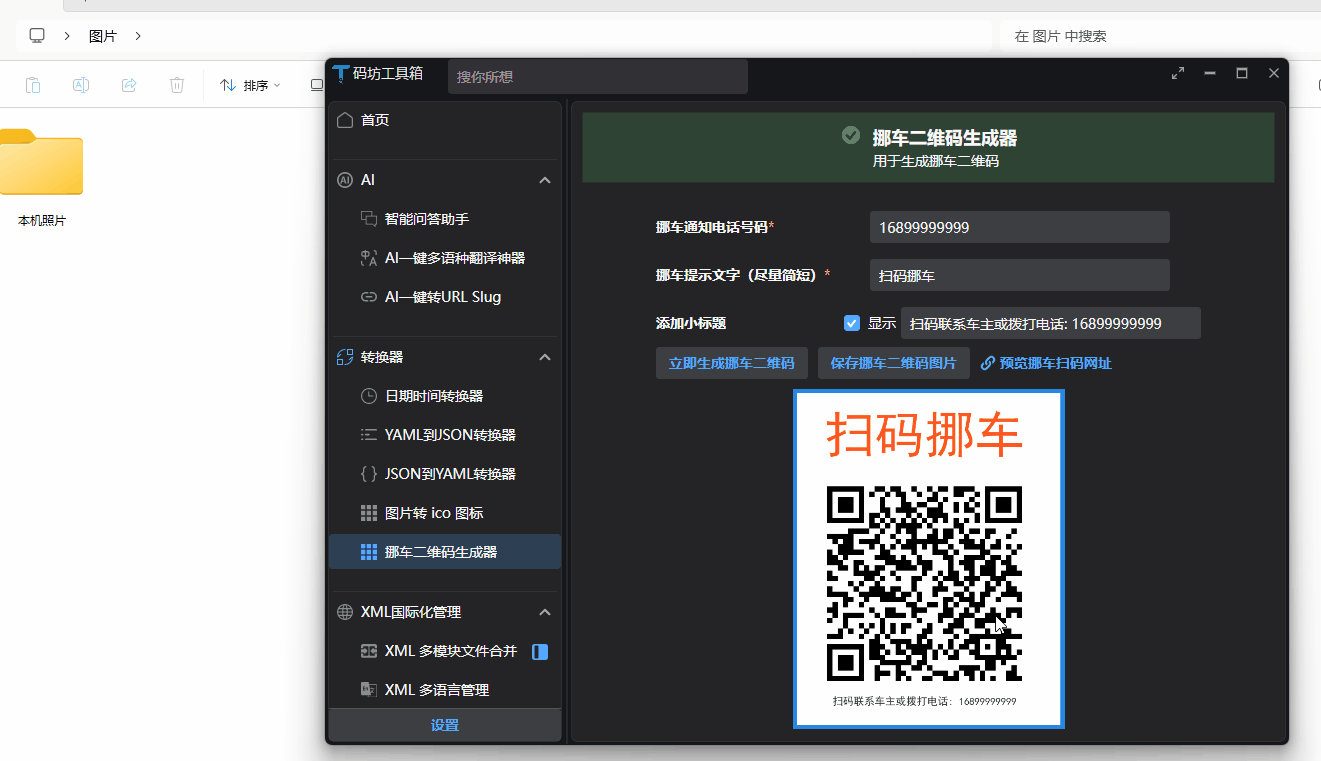
介面佈局簡潔明瞭,主要包括:
- 三個輸入框:手機號碼和 QR 碼標題、可選 QR 碼小標題
- 三個操作按鈕:生成 QR 碼、儲存 QR 碼和預覽移車頁面
- 一個影像顯示區域:展示生成的 QR 碼,並支援拖拽操作
實現效果如下:
2. 檢視模型實現
在 NuoCheViewModel.cs 中實現業務邏輯:
using Avalonia.Input;
using Avalonia.Media.Imaging;
using Avalonia.Platform.Storage;
using AvaloniaXmlTranslator;
using CodeWF.Core.IServices;
using CodeWF.LogViewer.Avalonia;
using CodeWF.Tools.Image;
using HashidsNet;
using ReactiveUI;

namespace CodeWF.Modules.Converter.ViewModels;

public class NuoCheViewModel : ReactiveObject
{
    private readonly INotificationService _notificationService;
    private readonly IFileChooserService _fileChooserService;
    private string _inputTitle;
    private long _phoneNumber;
    private Bitmap? _qrCodeImage;
    private string _qrCodeImagePath;
    private string _generatedUrl;
    private string _subTitle;
    private bool _enableSubTitle;

    public NuoCheViewModel(INotificationService notificationService, IFileChooserService fileChooserService)
    {
        _notificationService = notificationService;
        _fileChooserService = fileChooserService;

        InputTitle = I18nManager.Instance.GetResource(Localization.NuoCheView.DefaultInputTitle);
        PhoneNumber = 16899999999;
        SubTitle = $"{I18nManager.Instance.GetResource(Localization.NuoCheView.DefaultSubTitlePrefix)}: {PhoneNumber}";
        EnableSubTitle = false;
    }

    public string InputTitle
    {
        get => _inputTitle;
        set => this.RaiseAndSetIfChanged(ref _inputTitle, value);
    }

    public long PhoneNumber
    {
        get => _phoneNumber;
        set => this.RaiseAndSetIfChanged(ref _phoneNumber, value);
    }

    public Bitmap? QrCodeImage
    {
        get => _qrCodeImage;
        private set => this.RaiseAndSetIfChanged(ref _qrCodeImage, value);
    }

    public string QrCodeImagePath
    {
        get => _qrCodeImagePath;
        private set => this.RaiseAndSetIfChanged(ref _qrCodeImagePath, value);
    }

    public string GeneratedUrl
    {
        get => _generatedUrl;
        private set => this.RaiseAndSetIfChanged(ref _generatedUrl, value);
    }

    public string SubTitle
    {
        get => _subTitle;
        set => this.RaiseAndSetIfChanged(ref _subTitle, value);
    }

    public bool EnableSubTitle
    {
        get => _enableSubTitle;
        set => this.RaiseAndSetIfChanged(ref _enableSubTitle, value);
    }

    public void EnableSubTitleHandler()
    {
        SubTitle = $"{I18nManager.Instance.GetResource(Localization.NuoCheView.DefaultSubTitlePrefix)}: {PhoneNumber}";
    }

    public void GenerateQrCode()
    {
        if (string.IsNullOrWhiteSpace(InputTitle))
        {
            _notificationService.Show(I18nManager.Instance.GetResource(Localization.NuoCheView.Title),
                I18nManager.Instance.GetResource(Localization.NuoCheView.NeedInputTip));
            return;
        }

        try
        {
            var encodedPhone = new Hashids("codewf").EncodeLong(PhoneNumber);

            GeneratedUrl =
                $"https://codewf.com/nuoche?p={encodedPhone}";
            QrCodeImagePath = Path.Combine(Path.GetTempPath(), "nuoche.png");

            QrCodeGenerator.GenerateQrCode(InputTitle, GeneratedUrl, QrCodeImagePath,
                EnableSubTitle ? SubTitle : null);

            QrCodeImage = new Bitmap(QrCodeImagePath);
        }
        catch (Exception ex)
        {
            Logger.Error(I18nManager.Instance.GetResource(Localization.NuoCheView.CreateErrorMessage), ex);
            _notificationService.Show(I18nManager.Instance.GetResource(Localization.NuoCheView.Title),
                $"{I18nManager.Instance.GetResource(Localization.NuoCheView.CreateErrorMessage)}: {ex}");
        }
    }


    public async Task SaveQrCode()
    {
        if (QrCodeImage == null || string.IsNullOrEmpty(QrCodeImagePath))
        {
            _notificationService.Show(I18nManager.Instance.GetResource(Localization.NuoCheView.SaveNotificationTitle),
                I18nManager.Instance.GetResource(Localization.NuoCheView.SaveNoQrCodeMessage));
            return;
        }

        try
        {
            var file = await _fileChooserService.SaveFileAsync(
                I18nManager.Instance.GetResource(Localization.NuoCheView.SaveQrCodeFileTitle),
                new[]
                {
                    new FilePickerFileType(
                        I18nManager.Instance.GetResource(Localization.NuoCheView.SaveQrCodeFileFormat))
                    {
                        Patterns = new[] { "*.png" }
                    }
                }
            );

            if (file != null)
            {
                File.Copy(QrCodeImagePath, file, true);
                _notificationService.Show(
                    I18nManager.Instance.GetResource(Localization.NuoCheView.SaveQrCodeSuccessTitle),
                    I18nManager.Instance.GetResource(Localization.NuoCheView.SaveQrCodeSuccessMessage));
            }
        }
        catch (Exception ex)
        {
            _notificationService.Show(I18nManager.Instance.GetResource(Localization.NuoCheView.SaveNotificationTitle),
                $"{I18nManager.Instance.GetResource(Localization.NuoCheView.SaveQrCodeErrorMessage)}: {ex.Message}");
        }
    }

    public async Task RaisePointerPressed(PointerPressedEventArgs e)
    {
        if (string.IsNullOrWhiteSpace(QrCodeImagePath) || !File.Exists(QrCodeImagePath))
        {
            return;
        }

        var dragData = new DataObject();
        if (await _fileChooserService.StorageProvider.TryGetFileFromPathAsync(QrCodeImagePath) is { } storageFile)
        {
            dragData.Set(DataFormats.Files, new[] { storageFile });
        }

        await DragDrop.DoDragDrop(e, dragData, DragDropEffects.Copy);
    }
}
檢視模型實現了以下功能:
- 資料繫結:管理使用者輸入和 UI 狀態
- QR 碼生成:呼叫核心生成邏輯並顯示結果
- 檔案儲存:將生成的 QR 碼儲存到使用者指定位置
- 拖拽支援:允許使用者直接拖拽 QR 碼影像到其他應用
- 錯誤處理:提供友善的錯誤提示
值得一提的是,我們使用了 Hashids 庫對手機號碼進行編碼,提高了隱私保護。這樣,即使 QR 碼被公開展示,他人也無法直接獲取車主的真實手機號碼(當然最後一步進入撥號介面時會顯示真實手機號碼,這裡可考慮使用虛擬號碼屏蔽真實手機號碼)。
拖拽儲存移車 QR 碼效果:
四、線上網頁版實現
除了桌面應用版本外,我們還開發了一個基於 Blazor 的線上移車 QR 碼生成工具,方便使用者無需安裝軟體即可使用。
線上存取位址:https://dotnet9.com/nuoche
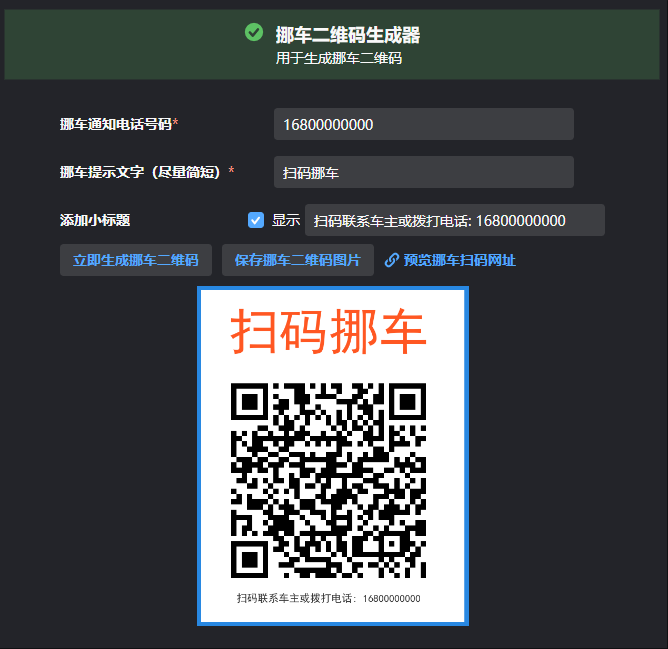
PC 端建立移車碼:
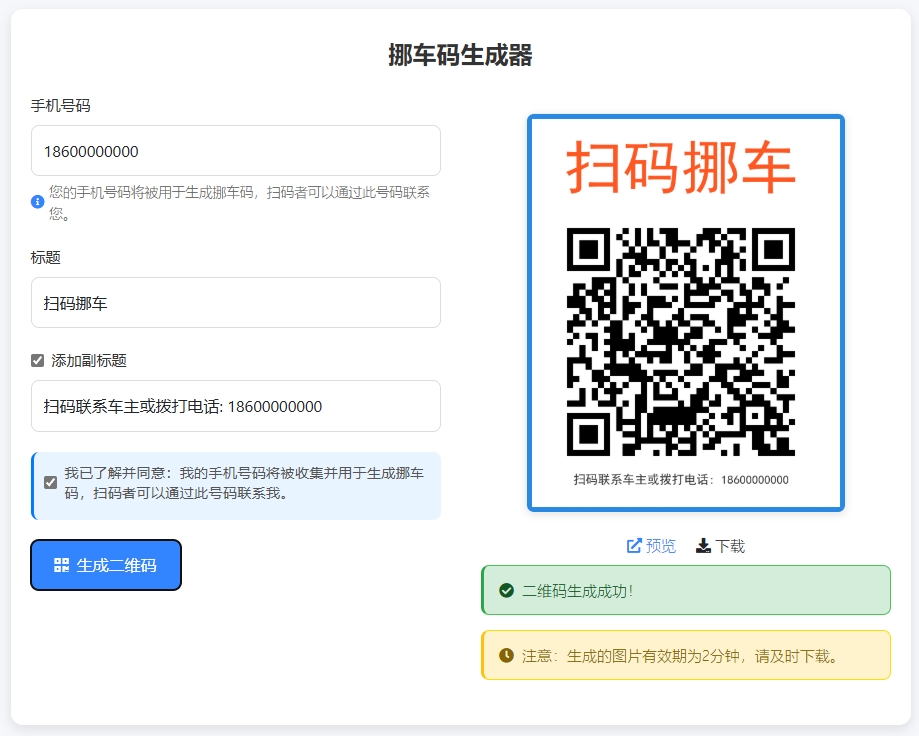
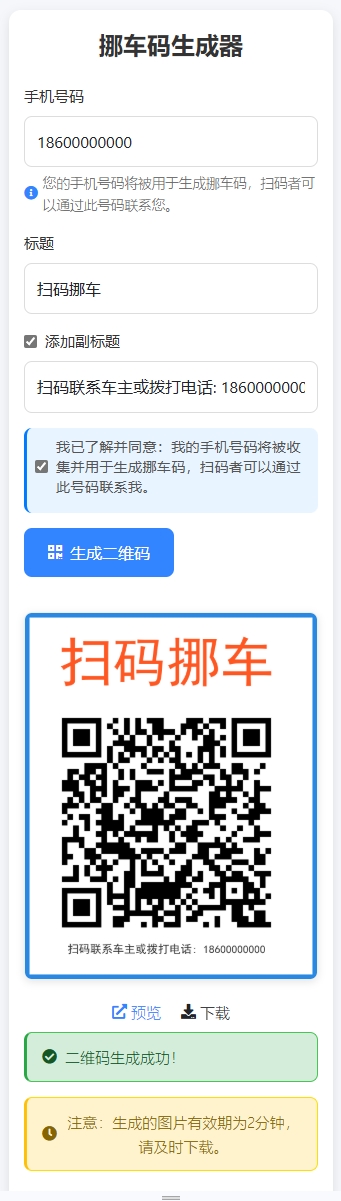
手機端建立移車碼:
1. 線上生成移車碼特點
與桌面版相比,線上版本有以下特點:
- 無需安裝:直接透過瀏覽器存取使用
- 雙向功能:既可以生成 QR 碼,也可以直接存取解析後的移車頁面
- 行動端友善:最佳化了行動裝置上的顯示和互動體驗
- 優雅的 UI 設計:使用現代化的 UI 元件和互動效果
2. 實現方式
線上版本使用 Blazor 實現,核心程式碼結構如下:
@page "/NuoChe"
@using HashidsNet
@inject IOptions<SiteOption> SiteOption
@layout EmptyLayout

@code {
    [SupplyParameterFromQuery]
    public string? P { get; set; }

    public const string Slug = "nuoche";

    private long? _decodePhone;

    protected override void OnInitialized()
    {
        base.OnInitialized();
        if (!string.IsNullOrWhiteSpace(P))
        {
            _decodePhone = new Hashids("codewf").DecodeLong(P)[0];
        }
    }
}

<PageTitle>免費移車碼</PageTitle>

<div class="nuoche-container">
    @if (string.IsNullOrWhiteSpace(P))
    {
        <div class="generator-container">
            <h1 class="generator-title">移車碼線上產生器</h1>
            <div class="input-group">
                <label for="phoneNumber">手機號碼</label>
                <input type="tel" id="phoneNumber" placeholder="請輸入手機號碼" />
            </div>
            <div class="input-group">
                <label for="title">標題</label>
                <input type="text" id="title" placeholder="掃碼移車" value="掃碼移車" />
            </div>
            <div class="input-group">
                <div class="checkbox-container">
                    <input type="checkbox" id="enableSubtitle" />
                    <label for="enableSubtitle">加入小標題</label>
                </div>
                <input type="text" id="subtitle" placeholder="掃碼聯絡車主或撥打電話: 16800000000" disabled />
            </div>
            <div class="button-group">
                <button class="primary-button" onclick="generateQrCode()">
                    <i class="fas fa-qrcode"></i> 產生 QR 碼
                </button>
            </div>
            <div class="qr-code-container" style="display: none">
                <img alt="移車碼" />
                <div class="action-buttons">
                    <a target="_blank" class="preview-link">
                        <i class="fas fa-external-link-alt"></i> 預覽
                    </a>
                    <a class="download-link">
                        <i class="fas fa-download"></i> 下載
                    </a>
                </div>
                <div class="alert alert-warning mt-2">
                    <i class="fas fa-clock"></i> 請注意:產生的檔案僅保留 2 分鐘,請及時下載。
                </div>
            </div>
        </div>
    }
    else
    {
        <div class="card">
            <div class="card-header">
                <i class="fas fa-car"></i>
                <h1 class="title">臨時停靠,請多關照</h1>
            </div>
            <div class="card-body">
                <p class="description">如果我的車阻礙了您的車輛通行,點擊下方按鈕通知我,給您帶來不便敬請諒解。</p>
                <a class="phone-button" href="tel:@_decodePhone">
                    <i class="fas fa-phone-alt"></i> 撥打車主電話
                </a>
                <a class="generate-link" href="/nuoche">去生成一個移車碼</a>
            </div>
        </div>
    }
</div>
該實現有兩個主要功能頁面:
- 生成頁面:當使用者直接存取 /nuoche 時,顯示 QR 碼生成介面,允許輸入手機號碼和標題
- 移車頁面:當使用者透過 QR 碼掃描存取(帶有 p 參數)時,顯示一鍵撥打車主電話的介面
透過這種設計,我們實現了 QR 碼的完整生命週期:生成、掃描、聯絡,為使用者提供了便捷的移車解決方案。
前面截圖掃碼後顯示詳細資訊頁面:
3. 線上版本核心 JavaScript 互動
async function generateQrCode() {
    const title = document.getElementById('title').value;
    const phoneNumber = document.getElementById('phoneNumber').value;
    const enableSubtitle = document.getElementById('enableSubtitle').checked;
    let subtitle = null;

    if (enableSubtitle) {
        subtitle = document.getElementById('subtitle').value.trim();
        if (!subtitle) {
            subtitle = `掃碼聯絡車主或撥打電話: ${phoneNumber || "16800000000"}`;
            document.getElementById('subtitle').value = subtitle;
        }
    }

    if (!title || !phoneNumber) {
        alert('請輸入標題和手機號碼');
        return;
    }

    try {
        const response = await fetch('/api/Image/nuoche', {
            method: 'POST',
            headers: {
                'Content-Type': 'application/json',
            },
            body: JSON.stringify({
                title: title,
                phoneNumber: phoneNumber,
                subtitle: subtitle
            })
        });

        const data = await response.json();
        if (data.success) {
            const qrCodeContainer = document.querySelector('.qr-code-container');
            const img = qrCodeContainer.querySelector('img');
            img.src = data.qrCodeUrl;
            qrCodeContainer.querySelector('.preview-link').href = data.generatedUrl;

            // 加入下載功能
            const downloadLink = qrCodeContainer.querySelector('.download-link');
            downloadLink.onclick = () => {
                const a = document.createElement('a');
                a.href = data.qrCodeUrl;
                a.download = '移車碼.png';
                document.body.appendChild(a);
                a.click();
                document.body.removeChild(a);
            };

            qrCodeContainer.style.display = 'block';
        } else {
            throw new Error(data.message);
        }
    } catch (error) {
        console.error('產生 QR 碼失敗:', error);
        alert('產生 QR 碼失敗,請稍後重試');
    }
}

// 加入小標題核取方塊的事件處理
document.addEventListener('DOMContentLoaded', function() {
    const enableSubtitleCheckbox = document.getElementById('enableSubtitle');
    const subtitleInput = document.getElementById('subtitle');
    const phoneInput = document.getElementById('phoneNumber');

    if (enableSubtitleCheckbox && subtitleInput) {
        enableSubtitleCheckbox.addEventListener('change', function() {
            subtitleInput.disabled = !this.checked;
            if (this.checked) {
                if (!subtitleInput.value.trim()) {
                    const phoneNumber = phoneInput.value.trim() || "16800000000";
                    subtitleInput.value = `掃碼聯絡車主或撥打電話: ${phoneNumber}`;
                }
                subtitleInput.focus();
            }
        });

        // 當手機號碼變化時,如果小標題已啟用且使用的是預設格式,則更新小標題中的電話號碼
        phoneInput.addEventListener('input', function() {
            if (enableSubtitleCheckbox.checked && subtitleInput.value.startsWith('掃碼聯絡車主或撥打電話:')) {
                const phoneNumber = this.value.trim() || "16800000000";
                subtitleInput.value = `掃碼聯絡車主或撥打電話: ${phoneNumber}`;
            }
        });
    }
});
線上版本的後端 API 實現與離線版類似,都是使用相同的核心 QR 碼生成邏輯,但增加了檔案上傳處理、臨時儲存和清理等功能,這裡不再細述,線上版原始碼戳這,移車 QR 碼介面定義如下:
[HttpPost("nuoche")]
[AllowAnonymous]
public async Task<IActionResult> NuoCheAsync([FromBody] NuoCheRequest request,
    [FromServices] IWebHostEnvironment env,
    [FromServices] IOptions<SiteOption> siteOption)
{
    try
    {
        if (string.IsNullOrWhiteSpace(request.Title) || string.IsNullOrWhiteSpace(request.PhoneNumber))
        {
            return BadRequest(new { success = false, message = "標題和手機號碼不能為空" });
        }

        if (!long.TryParse(request.PhoneNumber, out long phoneNumberLong))
        {
            return BadRequest(new { success = false, message = "無效的手機號碼" });
        }

        var encodedPhone = new Hashids("codewf").EncodeLong(phoneNumberLong);
        var generatedUrl = $"{siteOption.Value.Domain}/nuoche?p={encodedPhone}";

        var fileName = $"qrcode_{Guid.NewGuid():N}.png";
        var qrCodePath = Path.Combine(env.WebRootPath, IconFolder, fileName);

        Directory.CreateDirectory(Path.Combine(env.WebRootPath, IconFolder));

        QrCodeGenerator.GenerateQrCode(request.Title, generatedUrl, qrCodePath, request.SubTitle);

        var qrCodeUrl = $"/{IconFolder}/{fileName}";
        return Ok(new
        {
            success = true,
            qrCodeUrl,
            generatedUrl
        });
    }
    catch (Exception ex)
    {
        return BadRequest(new { success = false, message = ex.Message });
    }
}
五、功能對比與應用場景
離線桌面版和線上網頁版各有優勢,下面是它們的特點對比:
| 功能 | 離線版 | 線上版 |
|---|---|---|
| 安裝需求 | 需要下載安裝 | 無需安裝,瀏覽器存取 |
| 平台支援 | Windows、macOS、Linux | 任何現代瀏覽器 |
| 網路依賴 | 僅初次生成 URL 需要網路 | 完全依賴網路 |
| 檔案儲存 | 本機永久儲存 | 伺服器臨時儲存 |
| UI 體驗 | 桌面應用風格 | 響應式網頁設計 |
| 拖拽支援 | 支援拖拽 QR 碼 | 不支援直接拖拽 |
| 隱私保護 | 高(本機處理) | 中(伺服器處理) |
| 小標題功能 | 支援自訂小標題 | 支援自訂小標題 |
小標題功能的加入使 QR 碼更加資訊豐富,可以在 QR 碼下方加入額外提示資訊,如「掃碼聯絡車主」或顯示部分聯絡方式,增強了 QR 碼的可識別性和使用便捷性。
六、總結與展望
透過本文,我們詳細介紹了移車 QR 碼生成工具的開發過程,包括需求分析、核心程式碼實現、UI 設計和多平台部署。這個工具不僅解決了傳統移車聯絡方式帶來的隱私洩露和號碼濫用問題,還透過現代技術提供了更安全、便捷的移車體驗。
這個工具在以下場景中特別有用:
- 臨時停車:在小區、商場等地臨時停車時提供聯絡方式
- 車展活動:展示車輛時放置便於聯絡的 QR 碼
- 共享車位:在私人車位上提供臨時聯絡方式
- 緊急情況:車輛因特殊情況需要緊急聯絡車主時
未來,我們計劃進一步完善這個工具,可能的改進方向包括:
- 多語言支援:加入英文、日文等多語言介面,方便國際使用者使用
- 更多自訂選項:支援自訂 QR 碼顏色、樣式和佈局
- 統計功能:加入掃碼次數統計,幫助使用者了解 QR 碼使用情況
- 企業版功能:為車隊管理、停車場等企業使用者提供批次生成功能
作為一個實用工具,移車 QR 碼生成器解決了現實生活中的實際問題,同時也展示了如何使用現代 .NET 技術堆疊構建跨平台應用。
希望本文對你有所幫助,如有問題歡迎在評論區留言討論!
原始碼參考: