在实际开发中,一款应用可能有多个应用程序组成,那这款应用各个组成部分之间的数据交互就成了关键,如何才能快速高效的进行数据交互呢?如果是跨服务器的进程交互,可以采用Remoting,WCF,GRPC等远程过程调用技术(RPC),这种方式会经过网卡进行网络传输,存在一定的数据转换及网络传输等性能消耗。如果是同一台服务器的进程间数据交互,也采用这种远程过程调用技术,则不是最优方案。那如何才能绕过网络来进行跨进程数据交互呢?答案就是“共享内存”,今天我们就以一个简单的小例子,简述进程间如何通过共享内存进行数据交互的应用,仅供学习分享使用,如有不足之处,还请指正。

什么是共享内存?
在操作系统中,系统会为每一个进程分配一块独立的内存,以供进程运行程序和存储数据,各个进程间的内存相互独立,互不干扰,以保证程序的稳定有序的运行。虽然这种进程的内存保护机制在很大程度上保证了数据安全和程序稳定,但在需要进行交互的进程之间,也形成了难以逾越的壁垒。幸好操作系统也考虑到了这种情况,那就是共享内存。共享内存(Shared Memory)是一种 进程间通信(IPC) 机制,允许多个进程共享同一块物理内存,从而提高数据交换效率。相比其他 IPC 方式(如管道、消息队列等),共享内存具有 速度快、低开销 的优势,因为数据直接存储在内存中,而无需通过内核进行数据拷贝。
.NET中的共享内存
在.NET平台,共享内存通过MemoryMappedFile来实现,内存映射文件允许你保留一块地址空间,然后将该物理存储映射到这块内存空间中进行操作。物理存储是文件管理,而内存映射文件是**操作系统级内存管理。**内存映射文件技术主要涉及的知识点如下所示:
- 创建共享内存:内存映射文件的创建有两种方式,一种是直接创建,通过MemoryMappedFile.CreateNew方法来实现;一种是通过已经存在的文件进行创建,它通过调用MemoryMappedFile.CreateFromFile来实现。
- 共享内存访问器:在.NET中,通过MemoryMappedViewAccessor来访问共享内存,它通过MemoryMappedFile的实例对象的CreateViewAccessor来创建。
- 读取写入方式:共享内存中以Byte数组的方式存储数据,可以通过访问器的ReadArray和WriteArray来读取和写入字节数组。
内存映射文件创建
内存映射文件有两种创建形式:
第1种是直接创建,它通过MemoryMappedFile提供的静态方法CreateNew来创建,如下所示:

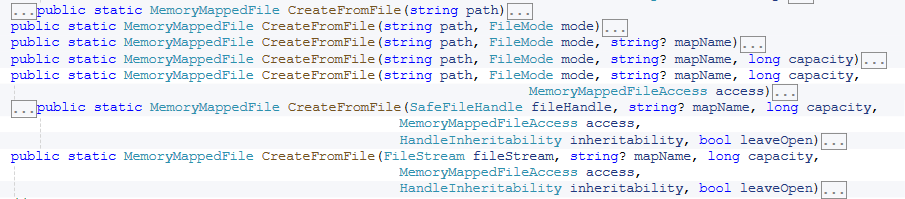
第2种是通过MemoryMappedFile提供的静态方法CreateFromFile来创建,它是利用已经存在的文件或文件流进行创建,如下所示:
打开已存在的内存映射文件,它通过MemoryMappedFile提供的静态方法OpenExist来实现,如下所示:

创建或打开内存映射文件,它通过MemoryMappedFile提供的静态方法CreateOrOpen来实现,如下所示:

内存映射文件访问器
内存映射文件访问器,主要用于操作共享内存,它通过MemoryMappedFile实例对象的CreateViewAccessor来实现,如下所示:

内存映射文件资源释放
MemoryMappedFile实现了IDisposable接口,直接调用它的Dispose方法即可。
共享内存应用步骤
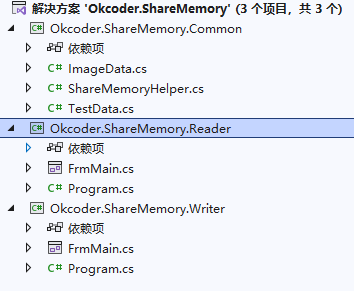
在本实例中,主要有两个WinForm可执行程序组成,分别进行读共享内存/写共享内存,运行时两个程序同时运行,如下所示:
主要介绍固定格式的Struct数据读写共享内存,和不定长的数据读写共享内存。
内存映射文件对象创建
本实例在写共享内存时创建内存映射文件,读共享内存时打开内存映射文件,如下所示:
/// <summary>
/// 创建或打开共享内存
/// </summary>
public void CreateOrOpenSharedMemory()
{
	this.memoryMapped = MemoryMappedFile.CreateOrOpen(this.MapName, this.capacity, MemoryMappedFileAccess.ReadWriteExecute, MemoryMappedFileOptions.None, HandleInheritability.Inheritable);
	this.memoryAccessor = this.memoryMapped.CreateViewAccessor();
}

/// <summary>
/// 从文件创建共享内存
/// </summary>
public void CreateFromFileShareMemory()
{
	this.memoryMapped = MemoryMappedFile.CreateFromFile(new FileStream(@"", FileMode.Create), this.MapName, this.capacity, MemoryMappedFileAccess.ReadWriteExecute, HandleInheritability.Inheritable, true);
	this.memoryAccessor = this.memoryMapped.CreateViewAccessor();
}

/// <summary>
/// 打开已存在的共享内存
/// </summary>
public void OpenShareMemory()
{
	this.memoryMapped = MemoryMappedFile.OpenExisting(this.MapName);
	this.memoryAccessor = this.memoryMapped.CreateViewAccessor();
}
不定长度字节读写
不定长度的字节数组方式读取,以用户打开的图片为例,将图片路径和图片内容以Byte数组的形式通过共享内存进行数据交换。它们在共享内存中的存储格式如下图所示:

实体模型ImageData
首先创建实体模型ImageData,它的主要功能是将图片对象Bitmap和Byte数组之间进行转换,如下所示:
using System;
using System.Collections.Generic;
using System.Drawing;
using System.Drawing.Imaging;
using System.Linq;
using System.Text;
using System.Threading.Tasks;

namespace Okcoder.ShareMemory.Common
{
    public class ImageData
    {
        public string ImageFullPath { get; set; }

        public Bitmap ImageContent { get; set; }

        /// <summary>
        /// 从对象转换成数组
        /// </summary>
        /// <returns></returns>
        public byte[] ImageToBytes()
        {
            var byteFullPath = Encoding.UTF8.GetBytes(this.ImageFullPath);
            MemoryStream stream = new MemoryStream();
            int lenFullPath = byteFullPath.Length;
            byte[] byteFullPathLen = BitConverter.GetBytes(lenFullPath);
            ImageContent.Save(stream, ImageContent.RawFormat);
            var byteImageContent = stream.ToArray();
            int lenImageContent = byteImageContent.Length;
            byte[] byteImageContentLen = BitConverter.GetBytes(lenImageContent);
            byte[] total = new byte[4 + lenFullPath + 4 + lenImageContent];
            byteFullPathLen.CopyTo(total, 0);
            byteFullPath.CopyTo(total, 4);
            byteImageContentLen.CopyTo(total, 4 + lenFullPath);
            byteImageContent.CopyTo(total, 4 + lenFullPath + 4);
            stream.Close();
            stream.Dispose();
            return total;
        }

        /// <summary>
        /// 从对象转换成对象
        /// </summary>
        /// <param name="bytes"></param>
        public void BytesToImage(byte[] bytes)
        {
            int lenFullPathLen = BitConverter.ToInt32(bytes, 0);
            var byteFullPath = new byte[lenFullPathLen];
            bytes.Skip(4).Take(lenFullPathLen).ToArray().CopyTo(byteFullPath, 0);
            this.ImageFullPath = Encoding.UTF8.GetString(byteFullPath);
            int lenImageContent = BitConverter.ToInt32(bytes, 4 + lenFullPathLen);
            var byteImageContent = new byte[lenImageContent];
            bytes.Skip(4 +lenFullPathLen+4).Take(lenImageContent).ToArray().CopyTo(byteImageContent,0);
            MemoryStream stream = new MemoryStream(byteImageContent);
            this.ImageContent = (Bitmap)Image.FromStream(stream);
            stream.Close();
            stream.Dispose();
        }
    }
}
共享内存字节读写
不定长度的共享内存的Byte读/写,如下所示:
/// <summary>
/// 读取字节
/// </summary>
/// <returns></returns>
public byte[] ReadMemoryWithBytes()
{
	byte[] bytes = new byte[this.capacity];
	this.memoryAccessor.ReadArray<byte>(0, bytes, 0, bytes.Length);
	return bytes;
}

/// <summary>
/// 写入字节
/// </summary>
/// <param name="bytes"></param>
public void WriteMemoryWithBytes(byte[] bytes)
{
	this.memoryAccessor.WriteArray<byte>(0, bytes, 0, bytes.Length);
}
其中capacity为内存映射文件的默认容量,大小为10M。
写共享内存调用
首先在Okcoder.ShareMemory.Writer项目页面,用户选择一张图片,并显示在UI页面上,如下所示:
private void btnBrowser_Click(object sender, EventArgs e)
{
	OpenFileDialog openFileDialog = new OpenFileDialog();
	openFileDialog.Title = "请选择图片";
	openFileDialog.Filter = "PNG图片|*.png|JPG图片|*.jpg";
	if (openFileDialog.ShowDialog() == DialogResult.OK)
	{
		string fileName = openFileDialog.FileName;
		this.pictureBox1.Image = Bitmap.FromFile(fileName);
		this.pictureBox1.SizeMode = PictureBoxSizeMode.StretchImage;
		this.txtImagePath.Text = fileName;
	}
}
然后点击“咻一下”按钮封装ImageData对象,并转换成Byte数组,然后写入共享内存 ,如下所示:
private void btnWriteMemory_Click(object sender, EventArgs e)
{
	//定义ImageData并转换成字节数组
	ImageData imageData = new ImageData();
	imageData.ImageFullPath = this.txtImagePath.Text;
	imageData.ImageContent = (Bitmap)this.pictureBox1.Image;
	byte[] bytes = imageData.ImageToBytes();
	//定义共享内存帮助对象并打开共享内存
	ShareMemoryHelper helper = new ShareMemoryHelper();
	helper.CreateOrOpenSharedMemory();
	//以字节方式写入共享内存
	helper.WriteMemoryWithBytes(bytes);
}
读共享内存调用
在Okcoder.ShareMemory.Reader项目页面,用户点击“咻一下”按钮,读取共享内存,并转换内ImageData,然后显示在UI页面上,如下所示:
private void btnRead_Click(object sender, EventArgs e)
{
	//定义共享内存帮助对象并打开共享内存
	ShareMemoryHelper helper = new ShareMemoryHelper();
	helper.OpenShareMemory();
	//以字节方式读取
	byte[] bytes = helper.ReadMemoryWithBytes();
	ImageData imageData = new ImageData();
	//转换字节到ImageData对象
	imageData.BytesToImage(bytes);
	//页面赋值
	this.txtImagePath.Text = imageData.ImageFullPath;
	this.pictureBox1.Image = imageData.ImageContent;
	this.pictureBox1.SizeMode = PictureBoxSizeMode.StretchImage;
}
这样通过咻咻两下,就可以将一个程序用户选择的图片,通过共享内存,传递到另一个应用程序。神不神奇,意不意外!
固定长度内容读写
在实际应用中,共享内存支持值类型的结构体,引用类型的Byte数组的数据床底,结构体中的属性排序,就是它在内存中的顺序。
定义实体模型
首先定义结构体TestData,为了能够让结构体在指针之间进行转换,必须通过StructLayout特性将结构体声明为可序列化,如下所示:
using System;
using System.Collections.Generic;
using System.Linq;
using System.Runtime.InteropServices;
using System.Text;
using System.Threading.Tasks;

namespace Okcoder.ShareMemory.Common
{
    [StructLayout(LayoutKind.Sequential, Pack = 1, CharSet = CharSet.Ansi)]
    public struct TestData
    {
        /// <summary>
        /// Id,长度为4个字节
        /// </summary>
        public int Id;

        /// <summary>
        /// 年龄长度为4个字节
        /// </summary>
        public int Age;

        /// <summary>
        /// 分数 10个元素
        /// </summary>
        [MarshalAs(UnmanagedType.ByValArray, SizeConst = 0x0A)]
        public int[] Scores;

        public TestData()
        {
            this.Id = 0;
            this.Age = 0;
            this.Scores = new int[10];
        }

        public override string ToString()
        {
            return $"Id={this.Id},Age={this.Age},Scores={string.Join(",",this.Scores)}";
        }
    }
}
写结构体类型
首先通过Marshal申请内存空间,并通过Marshal的StructureToPtr方法将结构体存储到申请的内存中,并指针指向开始位置,然后再通过Marshal的Copy方法将指针指向的内存复制到Byte数组中,然后写入到共享内存,最后通过Marshal的FreeHGlobal释放申请的指针,如下所示:
/// <summary>
/// 写入结构体
/// </summary>
/// <param name="data"></param>
public void WriteMemoryWithStruct(TestData data)
{
	//获取结构体的长度
	int len = Marshal.SizeOf(typeof(TestData));
	byte[] bytes = new byte[len];
	//申请内存并获取指针
	IntPtr p = Marshal.AllocHGlobal(len);
	//结构体写入内存
	Marshal.StructureToPtr(data, p, false);
	//将内存复制到数组
	Marshal.Copy(p, bytes, 0, len);
	//写入数组共享到内存
	this.memoryAccessor.WriteArray<byte>(0, bytes, 0, bytes.Length);
	//释放内存
	Marshal.FreeHGlobal(p);
	//释放指针
	p = IntPtr.Zero;
}
读取结构体类型
首先通过Marshal的AllocHGlobal方法申请内存空间,并将共享内存的字节数组读取出来并复制到申请的内存中,并指针指向开始位置,然后再通过Marshal的指针转结构体方法PtrToStructure,转换成结构体对象,最后通过Marshal的FreeHGlobal释放申请的指针,如下所示:
/// <summary>
/// 读取结构体
/// </summary>
/// <returns></returns>
public TestData ReadMemoryWithStruct()
{
	//获取结构体类型的长度
	int len = Marshal.SizeOf(typeof(TestData));
	byte[] bytes = new byte[len];
	//申请内存
	IntPtr p = Marshal.AllocHGlobal(len);
	//从共享内存读取数据
	this.memoryAccessor.ReadArray<byte>(0, bytes, 0, bytes.Length);
	//将字节数组复制到指针
	Marshal.Copy(bytes, 0, p, len);
	//指针转换到结构体
	TestData data = (TestData)Marshal.PtrToStructure(p, typeof(TestData));
	//释放内存
	Marshal.FreeHGlobal(p);
	//释放指针
	p = IntPtr.Zero;
	return data;
}
写共享内存调用
在Okcoder.ShareMemory.Writer项目页面,用户点击Struct按钮,然后封装TestData实例对象,然后写入共享内存,如下所示:
private void btnWriteStruct_Click(object sender, EventArgs e)
{
	//定义TestData并赋值
	TestData testData = new TestData();
	testData.Id = 100;
	testData.Age = 20;
	for (int i = 0; i < 10; i++)
	{
		testData.Scores[i] = i + 60;
	}
	//定义共享内存帮助对象并打开共享内存
	ShareMemoryHelper helper = new ShareMemoryHelper();
	helper.CreateOrOpenSharedMemory();
	//以结构体的形式写入共享内存
	helper.WriteMemoryWithStruct(testData);
}
读共享内存调用
在Okcoder.ShareMemory.Reader项目页面,用户点击Struct按钮,从共享内存获取结构体并弹框显示,如下所示:
private void btnReadStruct_Click(object sender, EventArgs e)
{
	//定义共享内存帮助对象并打开共享内存
	ShareMemoryHelper helper = new ShareMemoryHelper();
	helper.OpenShareMemory();
	//读取结构体
	TestData testData = helper.ReadMemoryWithStruct();
	MessageBox.Show(testData.ToString());
}
实例演示
首先是不定长度的图片在进程间交换数据,如下所示:
固定长度的结构体类型在进程间交换数据,如下所示:
以上就是《推荐一款进程间高速交换数据的解决方案》的全部内容,旨在抛砖引玉,一起学习,共同进步!