
注:本文隶属于《理解 ASP.NET Core》系列文章,请查看置顶博客或点击此处查看全文目录
之前,我们已经了解了 ASP.NET Core 中的身份认证,现在,我们来聊一下授权。
老规矩,示例程序源码XXTk.Auth.Samples已经提交了,需要的请自取。
1. 概述
ASP.NET Core 中的授权方式有很多,我们一起了解一下其中三种较为常见的方式:
- 基于角色的授权
- 基于声明的授权
- 基于策略的授权
其中,基于策略的授权是我们要了解的重点。
在进入正文之前,我们要先认识一个很重要的特性——AuthorizeAttribute,通过它,我们可以很方便的针对 Controller、Action 等维度进行权限控制:
[AttributeUsage(AttributeTargets.Class | AttributeTargets.Method, AllowMultiple = true, Inherited = true)]
public class AuthorizeAttribute : Attribute, IAuthorizeData
{
    public AuthorizeAttribute() { }

    public AuthorizeAttribute(string policy)
    {
        Policy = policy;
    }

    // 策略
    public string? Policy { get; set; }

    // 角色,可以通过英文逗号将多个角色分隔开,从而形成一个列表
    public string? Roles { get; set; }

    // 身份认证方案,可以通过英文逗号将多个身份认证方案分隔开,从而形成一个列表
    public string? AuthenticationSchemes { get; set; }
}
另外,为了方便测试,我们先添加一下基于 Cookie 的身份认证:
public class Startup
{
    public void ConfigureServices(IServiceCollection services)
    {
        services.AddAuthentication(CookieAuthenticationDefaults.AuthenticationScheme)
            .AddCookie(options =>
            {
                options.Cookie.Name = "auth";
                // 用户未登录时返回401
                options.Events.OnRedirectToLogin = context =>
                {
                    context.Response.StatusCode = StatusCodes.Status401Unauthorized;
                    return Task.CompletedTask;
                };
                // 用户无权限访问时返回403
                options.Events.OnRedirectToAccessDenied = context =>
                {
                    context.Response.StatusCode = StatusCodes.Status403Forbidden;
                    return Task.CompletedTask;
                };
            });
    }

    public void Configure(IApplicationBuilder app, IWebHostEnvironment env)
    {
        app.UseRouting();

        app.UseAuthentication();
        app.UseAuthorization();

        app.UseEndpoints(endpoints =>
        {
            endpoints.MapControllers();
        });
    }
}
在Configure中,通过app.UseAuthorization()将授权中间件AuthorizationMiddleware添加到了请求管道。
2. 基于角色的授权
实例程序请参考:XXTk.Auth.Samples.RoleBased.HttpApi
顾名思义,基于角色的授权就是检查用户是否拥有指定角色,如果是则授权通过,否则不通过。
我们先看一个简单的例子:
[Authorize(Roles = "Admin")]
public string GetForAdmin()
{
    return "Admin only";
}
这里,我们将AuthorizeAttribute特性的Roles属性设置为了Admin,也就是说,如果用户想要访问GetForAdmin接口,则必须拥有角色 Admin。
如果某个接口想要允许多个角色访问,该怎么做呢?很简单,通过英文逗号(,)分隔多个角色即可:
[Authorize(Roles = "Developer,Tester")]
public string GetForDeveloperOrTester()
{
    return "Developer || Tester";
}
就像上面这样,通过逗号将Developer和Tester分隔开来,当接到请求时,若用户拥有角色 Developer 和 Tester 其一,就允许访问该接口。
最后,如果某个接口要求用户必须同时拥有多个角色时才允许访问,那我们可以通过添加多个AuthorizeAttribute特性来达到目的:
[Authorize(Roles = "Developer")]
[Authorize(Roles = "Tester")]
public string GetForDeveloperAndTester()
{
    return "Developer && Tester";
}
只有当用户同时拥有角色Developer和Tester时,才允许访问该接口。
你现在可能已经迫不及待要亲自验证一下了,不过你还记得如何设置用户的角色吗?我们在身份认证的文章中介绍过,在颁发身份票据时,可以通过声明添加角色,例如:
public async Task<IActionResult> LoginForAdmin()
{
    var identity = new ClaimsIdentity(CookieAuthenticationDefaults.AuthenticationScheme);
    identity.AddClaims(new[]
    {
        new Claim(ClaimTypes.NameIdentifier, Guid.NewGuid().ToString("N")),
        new Claim(ClaimTypes.Name, "AdminOnly"),
        // 添加角色Admin
        new Claim(ClaimTypes.Role, "Admin")
    });

    var principal = new ClaimsPrincipal(identity);

    await HttpContext.SignInAsync(CookieAuthenticationDefaults.AuthenticationScheme, principal);

    return Ok();
}
由于篇幅限制,其他的登录代码就不贴了,可以在示例程序中找到。
3. 基于声明的授权
实例程序请参考:XXTk.Auth.Samples.ClaimsBased.HttpApi
上面介绍的基于角色的授权,实际上就是基于声明中的“角色”来实现的,而基于声明的授权,则将范围扩展到了所有声明(而不仅仅是角色)。
基于声明的授权,是在基于策略的授权基础上实现的。为什么这么说呢?因为我们需要通过添加策略来使用声明:
public class Startup
{
    public void ConfigureServices(IServiceCollection services)
    {
        services.AddAuthorization(options =>
        {
            // ... 可以在此处添加策略
        });
    }
}
一个简单的声明策略如下:
options.AddPolicy("RankClaim", policy => policy.RequireClaim("Rank"));
该策略名称为RankClaim,要求用户具有声明Rank,具体 Rank 对应的值是多少,不关心,只要有这个声明就好了。
当然,我们也可以将 Rank 的值限定一下:
options.AddPolicy("RankClaimP3", policy => policy.RequireClaim("Rank", "P3"));
options.AddPolicy("RankClaimM3", policy => policy.RequireClaim("Rank", "M3"));
我们添加了两条策略:RankClaimP3和RankClaimM3,除了要求用户具有声明Rank外,还分别要求 Rank 的值为P3和M3。
类似于基于角色的声明,我们也可以添加“Or”、“And”逻辑的策略:
options.AddPolicy("RankClaimP3OrM3", policy => policy.RequireClaim("Rank", "P3", "M3"));
options.AddPolicy("RankClaimP3AndM3", policy => policy.RequireClaim("Rank", "P3").RequireClaim("Rank", "M3"));
策略RankClaimP3OrM3要求用户具有声明Rank,且值为P3或M3即可;而策略RankClaimP3AndM3要求用户具有声明Rank,且值必须同时包含P3和M3。
策略的用法与之前的类似(注意策略不能像角色一样通过逗号分隔):
// 仅要求用户具有声明“Rank”,不关心值是多少
[Authorize(Policy = "RankClaim")]
public string GetForRankClaim()
{
    return "Rank claim only";
}

// 要求用户具有声明“Rank”,且值为“M3”
[HttpGet("GetForRankClaimP3")]
[Authorize(Policy = "RankClaimP3")]
public string GetForRankClaimP3()
{
    return "Rank claim P3";
}

// 要求用户具有声明“Rank”,且值为“P3” 或 “M3”
[Authorize(Policy = "RankClaimP3OrM3")]
public string GetForRankClaimP3OrM3()
{
    return "Rank claim P3 || M3";
}
表示“And”逻辑的策略可以有两种写法:
// 要求用户具有声明“Rank”,且值为“P3” 和 “M3”
[Authorize(Policy = "RankClaimP3AndM3")]
public string GetForRankClaimP3AndM3V1()
{
    return "Rank claim P3 && M3";
}

// 要求用户具有声明“Rank”,且值为“P3” 和 “M3”
[Authorize(Policy = "RankClaimP3")]
[Authorize(Policy = "RankClaimM3")]
public string GetForRankClaimP3AndM3V2()
{
    return "Rank claim P3 && M3";
}
另外,有时候声明策略略微有些复杂,可以使用RequireAssertion来实现:
options.AddPolicy("ComplexClaim", policy => policy.RequireAssertion(context =>
    context.User.HasClaim(c => (c.Type == "Rank" || c.Type == "Name") && c.Issuer == "Issuer")));
4. 基于策略的授权
实例程序请参考:XXTk.Auth.Samples.PolicyBased.HttpApi
通常来说,以上两种授权方式仅适用于较为简单的业务场景,而当业务场景比较复杂时,它俩就显得无能为力了。因此,我们必须能够设计更加自由的策略,也就是基于策略的授权。
基于策略的授权,我打算将其分成两种类型来介绍:简单策略和动态策略。
4.1 简单策略
在上面,我们制定策略时,使用了大量的RequireXXX,我们也希望能够将自定义策略封装一下,当然,你可以写一些扩展方法,不过我更加推荐使用IAuthorizationRequirement和IAuthorizationHandler。
现在,我们虚构一个场景:网吧管理,未满 18 岁的人员不准入内,只允许年满 18 岁的成年人进入。为此,我们需要一个限定最小年龄的要求:
public class MinimumAgeRequirement : IAuthorizationRequirement
{
    public MinimumAgeRequirement(int minimumAge) =>
       MinimumAge = minimumAge;

    public int MinimumAge { get; }
}
现在,要求有了,我们还需要一个授权处理器,来校验用户是否真的达到了指定年龄:
public class MinimumAgeAuthorizationHandler : AuthorizationHandler<MinimumAgeRequirement>
{
    protected override Task HandleRequirementAsync(AuthorizationHandlerContext context, MinimumAgeRequirement requirement)
    {
        // 这里生日信息可以从其他地方获取,如数据库,不限于声明
        var dateOfBirthClaim = context.User.FindFirst(c => c.Type == ClaimTypes.DateOfBirth);

        if (dateOfBirthClaim is null)
        {
            return Task.CompletedTask;
        }

        var today = DateTime.Today;
        var dateOfBirth = Convert.ToDateTime(dateOfBirthClaim.Value);
        int calculatedAge = today.Year - dateOfBirth.Year;
        if (dateOfBirth > today.AddYears(-calculatedAge))
        {
            calculatedAge--;
        }

        // 若年龄达到最小年龄要求,则授权通过
        if (calculatedAge >= requirement.MinimumAge)
        {
            context.Succeed(requirement);
        }

        return Task.CompletedTask;
    }
}
当校验通过时,调用context.Succeed来指示授权通过。当校验不通过时,我们有两种处理方式:
一种是直接返回
Task.CompletedTask,这将允许后续的 Handler 继续进行校验,这些 Handler 中任意一个认证通过,都视为该用户授权通过。另一种是通过调用
context.Fail来指示授权不通过,并且后续的 Handler 仍会执行(即使后续的 Handler 有授权通过的,也视为授权不通过)。如果你想在调用context.Fail后,立即返回而不再执行后续的 Handler,可以将选项AuthorizationOptions的属性InvokeHandlersAfterFailure设置为false来达到目的,默认为true。
现在,我们给虚构的场景增加一个授权逻辑:当用户未满 18 岁,但是其角色为网吧老板时,也允许其入内。
为了实现这个逻辑,我们再增加一个授权处理器:
public class MinimumAgeAnotherAuthorizationHandler : AuthorizationHandler<MinimumAgeRequirement>
{
    protected override Task HandleRequirementAsync(AuthorizationHandlerContext context, MinimumAgeRequirement requirement)
    {
        var isBoss = context.User.IsInRole("InternetBarBoss");

        if (isBoss)
        {
            context.Succeed(requirement);
        }

        return Task.CompletedTask;
    }
}
授权要求和授权处理器我们都已经实现了,接下来就是添加策略了,不过在这之前,不要忘了注入我们的要求和授权处理器:
public class Startup
{
    public void ConfigureServices(IServiceCollection services)
    {
        services.TryAddEnumerable(ServiceDescriptor.Transient<IAuthorizationHandler, MinimumAgeAuthorizationHandler>());
        services.TryAddEnumerable(ServiceDescriptor.Transient<IAuthorizationHandler, MinimumAgeAnotherAuthorizationHandler>());

        services.AddAuthorization(options =>
        {
            options.AddPolicy("AtLeast18Age", policy => policy.Requirements.Add(new MinimumAgeRequirement(18)));
        });
    }
}
需要注意的是,我们可以将 Handler 注册为任意的生命周期,不过,当 Handler 中依赖其他服务时,一定要注意生命周期提升的问题。
我们添加了一个名为AtLeast18Age的策略,该策略创建了一个MinimumAgeRequirement实例,要求最低年龄为 18 岁,并将其添加到了policy的Requirements属性中。
你可以写一个类似的接口进行测试:
[Authorize(Policy = "AtLeast18Age")]
public string GetForAtLeast18Age()
{
    return "At least 18 age";
}
最后,多说一句,如果你想让一个 Handler 可以同时处理多个 Requirement,可以这样做:
public class MultiRequirementsAuthorizationHandler : IAuthorizationHandler
{
    public Task HandleAsync(AuthorizationHandlerContext context)
    {
        var pendingRequirements = context.PendingRequirements;

        foreach (var requirement in pendingRequirements)
        {
            if (requirement is Custom1Requirement)
            {
                // ... 一些校验

                context.Succeed(requirement);
            }
            else if (requirement is Custom2Requirement)
            {
                // ... 一些校验

                context.Succeed(requirement);
            }
        }

        return Task.CompletedTask;
    }
}

public class Custom1Requirement : IAuthorizationRequirement
{
}

public class Custom2Requirement : IAuthorizationRequirement
{
}
4.2 动态策略
现在,问题又来了,如果我们的场景有多种年龄限制,比如有的要求 18 岁,有的要求 20,还有的只要求 10 岁,我们总不能一个个的把这些策略都提前创建好吧,要搞死人...如果能够动态地创建策略就好了!
下面我们尝试动态地创建多种最小年龄策略:
首先,继承AuthorizeAttribute来实现一个自定义授权特性MinimumAgeAuthorizeAttribute:
public class MinimumAgeAuthorizeAttribute : AuthorizeAttribute
{
    // 策略名前缀
    public const string PolicyPrefix = "MinimumAge";

    // 通过构造函数传入最小年龄
    public MinimumAgeAuthorizeAttribute(int minimumAge) =>
        MinimumAge = minimumAge;

    public int MinimumAge
    {
        get
        {
            // 从策略名中解析出最小年龄
            if (int.TryParse(Policy[PolicyPrefix.Length..], out var age))
            {
                return age;
            }

            return default;
        }
        set
        {
            // 生成动态的策略名,如 MinimumAge18 表示最小年龄为18的策略
            Policy = $"{PolicyPrefix}{value}";
        }
    }
}
逻辑很简单,就是将策略名前缀+传入的最小年龄参数动态地拼接为一个策略名,并且还可以通过策略名反向解析出最小年龄。
好了,现在策略名可以动态创建了,那下一步就是根据策略名动态创建出策略实例了,可以通过替换接口IAuthorizationPolicyProvider的默认实现来达到目的:
public class AppAuthorizationPolicyProvider : IAuthorizationPolicyProvider
{
    // 引用自第三方库 Nito.AsyncEx
    private static readonly AsyncLock _mutex = new();
    private readonly AuthorizationOptions _authorizationOptions;

    public AppAuthorizationPolicyProvider(IOptions<AuthorizationOptions> options)
    {
        BackupPolicyProvider = new DefaultAuthorizationPolicyProvider(options);
        _authorizationOptions = options.Value;
    }

    // 若不需要自定义实现,则均使用默认的
    private DefaultAuthorizationPolicyProvider BackupPolicyProvider { get; }

    public async Task<AuthorizationPolicy> GetPolicyAsync(string policyName)
    {
        if(policyName is null) throw new ArgumentNullException(nameof(policyName));

        // 若策略实例已存在,则直接返回
        var policy = await BackupPolicyProvider.GetPolicyAsync(policyName);
        if(policy is not null)
        {
            return policy;
        }

        using (await _mutex.LockAsync())
        {
            var policy = await BackupPolicyProvider.GetPolicyAsync(policyName);
            if(policy is not null)
            {
                return policy;
            }

            if (policyName.StartsWith(MinimumAgeAuthorizeAttribute.PolicyPrefix, StringComparison.OrdinalIgnoreCase)
                && int.TryParse(policyName[MinimumAgeAuthorizeAttribute.PolicyPrefix.Length..], out var age))
            {
                // 动态创建策略
                var builder = new AuthorizationPolicyBuilder();
                // 添加 Requirement
                builder.AddRequirements(new MinimumAgeRequirement(age));
                policy = builder.Build();
                // 将策略添加到选项
                _authorizationOptions.AddPolicy(policyName, policy);

                return policy;
            }
        }

        return null;
    }

    public Task<AuthorizationPolicy> GetDefaultPolicyAsync()
    {
        return BackupPolicyProvider.GetDefaultPolicyAsync();
    }

    public Task<AuthorizationPolicy> GetFallbackPolicyAsync()
    {
        return BackupPolicyProvider.GetFallbackPolicyAsync();
    }
}
最后,只需要注入一下服务就好啦:
services.AddTransient<IAuthorizationPolicyProvider, AppAuthorizationPolicyProvider>();
现在你就可以使用MinimumAgeAuthorizeAttribute进行授权了,比如限制最小年龄 20 岁:
[MinimumAgeAuthorize(20)]
public string GetForAtLeast20Age()
{
    return "At least 20 age";
}
5. 设计原理
现在,基础用法我们已经了解了,接下来就一起学习一下它背后的原理吧。
鉴于涉及到的源码较多,所以为了控制文章长度,下面只列举核心代码。
首先,我们再熟悉一下AuthorizeAttribute:
public interface IAuthorizeData
{
    // 策略
    string? Policy { get; set; }

    // 角色,可以通过英文逗号将多个角色分隔开,从而形成一个列表
    string? Roles { get; set; }

    // 身份认证方案,可以通过英文逗号将多个身份认证方案分隔开,从而形成一个列表
    string? AuthenticationSchemes { get; set; }
}

[AttributeUsage(AttributeTargets.Class | AttributeTargets.Method, AllowMultiple = true, Inherited = true)]
public class AuthorizeAttribute : Attribute, IAuthorizeData
{
    public AuthorizeAttribute() { }

    public AuthorizeAttribute(string policy)
    {
        Policy = policy;
    }

    public string? Policy { get; set; }
    public string? Roles { get; set; }
    public string? AuthenticationSchemes { get; set; }
}
Attribute自然不必多说,我们要注意的是AuthorizeAttribute实现的接口为IAuthorizeData。
接下来我们从services.AddAuthorization入手,看看针对授权都注册了哪些服务:
你可能会疑问,即使我没有显式的添加services.AddAuthorization这行代码,程序也不会报错,其实这个我们在前文 Startup 中就提到过,services.AddControllers()中会默认调用AddAuthorization。
public static IServiceCollection AddAuthorization(this IServiceCollection services)
{
    services.AddAuthorizationCore();
    services.AddAuthorizationPolicyEvaluator();
    return services;
}

public static IServiceCollection AddAuthorizationCore(this IServiceCollection services)
{
    services.AddOptions();

    services.TryAdd(ServiceDescriptor.Transient<IAuthorizationService, DefaultAuthorizationService>());
    services.TryAdd(ServiceDescriptor.Transient<IAuthorizationPolicyProvider, DefaultAuthorizationPolicyProvider>());
    services.TryAdd(ServiceDescriptor.Transient<IAuthorizationHandlerProvider, DefaultAuthorizationHandlerProvider>());
    services.TryAdd(ServiceDescriptor.Transient<IAuthorizationEvaluator, DefaultAuthorizationEvaluator>());
    services.TryAdd(ServiceDescriptor.Transient<IAuthorizationHandlerContextFactory, DefaultAuthorizationHandlerContextFactory>());
    services.TryAddEnumerable(ServiceDescriptor.Transient<IAuthorizationHandler, PassThroughAuthorizationHandler>());
    return services;
}

public static IServiceCollection AddAuthorizationPolicyEvaluator(this IServiceCollection services)
{
    services.TryAddSingleton<AuthorizationPolicyMarkerService>();
    services.TryAddTransient<IPolicyEvaluator, PolicyEvaluator>();
    services.TryAddTransient<IAuthorizationMiddlewareResultHandler, AuthorizationMiddlewareResultHandler>();
    return services;
}
我们整理下这里注册了哪些接口:
- IAuthorizationService
- IAuthorizationPolicyProvider
- IAuthorizationHandlerProvider
- IAuthorizationEvaluator
- IAuthorizationHandlerContextFactory
- IAuthorizationHandler
- AuthorizationPolicyMarkerService
- IPolicyEvaluator
- IAuthorizationMiddlewareResultHandler
这里面有几个接口是我们之前见过的,比如IAuthorizationPolicyProvider、IAuthorizationHandler。不着急研究其他几个接口的作用,咱们接着看下AuthorizationOptions:
public class AuthorizationOptions
{
    // 存放添加的策略,策略名不分区大小写
    private Dictionary<string, AuthorizationPolicy> PolicyMap { get; } = new Dictionary<string, AuthorizationPolicy>(StringComparer.OrdinalIgnoreCase);

    // 授权失败后,后续的 IAuthorizationHandler 是否还继续执行
    public bool InvokeHandlersAfterFailure { get; set; } = true;

    // 默认策略:身份认证通过的用户
    public AuthorizationPolicy DefaultPolicy { get; set; } = new AuthorizationPolicyBuilder().RequireAuthenticatedUser().Build();

    // 回退策略
    public AuthorizationPolicy? FallbackPolicy { get; set; }

    public void AddPolicy(string name, AuthorizationPolicy policy)
    {
        PolicyMap[name] = policy;
    }

    public void AddPolicy(string name, Action<AuthorizationPolicyBuilder> configurePolicy)
    {
        var policyBuilder = new AuthorizationPolicyBuilder();
        configurePolicy(policyBuilder);
        PolicyMap[name] = policyBuilder.Build();
    }

    public AuthorizationPolicy? GetPolicy(string name)
    {
        if (PolicyMap.TryGetValue(name, out var value))
        {
            return value;
        }

        return null;
    }
}
默认策略与回退策略不同:
- 默认策略,是指当接口标注了
Authorize,但是未明确指定策略时,应使用的策略 - 回退策略,是指当某个接口未标注
Authorize时,应使用的策略,且该值是可以为空的
接下来看中间件的注册app.UseAuthorization():
public static class AuthorizationAppBuilderExtensions
{
    public static IApplicationBuilder UseAuthorization(this IApplicationBuilder app)
    {
        VerifyServicesRegistered(app);

        return app.UseMiddleware<AuthorizationMiddleware>();
    }

    private static void VerifyServicesRegistered(IApplicationBuilder app)
    {
        if (app.ApplicationServices.GetService(typeof(AuthorizationPolicyMarkerService)) == null)
        {
            throw new InvalidOperationException(...);
        }
    }
}

internal class AuthorizationPolicyMarkerService
{
}
从这里,我们得知了AuthorizationPolicyMarkerService的作用,就是为了确保在注册授权中间件之前,我们已经调用过了UseAuthorization,注册了全部所需要的服务。
接下来,深入AuthorizationMiddleware的实现:
public class AuthorizationMiddleware
{
    private const string SuppressUseHttpContextAsAuthorizationResource = "Microsoft.AspNetCore.Authorization.SuppressUseHttpContextAsAuthorizationResource";

    private readonly RequestDelegate _next;
    private readonly IAuthorizationPolicyProvider _policyProvider;

    public AuthorizationMiddleware(RequestDelegate next, IAuthorizationPolicyProvider policyProvider)
    {
        _next = next ?? throw new ArgumentNullException(nameof(next));
        _policyProvider = policyProvider ?? throw new ArgumentNullException(nameof(policyProvider));
    }

    public async Task Invoke(HttpContext context)
    {
        var endpoint = context.GetEndpoint();

        // ... 省略部分代码

        // AuthorizeAttribute 就实现了接口 IAuthorizeData,从这里也就可以得到我们的授权数据
        var authorizeData = endpoint?.Metadata.GetOrderedMetadata<IAuthorizeData>() ?? Array.Empty<IAuthorizeData>();
        // 1. 将所有授权要求组装到一个策略实例中
        var policy = await AuthorizationPolicy.CombineAsync(_policyProvider, authorizeData);
        // 无授权策略,则无需进行授权校验
        if (policy == null)
        {
            await _next(context);
            return;
        }

        // IPolicyEvaluator 的默认声明周期是 Transient,而该中间件的生命周期是 Singleton,
        // 所以该服务不建议注入到构造函数
        var policyEvaluator = context.RequestServices.GetRequiredService<IPolicyEvaluator>();

        // 2. 认证
        var authenticateResult = await policyEvaluator.AuthenticateAsync(policy, context);

        // 3. 如果标记了 AllowAnonymousAttribute 特性,则跳过授权校验
        if (endpoint?.Metadata.GetMetadata<IAllowAnonymous>() != null)
        {
            await _next(context);
            return;
        }

        object? resource;
        if (AppContext.TryGetSwitch(SuppressUseHttpContextAsAuthorizationResource, out var useEndpointAsResource) && useEndpointAsResource)
        {
            resource = endpoint;
        }
        else
        {
            resource = context;
        }

        // 4. 授权
        var authorizeResult = await policyEvaluator.AuthorizeAsync(policy, authenticateResult, context, resource);
        // 5. 针对授权结果,进行不同的响应处理
        var authorizationMiddlewareResultHandler = context.RequestServices.GetRequiredService<IAuthorizationMiddlewareResultHandler>();
        await authorizationMiddlewareResultHandler.HandleAsync(_next, context, policy, authorizeResult);
    }
}
从这里可以看出,授权的所有方式,都是基于策略来实现的。
下面我们一步步来分析它。先看第 1 步,了解它是如何将多种授权要求组装为一个策略的:
public class AuthorizationPolicy
{
    public static async Task<AuthorizationPolicy?> CombineAsync(IAuthorizationPolicyProvider policyProvider, IEnumerable<IAuthorizeData> authorizeData)
    {
        // ... 省略部分代码

        AuthorizationPolicyBuilder? policyBuilder = null;

        foreach (var authorizeDatum in authorizeData)
        {
            if (policyBuilder == null)
            {
                policyBuilder = new AuthorizationPolicyBuilder();
            }

            // 先处理策略
            var useDefaultPolicy = true;
            if (!string.IsNullOrWhiteSpace(authorizeDatum.Policy))
            {
                // 通过指定的策略名获取策略实例
                var policy = await policyProvider.GetPolicyAsync(authorizeDatum.Policy);
                if (policy == null)
                {
                    throw new InvalidOperationException(...);
                }
                policyBuilder.Combine(policy);
                useDefaultPolicy = false;
            }

            // 再处理角色
            var rolesSplit = authorizeDatum.Roles?.Split(',');
            if (rolesSplit?.Length > 0)
            {
                var trimmedRolesSplit = rolesSplit.Where(r => !string.IsNullOrWhiteSpace(r)).Select(r => r.Trim());
                // 将角色要求添加到策略
                policyBuilder.RequireRole(trimmedRolesSplit);
                useDefaultPolicy = false;
            }

            // 最后处理认证方案
            var authTypesSplit = authorizeDatum.AuthenticationSchemes?.Split(',');
            if (authTypesSplit?.Length > 0)
            {
                foreach (var authType in authTypesSplit)
                {
                    if (!string.IsNullOrWhiteSpace(authType))
                    {
                        // 将认证方案要求添加到策略
                        policyBuilder.AuthenticationSchemes.Add(authType.Trim());
                    }
                }
            }

            if (useDefaultPolicy)
            {
                // 添加默认策略
                policyBuilder.Combine(await policyProvider.GetDefaultPolicyAsync());
            }
        }

        // 如果此时还没有策略,则查看是否存在回退策略,如果有,则返回
        if (policyBuilder == null)
        {
            var fallbackPolicy = await policyProvider.GetFallbackPolicyAsync();
            if (fallbackPolicy != null)
            {
                return fallbackPolicy;
            }
        }

        // 返回当前组装的策略实例
        return policyBuilder?.Build();
    }
}
整体逻辑已经通过注释给出了,就不多做解释了。我们来看一下IAuthorizationPolicyProvider,在之前我们就已经认识它了,这里也用到了:
public interface IAuthorizationPolicyProvider
{
    Task<AuthorizationPolicy?> GetPolicyAsync(string policyName);

    Task<AuthorizationPolicy> GetDefaultPolicyAsync();

    Task<AuthorizationPolicy?> GetFallbackPolicyAsync();
}
从名字我们可以看出,该接口用于提供授权策略实例。
该接口有三个方法:
GetPolicyAsync:根据策略名获取策略实例GetDefaultPolicyAsync:获取默认策略,当我们指明了要进行授权校验,但没有设定任何授权要求(如策略名、角色、身份认证方案等)时,会使用默认策略。GetFallbackPolicyAsync:获取回退策略,当我们没有指定任何授权校验时,会使用回退策略。如果回退策略为 null,则跳过授权校验。
下面就看下该接口的默认实现DefaultAuthorizationPolicyProvider:
public class DefaultAuthorizationPolicyProvider : IAuthorizationPolicyProvider
{
    private readonly AuthorizationOptions _options;
    private Task<AuthorizationPolicy>? _cachedDefaultPolicy;
    private Task<AuthorizationPolicy?>? _cachedFallbackPolicy;

    public DefaultAuthorizationPolicyProvider(IOptions<AuthorizationOptions> options)
    {
        _options = options.Value;
    }

    public virtual Task<AuthorizationPolicy?> GetPolicyAsync(string policyName)
    {
        // 从 AuthorizationOptions 中查找已添加的策略实例
        return Task.FromResult(_options.GetPolicy(policyName));
    }

    public Task<AuthorizationPolicy> GetDefaultPolicyAsync()
    {
        // 取 AuthorizationOptions 中配置的 DefaultPolicy
        if (_cachedDefaultPolicy == null || _cachedDefaultPolicy.Result != _options.DefaultPolicy)
        {
            _cachedDefaultPolicy = Task.FromResult(_options.DefaultPolicy);
        }

        return _cachedDefaultPolicy;
    }

    public Task<AuthorizationPolicy?> GetFallbackPolicyAsync()
    {
        // 取 AuthorizationOptions 中配置的 FallbackPolicy
        if (_cachedFallbackPolicy == null || _cachedFallbackPolicy.Result != _options.FallbackPolicy)
        {
            _cachedFallbackPolicy = Task.FromResult(_options.FallbackPolicy);
        }

        return _cachedFallbackPolicy;
    }
}
OK,IAuthorizationPolicyProvider我们就看到这。
下面,我们回到AuthorizationMiddleware,继续往下来到第 2 步,出现了新接口IPolicyEvaluator:
public interface IPolicyEvaluator
{
    Task<AuthenticateResult> AuthenticateAsync(AuthorizationPolicy policy, HttpContext context);

    Task<PolicyAuthorizationResult> AuthorizeAsync(AuthorizationPolicy policy, AuthenticateResult authenticationResult, HttpContext context, object? resource);
}
该接口用于评估身份认证和授权结果,分别产出AuthenticateResult和PolicyAuthorizationResult。
该接口有两个方法:
AuthenticateAsync:根据策略中提供的方案进行身份认证,生成认证结果AuthorizeAsync:根据策略和认证结果进行授权,生成授权结果
该接口的默认实现类为PolicyEvaluator:
public class PolicyEvaluator : IPolicyEvaluator
{
    private readonly IAuthorizationService _authorization;

    public PolicyEvaluator(IAuthorizationService authorization)
    {
        _authorization = authorization;
    }

    public virtual async Task<AuthenticateResult> AuthenticateAsync(AuthorizationPolicy policy, HttpContext context)
    {
        // 策略中指定了身份认证方案
        if (policy.AuthenticationSchemes != null && policy.AuthenticationSchemes.Count > 0)
        {
            // 将多个身份认证方案的结果进行合并
            ClaimsPrincipal? newPrincipal = null;
            foreach (var scheme in policy.AuthenticationSchemes)
            {
                var result = await context.AuthenticateAsync(scheme);
                if (result != null && result.Succeeded)
                {
                    newPrincipal = SecurityHelper.MergeUserPrincipal(newPrincipal, result.Principal);
                }
            }

            if (newPrincipal != null)
            {
                context.User = newPrincipal;
                return AuthenticateResult.Success(new AuthenticationTicket(newPrincipal, string.Join(";", policy.AuthenticationSchemes)));
            }
            else
            {
                context.User = new ClaimsPrincipal(new ClaimsIdentity());
                return AuthenticateResult.NoResult();
            }
        }

        // 是否通过了默认的身份认证方案
        return (context.User?.Identity?.IsAuthenticated ?? false)
            ? AuthenticateResult.Success(new AuthenticationTicket(context.User, "context.User"))
            : AuthenticateResult.NoResult();
    }

    public virtual async Task<PolicyAuthorizationResult> AuthorizeAsync(AuthorizationPolicy policy, AuthenticateResult authenticationResult, HttpContext context, object? resource)
    {
        var result = await _authorization.AuthorizeAsync(context.User, resource, policy);
        if (result.Succeeded)
        {
            return PolicyAuthorizationResult.Success();
        }

        // 授权失败时:
        //      若身份认证通过,则返回Forbid
        //      若身份认证未通过,则发出质询
        return (authenticationResult.Succeeded)
            ? PolicyAuthorizationResult.Forbid(result.Failure)
            : PolicyAuthorizationResult.Challenge();
    }
}
从这里,我们可以看出,如果默认的身份认证方案无法提供完整的身份认证,可以在IAuthorizeData中指定AuthenticationSchemes,通过它来重新进行身份认证。
这里面使用到了新的接口IAuthorizationService,从名字也可以看出它是专门用来做授权的服务接口,真正的授权逻辑代码被封装到了该接口的实现类中,我们看下它的定义:
public interface IAuthorizationService
{
    Task<AuthorizationResult> AuthorizeAsync(ClaimsPrincipal user, object? resource, IEnumerable<IAuthorizationRequirement> requirements);

    Task<AuthorizationResult> AuthorizeAsync(ClaimsPrincipal user, object? resource, string policyName);
}
该接口具有一个方法AuthorizeAsync的两种重载:
- 检查用户是否满足指定资源(resource)的特定要求(requirements)
- 检查用户是否满足特定的授权策略
如果你足够细心,你会发现这两个重载并不能满足上方代码的调用,因为调用时第三个参数我们传递的是AuthorizationPolicy类型,其实啊,它是被放到了扩展方法中。
public static class AuthorizationServiceExtensions
{
    public static Task<AuthorizationResult> AuthorizeAsync(this IAuthorizationService service, ClaimsPrincipal user, object? resource, AuthorizationPolicy policy)
    {
        return service.AuthorizeAsync(user, resource, policy.Requirements);
    }
}
所以,从这里我们就知道了,它调用的实际上是第一个重载。
该接口的默认实现为DefaultAuthorizationService:
public class DefaultAuthorizationService : IAuthorizationService
{
    // 以下字段均为构造函数注入
    private readonly AuthorizationOptions _options;
    private readonly IAuthorizationHandlerContextFactory _contextFactory;
    private readonly IAuthorizationHandlerProvider _handlers;
    private readonly IAuthorizationEvaluator _evaluator;
    private readonly IAuthorizationPolicyProvider _policyProvider;

    public virtual async Task<AuthorizationResult> AuthorizeAsync(ClaimsPrincipal user, object? resource, IEnumerable<IAuthorizationRequirement> requirements)
    {
        var authContext = _contextFactory.CreateContext(requirements, user, resource);
        var handlers = await _handlers.GetHandlersAsync(authContext);
        foreach (var handler in handlers)
        {
            await handler.HandleAsync(authContext);
            // 若配置为授权失败后不在调用后续Handlers
            if (!_options.InvokeHandlersAfterFailure && authContext.HasFailed)
            {
                break;
            }
        }

        var result = _evaluator.Evaluate(authContext);

        // 省略一些代码...

        return result;
    }

    public virtual async Task<AuthorizationResult> AuthorizeAsync(ClaimsPrincipal user, object? resource, string policyName)
    {
        var policy = await _policyProvider.GetPolicyAsync(policyName);
        if (policy == null)
        {
            throw new InvalidOperationException($"No policy found: {policyName}.");
        }
        return await this.AuthorizeAsync(user, resource, policy);
    }
}
首先,这里用到了IAuthorizationHandlerContextFactory,它用来创建授权处理器上下文:
public interface IAuthorizationHandlerContextFactory
{
    AuthorizationHandlerContext CreateContext(IEnumerable<IAuthorizationRequirement> requirements, ClaimsPrincipal user, object? resource);
}

public class DefaultAuthorizationHandlerContextFactory : IAuthorizationHandlerContextFactory
{
    public virtual AuthorizationHandlerContext CreateContext(IEnumerable<IAuthorizationRequirement> requirements, ClaimsPrincipal user, object? resource)
    {
        return new AuthorizationHandlerContext(requirements, user, resource);
    }
}
然后,下面用到了IAuthorizationHandlerProvider,它用来提供 Handler,这些 Handler 包括我们之前实现的MinimumAgeAuthorizationHandler等。
public interface IAuthorizationHandlerProvider
{
    Task<IEnumerable<IAuthorizationHandler>> GetHandlersAsync(AuthorizationHandlerContext context);
}

public class DefaultAuthorizationHandlerProvider : IAuthorizationHandlerProvider
{
    private readonly IEnumerable<IAuthorizationHandler> _handlers;

    public DefaultAuthorizationHandlerProvider(IEnumerable<IAuthorizationHandler> handlers)
    {
        _handlers = handlers;
    }

    public Task<IEnumerable<IAuthorizationHandler>> GetHandlersAsync(AuthorizationHandlerContext context)
        => Task.FromResult(_handlers);
}
另外,这里还用到了IAuthorizationEvaluator,该接口用于评估授权结果是成功还是失败,并将结果构造为AuthorizationResult实例。
public interface IAuthorizationEvaluator
{
    AuthorizationResult Evaluate(AuthorizationHandlerContext context);
}

public class DefaultAuthorizationEvaluator : IAuthorizationEvaluator
{
    public AuthorizationResult Evaluate(AuthorizationHandlerContext context)
        => context.HasSucceeded
            ? AuthorizationResult.Success()
            : AuthorizationResult.Failed(context.HasFailed
                ? AuthorizationFailure.ExplicitFail()
                : AuthorizationFailure.Failed(context.PendingRequirements));
}
最后,获取到授权结果AuthorizationResult后,我们就来到了第 5 步,由IAuthorizationMiddlewareResultHandler针对不同的授权结果进行响应处理。
public interface IAuthorizationMiddlewareResultHandler
{
    Task HandleAsync(RequestDelegate next, HttpContext context, AuthorizationPolicy policy, PolicyAuthorizationResult authorizeResult);
}

public class AuthorizationMiddlewareResultHandler : IAuthorizationMiddlewareResultHandler
{
    public async Task HandleAsync(RequestDelegate next, HttpContext context, AuthorizationPolicy policy, PolicyAuthorizationResult authorizeResult)
    {
        // 需要发出质询
        if (authorizeResult.Challenged)
        {
            if (policy.AuthenticationSchemes.Count > 0)
            {
                foreach (var scheme in policy.AuthenticationSchemes)
                {
                    await context.ChallengeAsync(scheme);
                }
            }
            else
            {
                await context.ChallengeAsync();
            }

            return;
        }
        // 需要响应403
        else if (authorizeResult.Forbidden)
        {
            if (policy.AuthenticationSchemes.Count > 0)
            {
                foreach (var scheme in policy.AuthenticationSchemes)
                {
                    await context.ForbidAsync(scheme);
                }
            }
            else
            {
                await context.ForbidAsync();
            }

            return;
        }

        // 授权通过,继续执行管道
        await next(context);
    }
}
至此,容器中注册的几个服务均涉及到了,我们再来总结一下:
AuthorizationPolicyMarkerService:用于标志已经调用过了UseAuthorization,注册了授权所需要的全部服务。IAuthorizationService:默认实现为DefaultAuthorizationService,用于对用户进行授权(Authorize)。IAuthorizationHandlerContextFactory:默认实现为DefaultAuthorizationHandlerContextFactory,用于创建授权处理器上下文。IAuthorizationHandlerProvider:默认实现为DefaultAuthorizationHandlerProvider,用于提供用户授权的处理器(IAuthorizationHandler)IAuthorizationHandler:默认实现为PassThroughAuthorizationHandler(处理自身既是 Requirement,又是 Handler 的类),用于提供 Requirement 的处理逻辑。IAuthorizationPolicyProvider:默认实现为DefaultAuthorizationPolicyProvider,用于提供授权策略实例(AuthorizationPolicy)。IAuthorizationEvaluator:默认实现为DefaultAuthorizationEvaluator,用于评估授权结果是成功还是失败,并将结果构造为 AuthorizationResult 实例。IPolicyEvaluator:默认实现为PolicyEvaluator,用于评估身份认证和授权结果IAuthorizationMiddlewareResultHandler:默认实现为AuthorizationMiddlewareResultHandler,用于针对授权结果,进行不同的响应处理。
这下,当你要实现自定义操作时,只需要重写对应接口的实现就好啦。
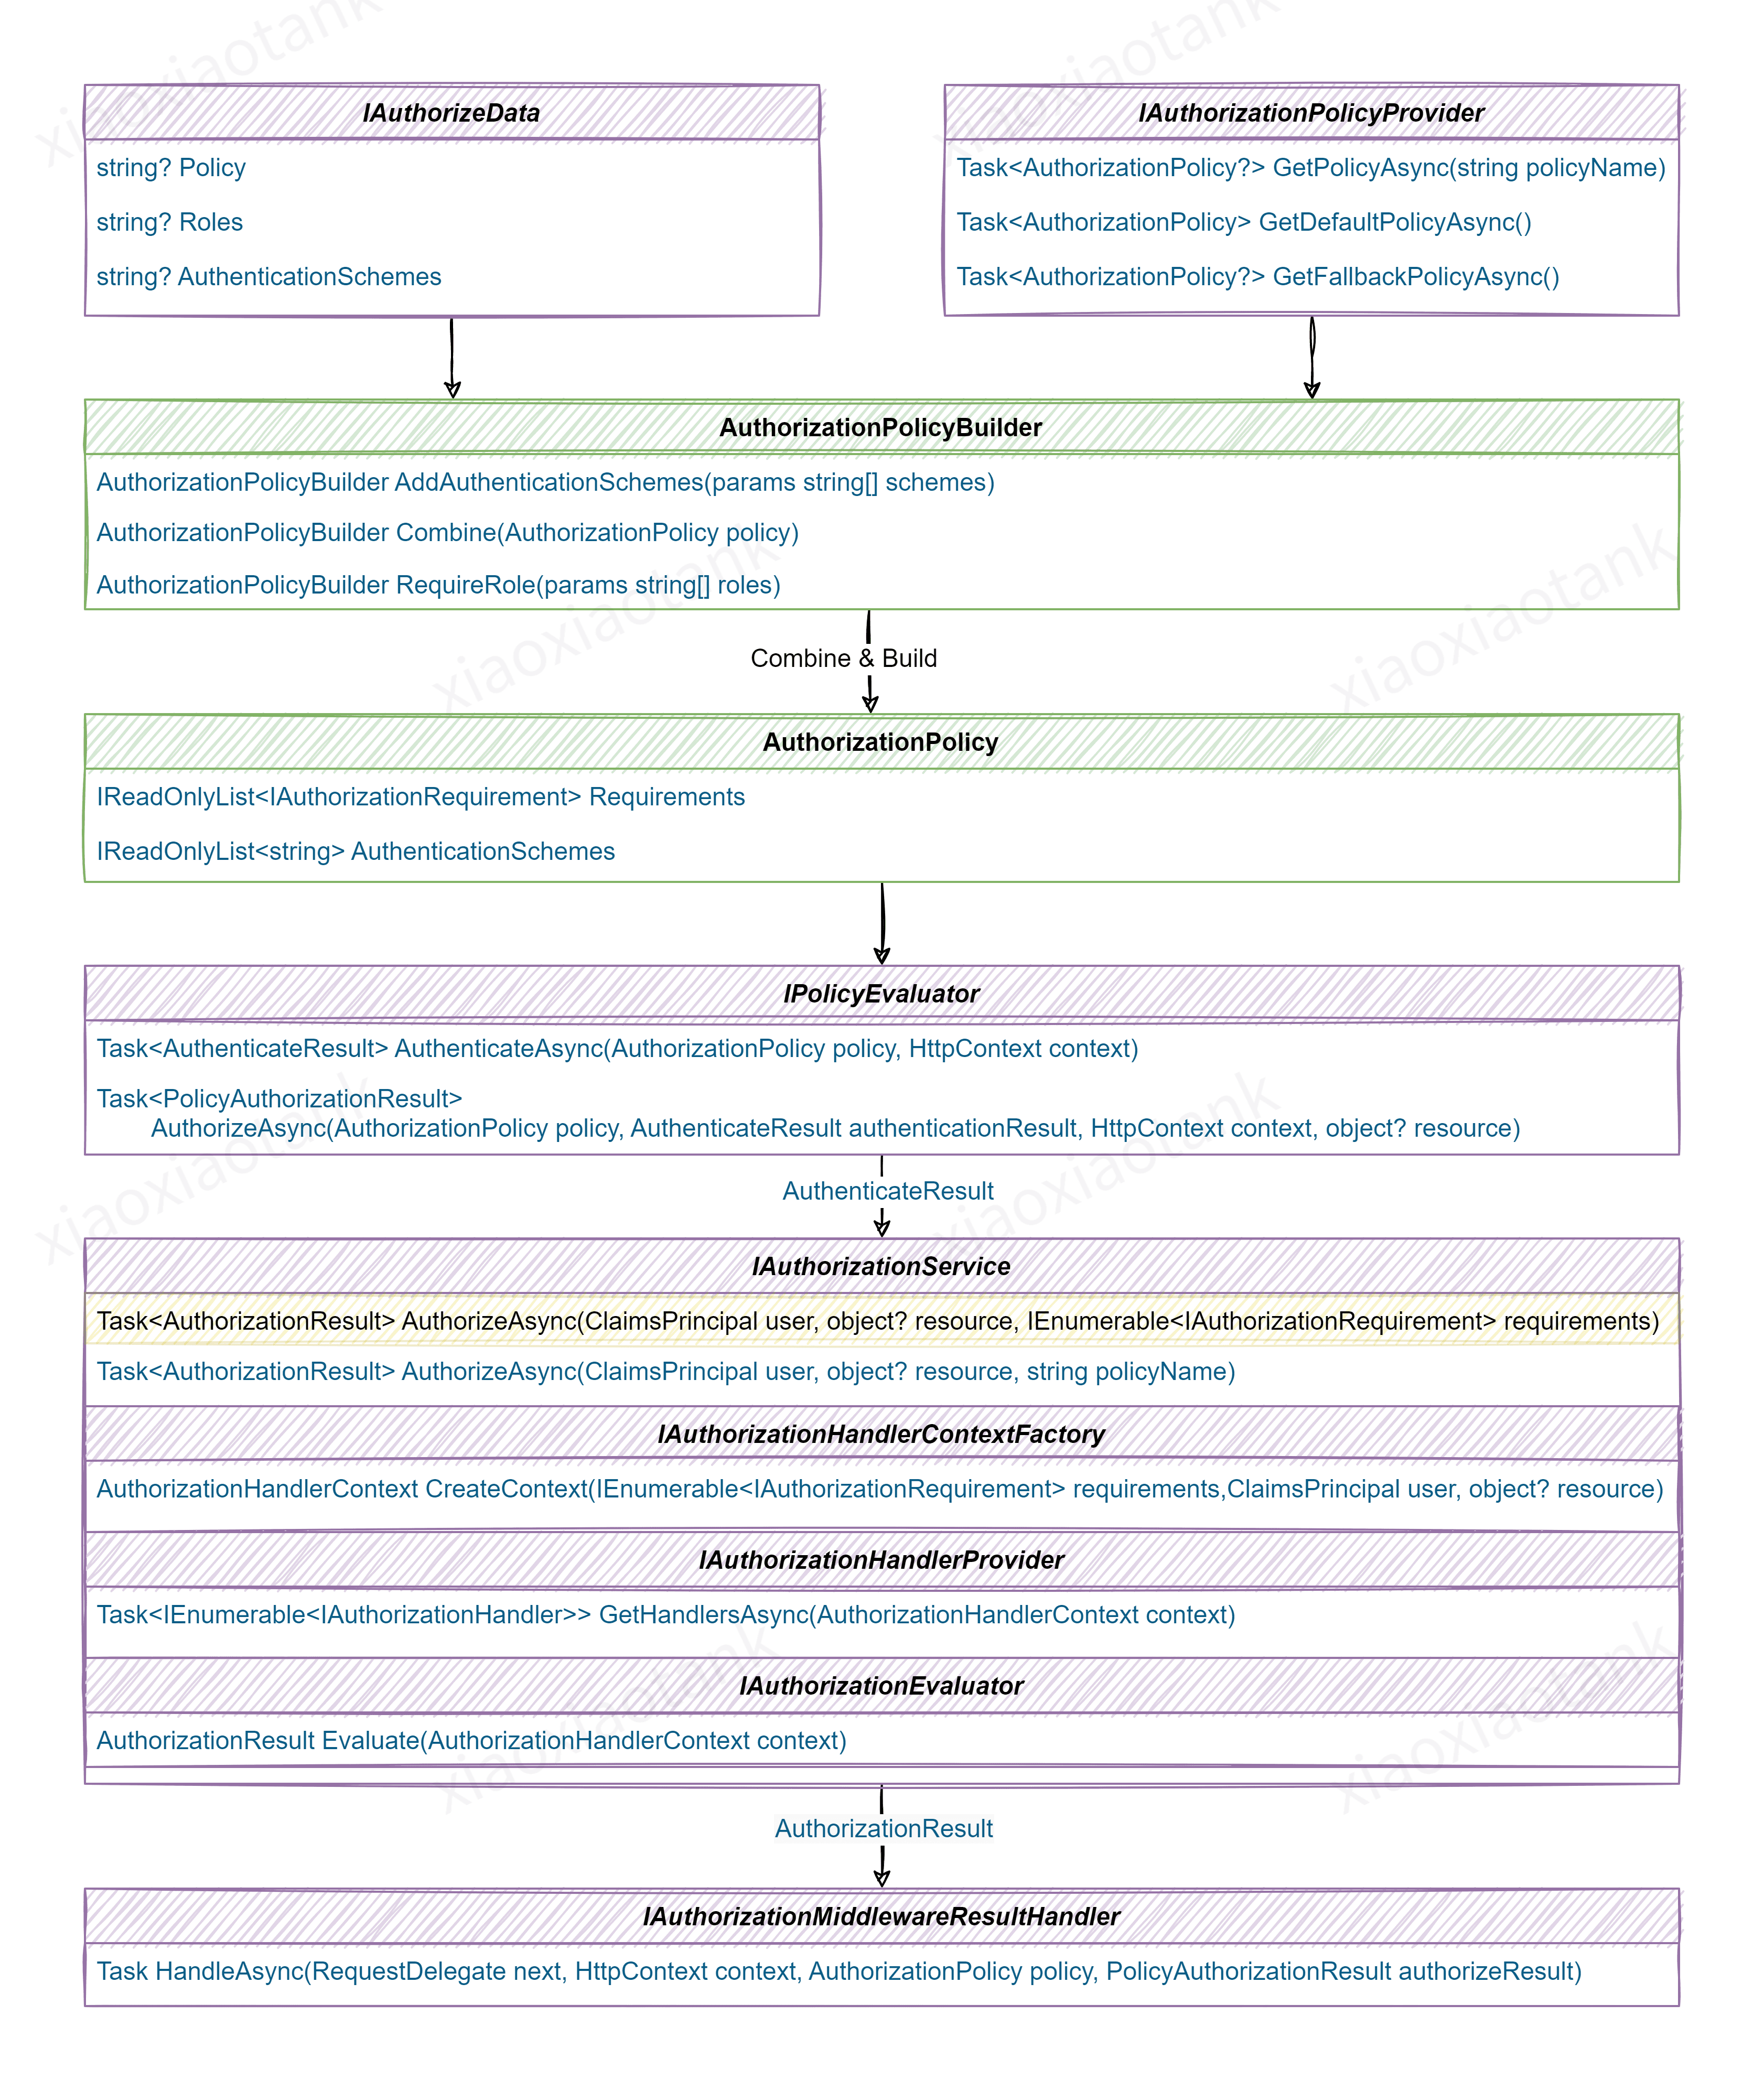
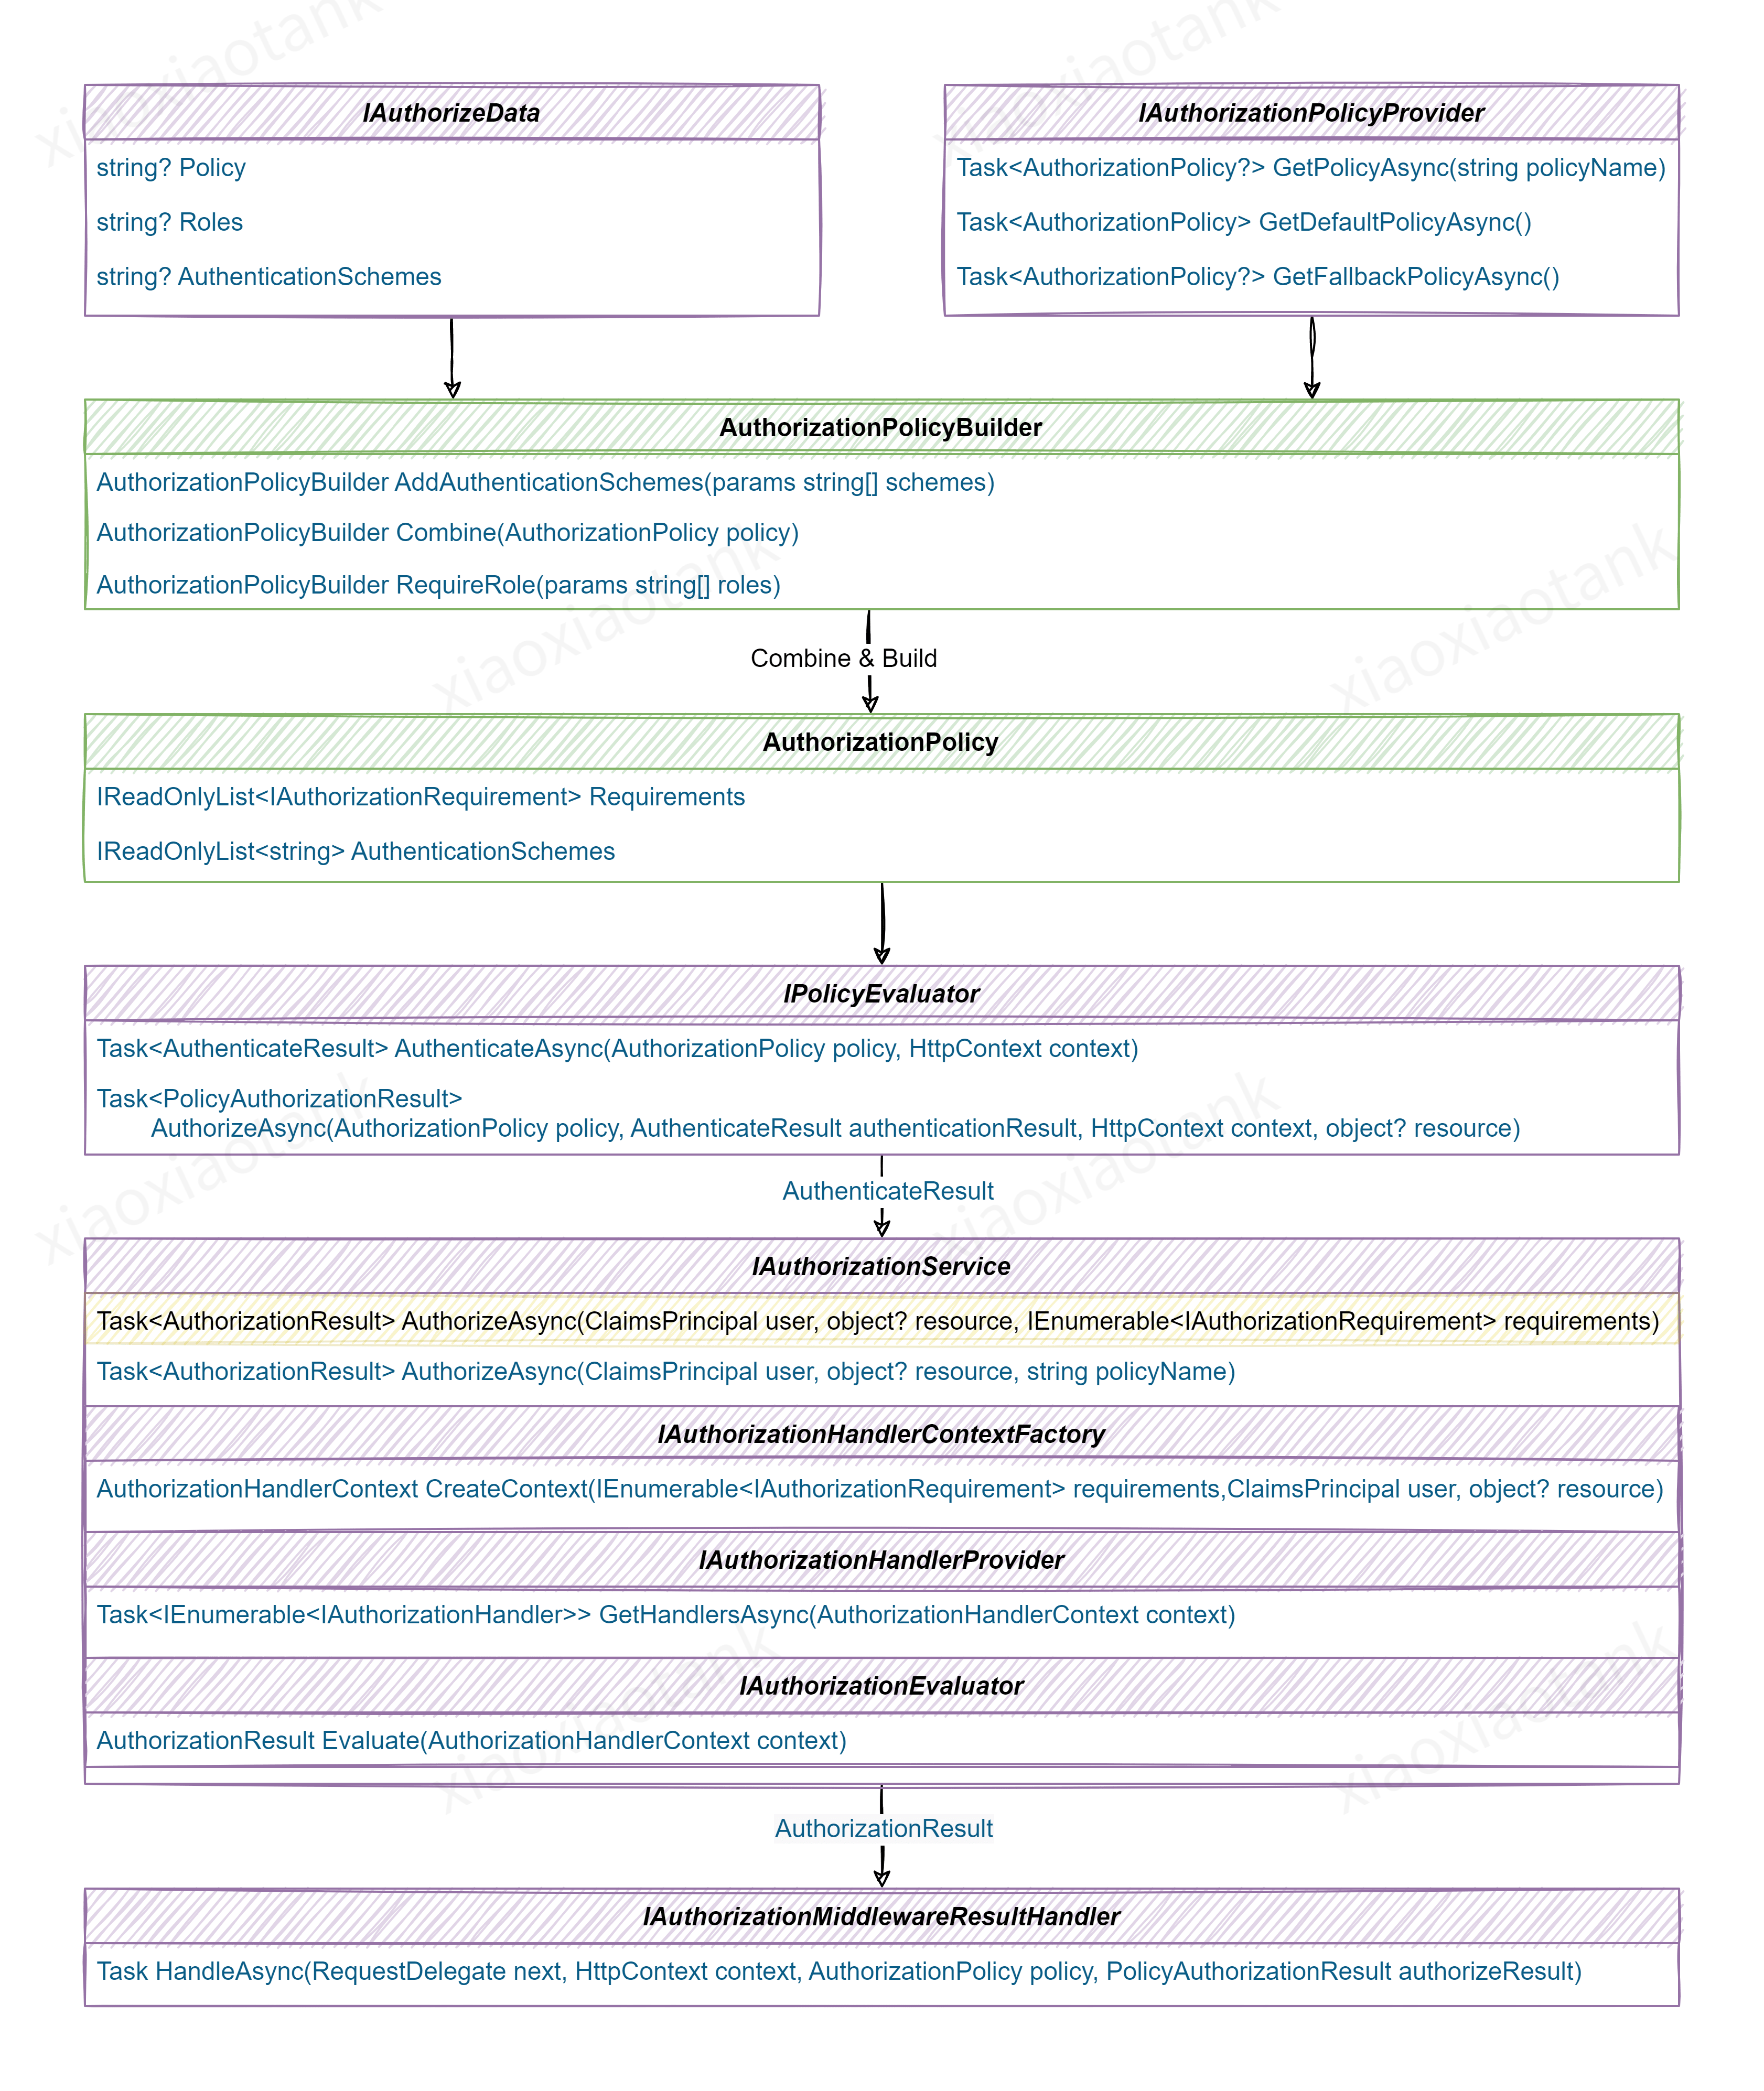
为了方便大家理解,我将各个接口的调用关系画了一张图:
最后,大家肯定知道还有一个可以控制权限的地方,就是IAuthorizationFilter过滤器。不过,如果没有必要,我并不推荐你使用它。因为它是 mvc 时代的旧产物,而且你要自己来实现一套完整的授权框架。
6. 补充
根据我的经验,大家用的比较多的授权方案是基于权限 Key 的,为此,我也写了一个简单的示例程序,供大家参考:XXTk.Auth.Samples.Permission.HttpApi