
This article is reproduced from a blog post.
Original author: RyzenAdorer
Original title: .NET Core 3 WPF MVVM Framework Prism Series: Modularization
Original link: https://www.cnblogs.com/ryzen/p/12185054.html
This article will introduce how to modularize an application using the MVVM framework Prism in the .NET Core 3 environment.
1. Introduction
As we all know, to build a low-coupling, high-cohesion application, we need to layer it. Take a WPF program as an example; we use the MVVM pattern to divide the application into View-ViewModel-Model, greatly eliminating the high coupling that previously existed between business logic and UI elements. This allows backend developers to focus more on business logic, while UI-related parts can be handed over to more professional UI personnel.
However, an application is composed of different business modules. In an ideal scenario, each business module has independent functionality and is loosely coupled with other business modules. Moreover, each business module can be developed, tested, and deployed independently. Such an application is very easy to extend, test, and maintain. Prism provides the functionality to modularize applications.
Let's first look at a small demo.
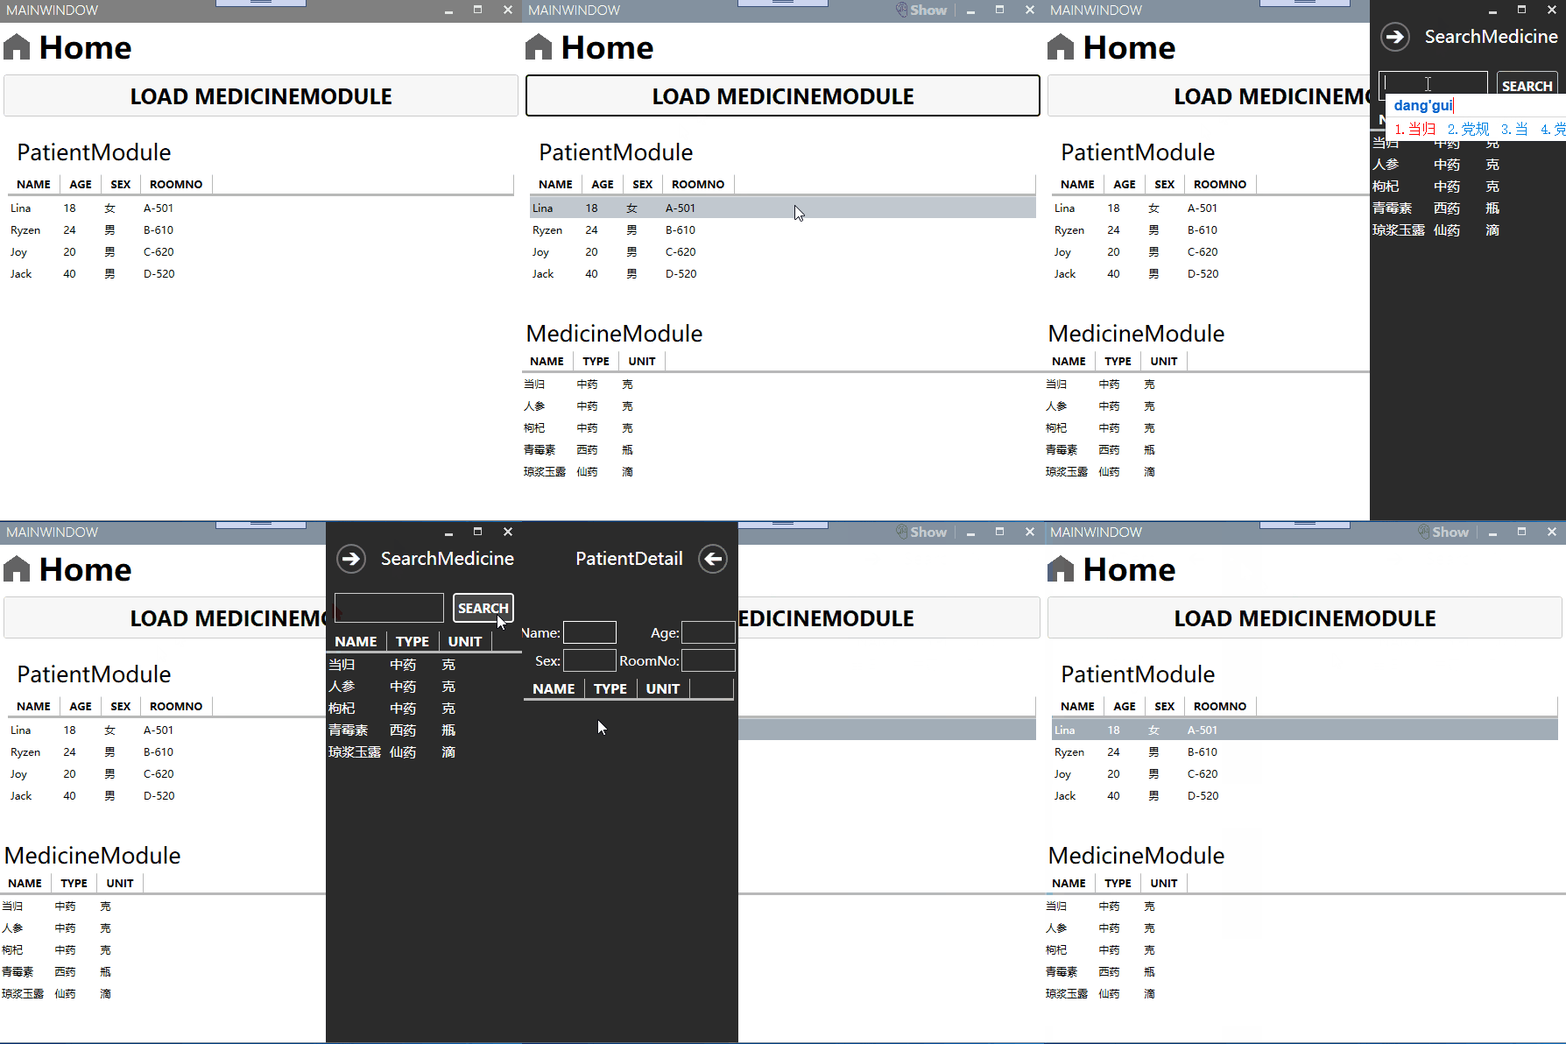
Now, let's examine the solution's projects:
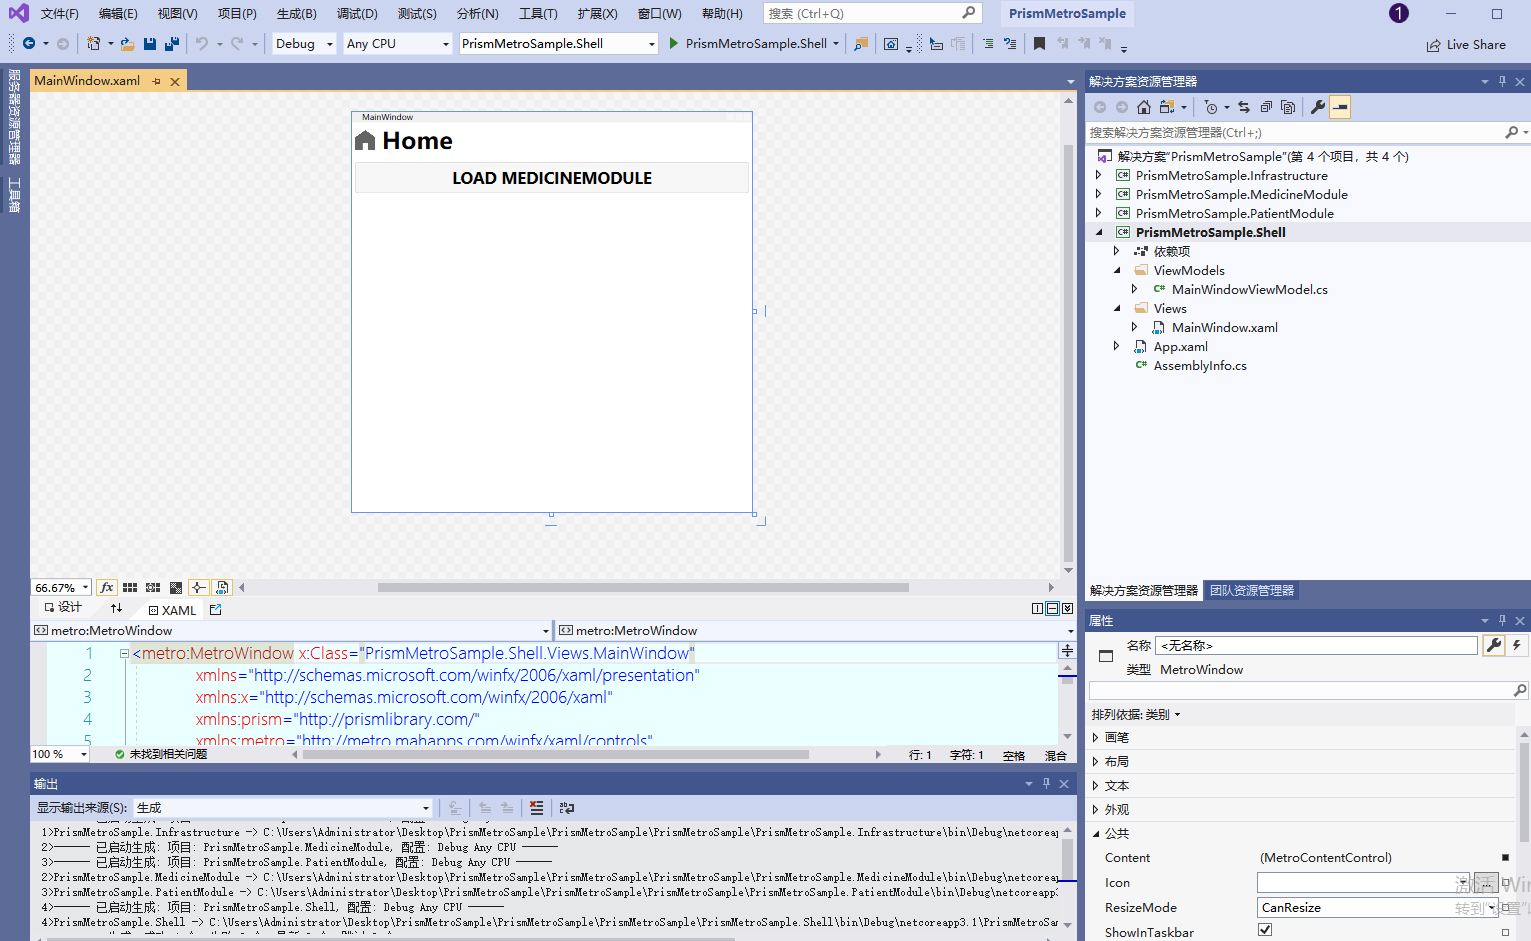
I divided this small demo into four projects: Shell is the main form project, MedicineModule and PatientModule are the separated business modules, and Infrastructure is the common shared project. We will explain step by step how to modularize this demo.
First, let's refer to an official diagram that roughly explains the process of creating and loading modules:
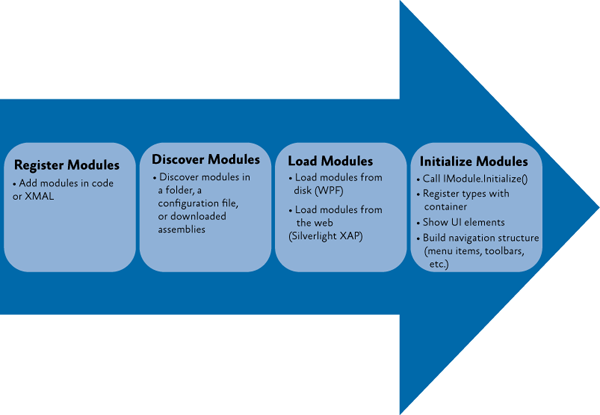
- Register/Discover modules
- Load modules
- Initialize modules
Let's follow this process to see how the demo achieves modularization.
2. Register/Discover Modules
2.1. Register Modules
Prism offers three ways to register modules:
- Code registration
- Directory file scan registration
- Configuration file App.config registration
We'll start with code registration. First, we need to define the modules. Create MedicineModule and PatientModule classes in the PrismMetroSample.MedicineModule and PrismMetroSample.PatientModule projects respectively. The code is as follows:
MedicineModule.cs:
public class MedicineModule : IModule
 {
     public void OnInitialized(IContainerProvider containerProvider)
     {
         var regionManager = containerProvider.Resolve<IRegionManager>();


         //MedicineMainContent
         regionManager.RegisterViewWithRegion(RegionNames.MedicineMainContentRegion, typeof(MedicineMainContent));

         //SearchMedicine-Flyout
         regionManager.RegisterViewWithRegion(RegionNames.FlyoutRegion, typeof(SearchMedicine));

         //rightWindowCommandsRegion
         regionManager.RegisterViewWithRegion(RegionNames.ShowSearchPatientRegion, typeof(ShowSearchPatient));
        }

     public void RegisterTypes(IContainerRegistry containerRegistry)
     {

     }
 }
PatientModule.cs:
public class PatientModule : IModule
 {
     public void OnInitialized(IContainerProvider containerProvider)
     {
         var regionManager = containerProvider.Resolve<IRegionManager>();

         //PatientList
         regionManager.RegisterViewWithRegion(RegionNames.PatientListRegion, typeof(PatientList));
         //PatientDetail-Flyout
         regionManager.RegisterViewWithRegion(RegionNames.FlyoutRegion, typeof(PatientDetail));

     }

     public void RegisterTypes(IContainerRegistry containerRegistry)
     {

     }
 }
2.1.1. Code Registration
Then, in the PrismMetroSample.Shell main form project, add references to PrismMetroSample.MedicineModule and PrismMetroSample.PatientModule assemblies. Afterwards, register the modules in code within App.xaml.cs:
protected override void ConfigureModuleCatalog(IModuleCatalog moduleCatalog)
{
   moduleCatalog.AddModule<PrismMetroSample.PatientModule.PatientModule>();

    //Set MedicineModule to load on demand
   var MedicineModuleType = typeof(PrismMetroSample.MedicineModule.MedicineModule);
   moduleCatalog.AddModule(new ModuleInfo()
   {
        ModuleName= MedicineModuleType.Name,
        ModuleType=MedicineModuleType.AssemblyQualifiedName,
        InitializationMode=InitializationMode.OnDemand
    });

 }
Note: Code registration does not involve a discovery phase; it directly registers the modules.
2.1.2. Directory File Scan Registration
2.1.2.1. Register Modules
First, add an attribute to MedicineModule, setting OnDemand = true for "on-demand" loading. PatientModule loads by default, so no attribute is needed.
[Module(ModuleName = "MedicineModule", OnDemand =true)]
 public class MedicineModule : IModule
Then, configure the build events for PrismMetroSample.MedicineModule and PrismMetroSample.PatientModule projects to copy their DLLs to the Modules folder under PrismMetroSample.Shell\bin\Debug\netcoreapp3.1.
The build event command line is as follows:
xcopy "$(TargetDir)$(TargetName)*$(TargetExt)" "$(SolutionDir)\PrismMetroSample.Shell\bin\Debug\netcoreapp3.1\Modules\" /Y /S
2.1.2.2. Discover Modules
Override the following function in App.xaml.cs:
protected override IModuleCatalog CreateModuleCatalog()
{
   //Return a directory module catalog pointing to the Modules folder
   return new DirectoryModuleCatalog() { ModulePath = @".\Modules" };
}
2.1.3. Register Using App.config
2.1.3.1. Register Modules
Add an App.config file to the main form project PrismMetroSample.Shell:
App.config:
<?xml version="1.0" encoding="utf-8" ?>
<configuration>
  <configSections>
    <section name="modules" type="Prism.Modularity.ModulesConfigurationSection, Prism.Wpf"/>
  </configSections>
  <modules>
    <!--Register PatientModule-->
    <module assemblyFile="PrismMetroSample.PatientModule.dll" moduleType="PrismMetroSample.PatientModule.PatientModule, PrismMetroSample.PatientModule, Version=1.0.0.0, Culture=neutral, PublicKeyToken=null" moduleName="PatientModule" startupLoaded="True" />
    <!--Register MedicineModule-->
    <module assemblyFile="PrismMetroSample.MedicineModule.dll" moduleType="PrismMetroSample.MedicineModule.MedicineModule, PrismMetroSample.MedicineModule, Version=1.0.0.0, Culture=neutral, PublicKeyToken=null" moduleName="MedicineModule" startupLoaded="false" />
  </modules>
</configuration>
Here, startupLoaded="true" means automatic loading (available when needed), while "false" means it will not be loaded and is set as an "on-demand" module.
2.1.3.2. Discover Modules
Modify the CreateModuleCatalog function in App.xaml.cs:
protected override IModuleCatalog CreateModuleCatalog()
 {
    return new ConfigurationModuleCatalog(); // Load module catalog from configuration file
 }
3. Load Modules
Prism applications load modules in two ways:
- Load "available" modules (default mode)
- Load "on-demand" modules based on the situation
In code registration, I registered PatientModule using the default method, while MedicineModule was set to "on-demand" loading. The benefit of on-demand loading is that after the application initializes, the MedicineModule is not loaded into memory, providing great flexibility. By default, we can load "available" modules, and then load the modules we need on demand according to our requirements.
Here, we can explain the implementation of on-demand loading for MedicineModule. First, we already set MedicineModule to "on-demand" loading in App.xaml.cs. Then, in the main form, we load MedicineModule via a button. The code is as follows:
MainWindowViewModel.cs:
public class MainWindowViewModel : BindableBase
 {
    IModuleManager _moduleManager;
    public MainWindowViewModel(IModuleManager moduleManager)
    {
       _moduleManager = moduleManager;
    }

    private DelegateCommand _loadPatientModuleCommand;
    public DelegateCommand LoadPatientModuleCommand =>
        _loadPatientModuleCommand ?? (_loadPatientModuleCommand = new DelegateCommand(ExecuteLoadPatientModuleCommand));

    void ExecuteLoadPatientModuleCommand()
    {
       _moduleManager.LoadModule("MedicineModule");
    }
 }
We can also detect the module load completion event. Add the following lines in MainWindowViewModel:
IModuleManager _moduleManager;
public MainWindowViewModel(IModuleManager moduleManager)
{
   _moduleManager = moduleManager;
   _moduleManager.LoadModuleCompleted += _moduleManager_LoadModuleCompleted;
}

private void _moduleManager_LoadModuleCompleted(object sender, LoadModuleCompletedEventArgs e)
{
   MessageBox.Show($"{e.ModuleInfo.ModuleName} module has been loaded.");
}
The effect is as follows:
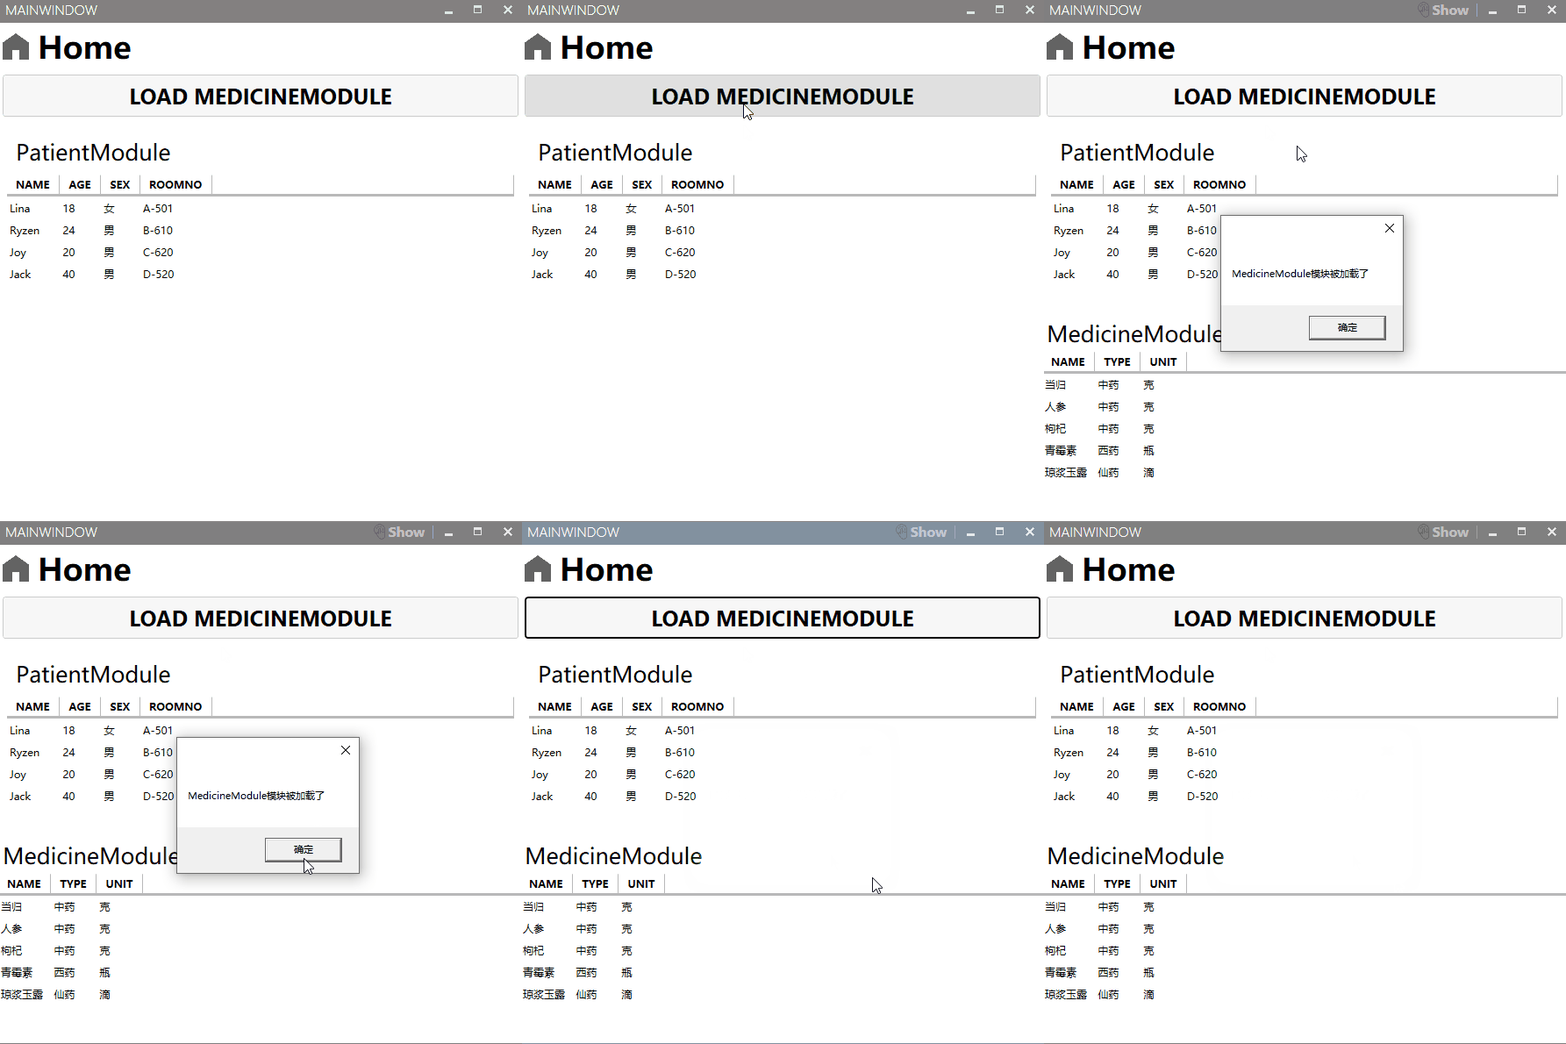
4. Initialize Modules
After loading a module, it will be initialized. Take MedicineModule as an example. Let's look at the code:
public class MedicineModule : IModule
 {
     public void OnInitialized(IContainerProvider containerProvider)
     {
         var regionManager = containerProvider.Resolve<IRegionManager>();


         //MedicineMainContent
         regionManager.RegisterViewWithRegion(RegionNames.MedicineMainContentRegion, typeof(MedicineMainContent));

         //SearchMedicine-Flyout
         regionManager.RegisterViewWithRegion(RegionNames.FlyoutRegion, typeof(SearchMedicine));

         //rightWindowCommandsRegion
         regionManager.RegisterViewWithRegion(RegionNames.ShowSearchPatientRegion, typeof(ShowSearchPatient));
        }

     public void RegisterTypes(IContainerRegistry containerRegistry)
     {

     }
 }
The IModule interface defines two functions: OnInitialized and RegisterTypes. The initialization order is RegisterTypes → OnInitialized, meaning RegisterTypes runs first. Although I didn't write any code in RegisterTypes here, it can still be used for dependency injection into the container for the MedicineModule. In OnInitialized, we typically register module views or subscribe to application-level events and services. Here, I registered three views in their respective regions.
Finally, as we saw in the demo at the beginning, clicking the patient list shows the patient detail page without data. This involves communication between forms. The patient list and patient detail page belong to the same module, which is easy to handle. However, how to add searched medications to the current patient's medication list in the detail page involves communication between different modules. Improper handling can lead to strong coupling between modules. In the next article, we will discuss how to use the Event Aggregator to achieve communication between forms within the same module and between forms across different modules. The complete demo will also be released in the next article.