
1. OpenXML SDK のインストール
まず、必要な OpenXML SDK の NuGet パッケージをインストールします。PPtx 解析用の Openxml フラット化 をオープンソースで公開しています。以下の 2 つの方法でインストールできます。
- NuGet パッケージマネージャーコンソール:
Install-Package dotnetCampus.DocumentFormat.OpenXml.Flatten -Version 2.0.0
- csproj 参照:
<PackageReference Include="dotnetCampus.DocumentFormat.OpenXml.Flatten" Version="2.0.0" />
2. Pptx の解析
ここでは PPTX の 7 種類の直線を使用し、設定可能な 7 種類の破線タイプをそれぞれ設定します。PPTX の表示は次のようになります。
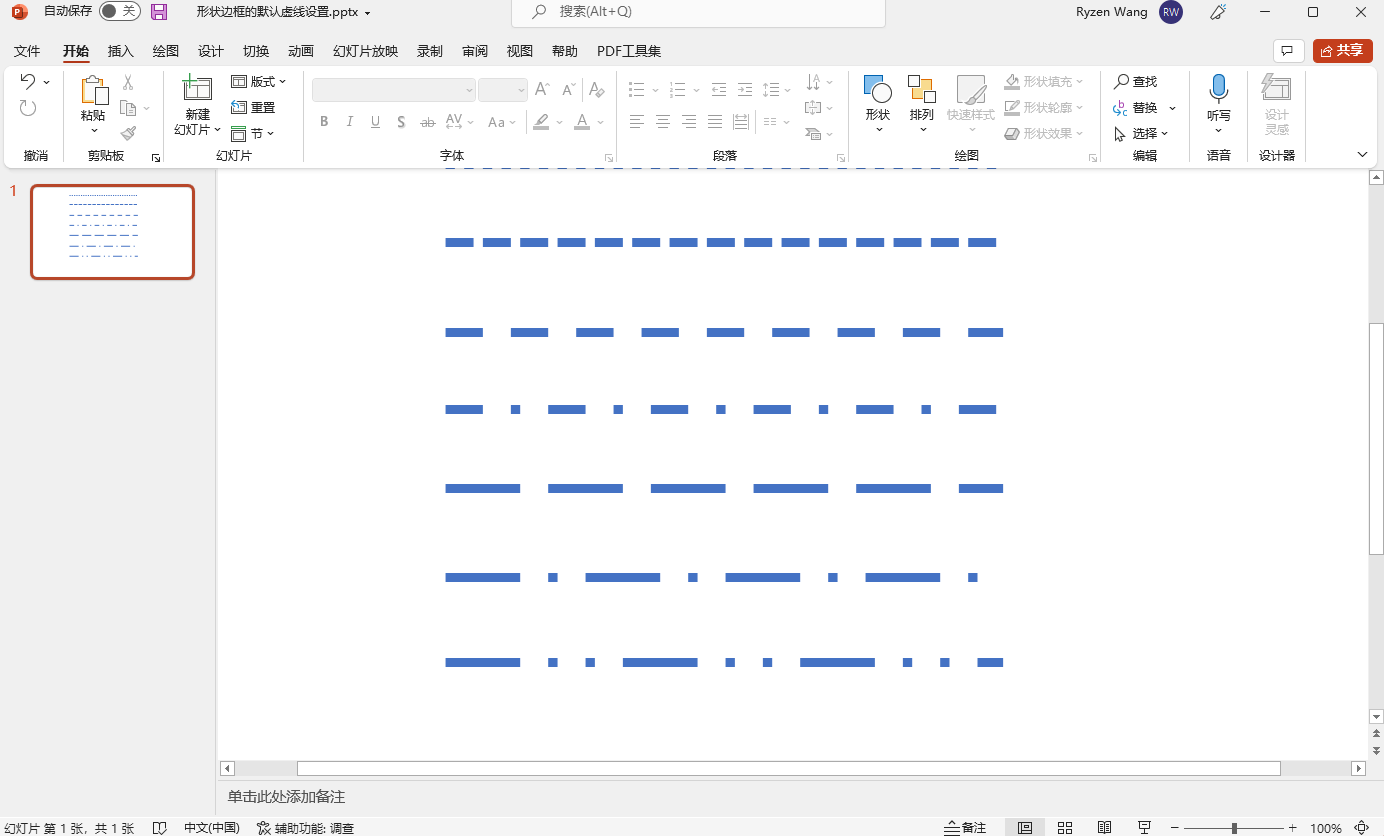
解析コードは以下の通りです。解析の主要なロジック部分です。
private void PptxToGeometry(string filePath)
{
    if (!File.Exists(filePath) || !filePath.EndsWith(".pptx", StringComparison.OrdinalIgnoreCase))
    {
        return;
    }

    var lines = new List<Line>();
    using var presentationDocument = PresentationDocument.Open(filePath, false);
    var presentationPart = presentationDocument.PresentationPart;
    var presentation = presentationPart?.Presentation;
    var slideIdList = presentation?.SlideIdList;
    if (slideIdList == null)
    {
        return;
    }
    foreach (var slideId in slideIdList.ChildElements.OfType<SlideId>())
    {
        var slidePart = (SlidePart)presentationPart.GetPartById(slideId.RelationshipId);
        var slide = slidePart.Slide;
        foreach (var shapeProperties in slide.Descendants<ShapeProperties>())
        {
            var presetGeometry = shapeProperties.GetFirstChild<PresetGeometry>();
            if (presetGeometry != null && presetGeometry.Preset.HasValue)
            {
                if (presetGeometry.Preset == ShapeTypeValues.StraightConnector1)
                {
                    var transform2D = shapeProperties.GetFirstChild<Transform2D>();
                    var extents = transform2D?.GetFirstChild<Extents>();
                    if (extents != null)
                    {
                        var width = new Emu(extents.Cx!.Value).ToPixel().Value;
                        var height = new Emu(extents.Cy!.Value).ToPixel().Value;


                        var presetDash = shapeProperties.GetFirstChild<Outline>()?.GetFirstChild<PresetDash>()?.Val;
                        var dashArray = GetDashArrayByPresetLineDashValues(presetDash);
                        var line = ConverterToGeometry( width, height, dashArray);
                        lines.Add(line);
                    }
                }
            }
        }
    }

    this.ListBox.ItemsSource = lines;
}
PPTX から WPF の破線にマッピングするメソッド:
private DoubleCollection GetDashArrayByPresetLineDashValues(PresetLineDashValues presetLineDashValues)
{
    DoubleCollection dashStyle = presetLineDashValues switch
    {
        PresetLineDashValues.Solid => new(),
        PresetLineDashValues.Dot => new() { 0, 2 },
        PresetLineDashValues.Dash => new() { 3, 3 },
        PresetLineDashValues.LargeDash => new() { 8, 3 },
        PresetLineDashValues.DashDot => new() { 3, 3, 1, 3 },
        PresetLineDashValues.LargeDashDot => new() { 7.5, 3.5, 1, 3.5 },
        PresetLineDashValues.LargeDashDotDot => new() { 8, 3, 1, 3, 1, 3 },
        PresetLineDashValues.SystemDash => new() { 3, 1 },
        PresetLineDashValues.SystemDot => new() { 1, 1 },
        PresetLineDashValues.SystemDashDot => new() { 2, 2, 0, 2 },
        PresetLineDashValues.SystemDashDotDot => new() { 2, 2, 0, 2 },
        _ => new DoubleCollection()
    };
    return dashStyle;
}
最終的な線を描画するメソッド:
private Line ConverterToGeometry(double width, double height, DoubleCollection dashDoubleCollection)
{
    var line = new Line
    {
        X1 = 0,
        Y1 = 0,
        X2 = width,
        Y2 = height,
        StrokeDashArray = dashDoubleCollection,
        Stroke = Stroke,
        StrokeThickness = StrokeThickness
    };
    return line;
}
最終的な結果:
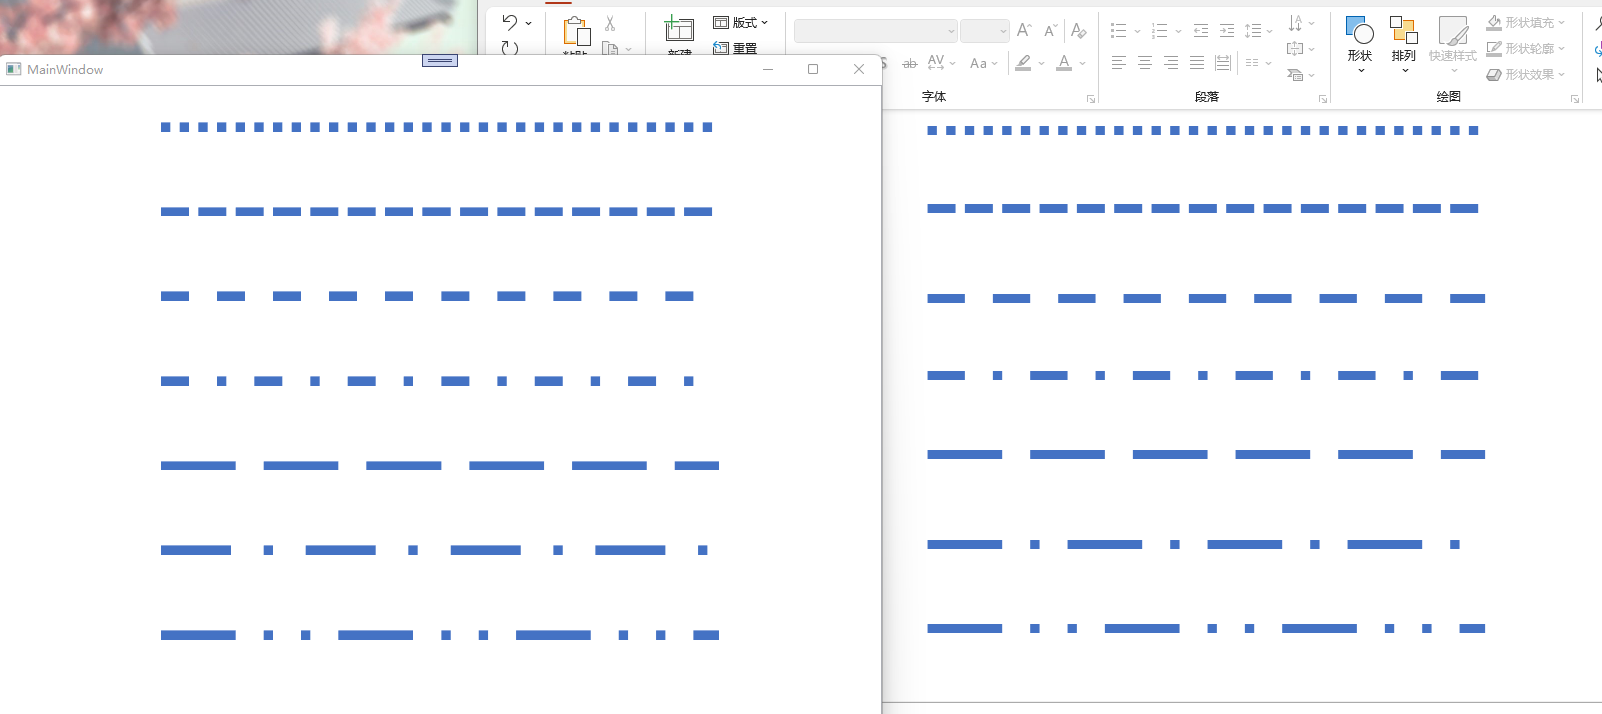
ほぼ近い結果が得られていることがわかります。もちろん、私のコードを基にさらに正確な値を微調整することも可能です。GetDashArrayByPresetLineDashValues メソッド内の対応する値を少し変更するだけで大丈夫です。
3. あとがき
実際、openxml ドキュメントには PresetDash の値が記載されています。おおよそ以下の通りです。
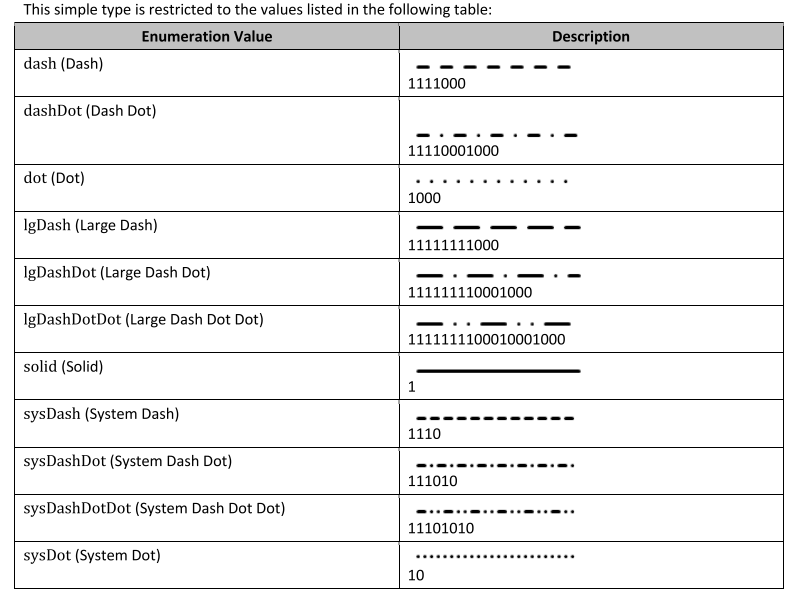
しかし、その値は WPF の Dash 設定用の DoubleCollection と対応していないため、上記のマッピング値はすべて自分で微調整したものです。
4. ソースコード
BlogCodeSample/PptDashConverToWpfSample at main · ZhengDaoWang/BlogCodeSample