
本文透過.NET Core 3.1 分享 Web API 基礎知識,其他更新版本相差不遠
一、前言
隨著近年前後端分離、微服務等模式的興起,.NET Core 也如火如荼地發展,自 16 年發布第一個版本到 19 年底的 3.1 LTS 版本,以及即將發布的.NET 5,.NET Core 一路更迭,在部署和開發工具上也都支援了跨平台應用。一直對.NET Core 有所關注,但未涉及太多實際應用,經過一番學習和了解後,於是分享出來。本文主要以.NET Core Web API 為例,講述.NET Core 的基本應用及注意事項,對於想透過 WebAPI 搭建介面應用的開發者,應該能提供一個系統的輪廓和認識,同時和更多的.NET Core 開發者交流互動,探本勘誤,加強對知識的理解,並幫助更多的人。本文以貼近基本的實際操作為主,部分概念或基礎步驟不再贅述,文中如有疏漏,還望不吝斧正。
二、Swagger 調試 Web API
開發環境:Visual Studio 2019
為解決前後端苦於介面文件與實際不一致、維護和更新文件耗時費力等問題,swagger 應運而生,同時也解決了介面測試問題。話不多說,直接說明應用步驟。
- 新建一個 ASP.NET Core Web API 應用程式,版本選擇.ASP.NET Core 3.1;
- 透過 NuGet 安裝套件:Swashbuckle.AspNetCore,當前範例版本 5.5.0;
- 在 Startup 類別的 ConfigureServices 方法內新增下列注入程式碼:
services.AddSwaggerGen(c =>
{
    c.SwaggerDoc("v1", new OpenApiInfo
    {
        Title = "My API",
        Version = "v1",
        Description = "API文件描述",
        Contact = new OpenApiContact
        {
            Email = "5007032@qq.com",
            Name = "測試專案",
            //Url = new Uri("http://t.abc.com/")
        },
        License = new OpenApiLicense
        {
            Name = "BROOKE授權",
            //Url = new Uri("http://t.abc.com/")
        }
    });

});
Startup 類別的 Configure 方法新增如下程式碼:
//配置Swagger
app.UseSwagger();
app.UseSwaggerUI(c =>
{
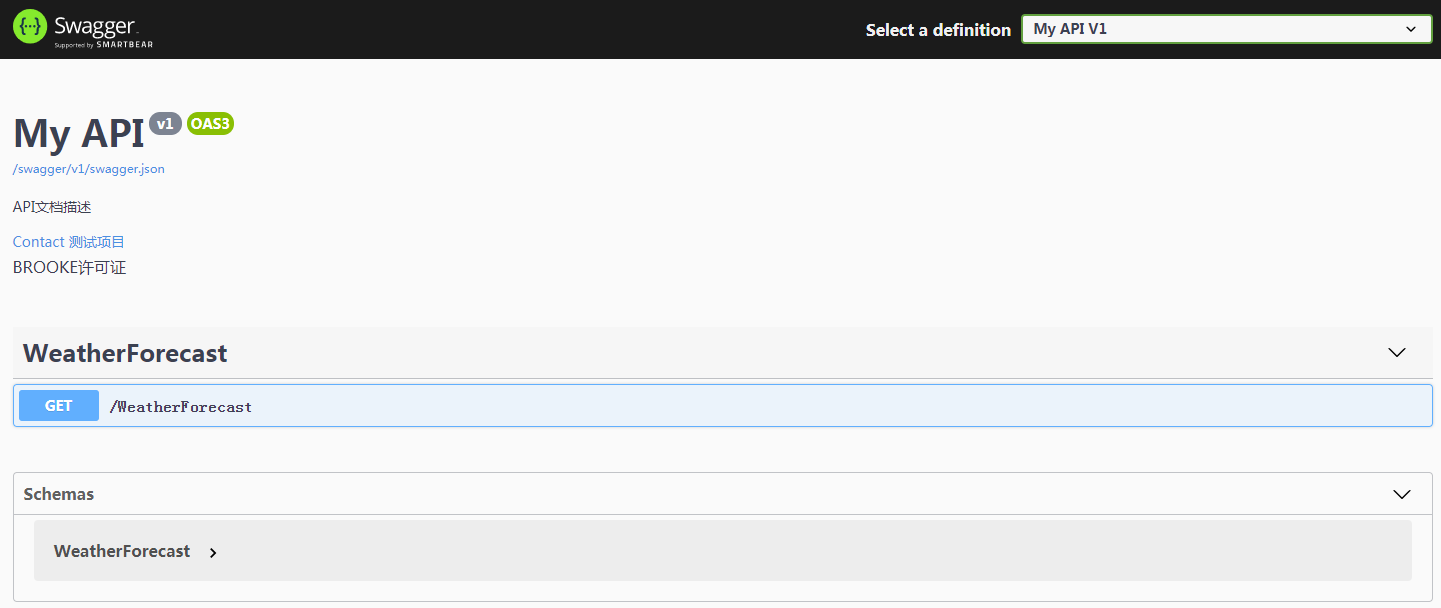
c.SwaggerEndpoint("/swagger/v1/swagger.json", "My API V1");
c.RoutePrefix = "api";// 如果設為空,存取路徑就是根域名/index.html,設為空表示直接在根域名存取;想換一個路徑,直接寫名字即可,比如直接寫c.RoutePrefix = "swagger"; 則存取路徑為 根域名/swagger/index.html
});
Ctrl+F5 進入瀏覽,按上述配置修改路徑為:http://localhost:***/api/index.html,即可看到 Swagger 頁面:
然而到這裡還沒完,相關介面的註解說明我們看不到,透過配置 XML 檔案的方式繼續調整程式碼如下,新增程式碼見加粗部分:
services.AddSwaggerGen(c =>
{
    c.SwaggerDoc("v1", new OpenApiInfo
    {
        Title = "My API",
        Version = "v1",
        Description = "API文件描述",
        Contact = new OpenApiContact
        {
            Email = "5007032@qq.com",
            Name = "測試專案",
            //Url = new Uri("http://t.abc.com/")
        },
        License = new OpenApiLicense
        {
            Name = "BROOKE授權",
            //Url = new Uri("http://t.abc.com/")
        }
    });

    var xmlFile = $"{Assembly.GetExecutingAssembly().GetName().Name}.xml";
    var xmlPath = Path.Combine(AppContext.BaseDirectory, xmlFile);
    c.IncludeXmlComments(xmlPath);
});
上述程式碼透過反射生成與 Web API 專案相匹配的 XML 檔名,AppContext.BaseDirectory 屬性用於建構 XML 檔案的路徑,關於 OpenApiInfo 內的配置參數用於文件的一些描述,在此不作過多說明。
然後右鍵 Web API 專案、屬性、建置,配置 XML 文件的輸出路徑,以及取消不必要的 XML 註解警告提醒(增加 1591):
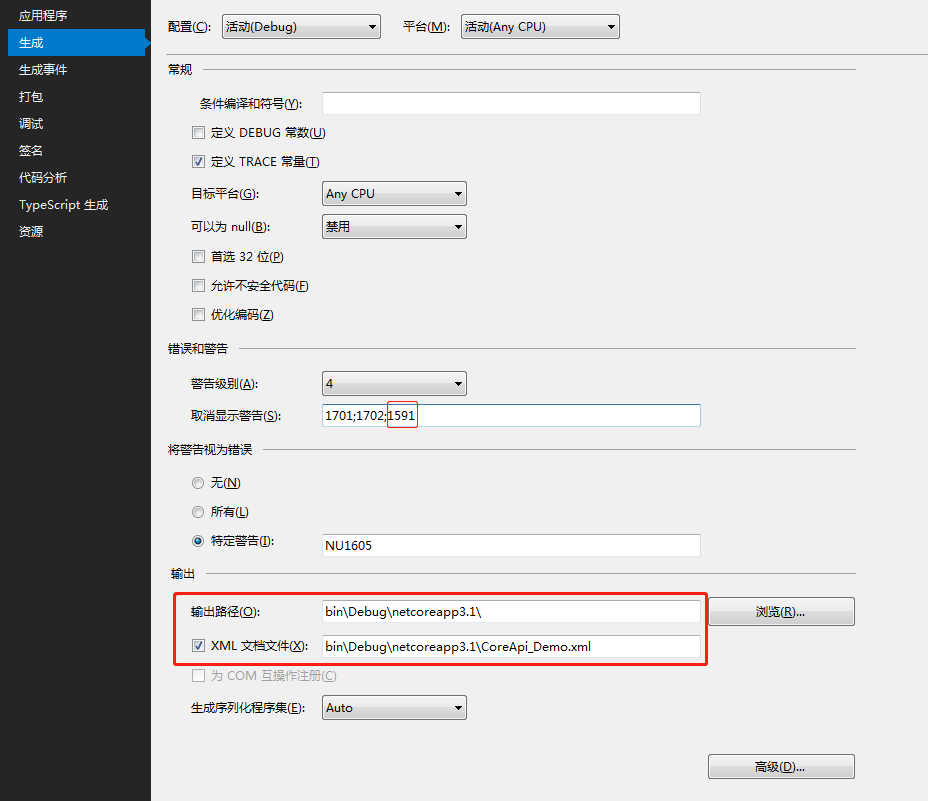
這樣,我們以三斜線(///)方式給類別方法屬性等相關程式碼新增註解後,重新整理 Swagger 頁面,即可看到註解說明。
如果不想將 XML 檔案輸出為 debug 下的目錄,譬如想要放在專案根目錄(但不要修改成磁碟絕對路徑),可調整相關程式碼如下,xml 檔案的名字也可以改成自己想要的:
var basePath = Path.GetDirectoryName(typeof(Program).Assembly.Location);//取得應用程式所在目錄
var xmlPath = Path.Combine(basePath, "CoreAPI_Demo.xml");
c.IncludeXmlComments(xmlPath, true);
同時,調整專案生成的 XML 文件檔案路徑為:..\CoreAPI_Demo\CoreAPI_Demo.xml
隱藏相關介面
對於不想曝露給 Swagger 展示的介面,我們可以給相關 Controller 或 Action 頭上加上:[ApiExplorerSettings(IgnoreApi = true)]
調整系統預設輸出路徑
專案啟動後,預設會存取自帶的 weatherforecast,如果想調整為其他路徑,譬如打開後直接存取 Swagger 文件,那麼調整 Properties 目錄下的 launchSettings.json 檔案,修改 launchUrl 值為 api(前述配置的 RoutePrefix 值):
{
  "$schema": "http://json.schemastore.org/launchsettings.json",
  "iisSettings": {
    "windowsAuthentication": false,
    "anonymousAuthentication": true,
    "iisExpress": {
      "applicationUrl": "http://localhost:7864",
      "sslPort": 0
    }
  },
  "profiles": {
    "IIS Express": {
      "commandName": "IISExpress",
      "launchBrowser": true,
      "launchUrl": "api",
      "environmentVariables": {
        "ASPNETCORE_ENVIRONMENT": "Development"
      }
    },
    "CoreApi_Demo": {
      "commandName": "Project",
      "launchBrowser": true,
      "launchUrl": "api",
      "applicationUrl": "http://localhost:5000",
      "environmentVariables": {
        "ASPNETCORE_ENVIRONMENT": "Development"
      }
    }
  }
}
三、設定檔案
以讀取 appsettings.json 檔案為例,當然你也可以定義其他名稱的.json 檔案進行讀取,讀取方式一致,該檔案類似於 Web.config 檔案。為方便範例,定義 appsettings.json 檔案內容如下:
{
  "ConnString": "Data Source=(local);Initial Catalog=Demo;Persist Security Info=True;User ID=DemoUser;Password=123456;MultipleActiveResultSets=True;",
  "ConnectionStrings": {
    "MySQLConnection": "server=127.0.0.1;database=mydemo;uid=root;pwd=123456;charset=utf8;SslMode=None;"
  },
  "SystemConfig": {
    "UploadFile": "/Files",
    "Domain": "http://localhost:7864"
  },
  "JwtTokenConfig": {
    "Secret": "fcbfc8df1ee52ba127ab",
    "Issuer": "abc.com",
    "Audience": "Brooke.WebApi",
    "AccessExpiration": 30,
    "RefreshExpiration": 60
  },
  "Logging": {
    "LogLevel": {
      "Default": "Information",
      "Microsoft": "Warning",
      "Microsoft.Hosting.Lifetime": "Information"
    }
  },
  "AllowedHosts": "*"
}
- 設定檔案的基本讀取
public class Startup
{
    public Startup(IConfiguration configuration)
    {
        Configuration = configuration;
    }

    public IConfiguration Configuration { get; }

    // This method gets called by the runtime. Use this method to add services to the container.
    public void ConfigureServices(IServiceCollection services)
    {
        services.AddControllers();

        //讀取方式一
        var ConnString = Configuration["ConnString"];
        var MySQLConnection = Configuration.GetSection("ConnectionStrings")["MySQLConnection"];
        var UploadPath = Configuration.GetSection("SystemConfig")["UploadPath"];
        var LogDefault = Configuration.GetSection("Logging").GetSection("LogLevel")["Default"];

        //讀取方式二
        var ConnString2 = Configuration["ConnString"];
        var MySQLConnection2 = Configuration["ConnectionStrings:MySQLConnection"];
        var UploadPath2 = Configuration["SystemConfig:UploadPath"];
        var LogDefault2 = Configuration["Logging:LogLevel:Default"];

    }

}
以上介紹了 2 種讀取設定資訊的方式,如果要在 Controller 內使用,類似地,進行注入並呼叫如下:
public class ValuesController : ControllerBase
{
    private IConfiguration _configuration;

    public ValuesController(IConfiguration configuration)
    {
        _configuration = configuration;
    }

    // GET: api/<ValuesController>
    [HttpGet]
    public IEnumerable<string> Get()
    {
        var ConnString = _configuration["ConnString"];
        var MySQLConnection = _configuration.GetSection("ConnectionStrings")["MySQLConnection"];
        var UploadPath = _configuration.GetSection("SystemConfig")["UploadPath"];
        var LogDefault = _configuration.GetSection("Logging").GetSection("LogLevel")["Default"];
        return new string[] { "value1", "value2" };
    }
}
- 讀取設定檔案到自訂物件
以 SystemConfig 節點為例,定義類別如下:
public class SystemConfig
{
    public string UploadPath { get; set; }
    public string Domain { get; set; }

}
調整程式碼如下:
public class Startup
{
    public Startup(IConfiguration configuration)
    {
        Configuration = configuration;
    }

    public IConfiguration Configuration { get; }

    // This method gets called by the runtime. Use this method to add services to the container.
    public void ConfigureServices(IServiceCollection services)
    {
        services.AddControllers();

        services.Configure<SystemConfig>(Configuration.GetSection("SystemConfig"));
    }

}
然後 Controller 內進行注入呼叫:
[Route("api/[controller]/[action]")]
[ApiController]
public class ValuesController : ControllerBase
{
    private SystemConfig _sysConfig;
    public ValuesController(IOptions<SystemConfig> sysConfig)
    {
        _sysConfig = sysConfig.Value;
    }

    [HttpGet]
    public IEnumerable<string> GetSetting()
    {
        var UploadPath = _sysConfig.UploadPath;
        var Domain = _sysConfig.Domain;
        return new string[] { "value1", "value2" };
    }
}
- 繫結到靜態類別方式讀取
定義相關靜態類別如下:
public static class MySettings
{
    public static SystemConfig Setting { get; set; } = new SystemConfig();
}
調整 Startup 類別建構子如下:
public Startup(IConfiguration configuration, IWebHostEnvironment env)
{
    var builder = new ConfigurationBuilder()
        .SetBasePath(env.ContentRootPath)
        .AddJsonFile("appsettings.json", optional: true, reloadOnChange: true);

    Configuration = builder.Build();
    //Configuration = configuration;

    configuration.GetSection("SystemConfig").Bind(MySettings.Setting);//繫結靜態設定類別
}
接下來,諸如直接使用:MySettings.Setting.UploadPath 即可呼叫。
四、檔案上傳
介面一般少不了檔案上傳,相比.net framework 框架下 webapi 透過 byte 陣列物件等複雜方式進行檔案上傳,.NET Core WebApi 有了很大變化,其定義了新的 IFormFile 物件來接收上傳檔案,直接上 Controller 程式碼:
後端程式碼
[Route("api/[controller]/[action]")]
[ApiController]
public class UploadController : ControllerBase
{
    private readonly IWebHostEnvironment _env;

    public UploadController(IWebHostEnvironment env)
    {
        _env = env;
    }

    public ApiResult UploadFile(List<IFormFile> files)
    {
        ApiResult result = new ApiResult();

       //註:參數files物件去也可以透過換成: var files = Request.Form.Files;來取得

        if (files.Count <= 0)
        {
            result.Message = "上傳檔案不能為空";
            return result;
        }

        #region 上傳

        List<string> filenames = new List<string>();

        var webRootPath = _env.WebRootPath;
        var rootFolder = MySettings.Setting.UploadPath;

        var physicalPath = $"{webRootPath}/{rootFolder}/";

        if (!Directory.Exists(physicalPath))
        {
            Directory.CreateDirectory(physicalPath);
        }

        foreach (var file in files)
        {
            var fileExtension = Path.GetExtension(file.FileName);//取得檔案格式,副檔名

            var saveName = $"{rootFolder}/{Path.GetRandomFileName()}{fileExtension}";
            filenames.Add(saveName);//相對路徑

            var fileName = webRootPath + saveName;

            using FileStream fs = System.IO.File.Create(fileName);
            file.CopyTo(fs);
            fs.Flush();

        }
        #endregion


        result.IsSuccess = true;
        result.Data["files"] = filenames;

        return result;
    }
}
前端呼叫
接下來透過前端呼叫上述上傳介面,在專案根目錄新建 wwwroot 目錄(.net core webapi 內建目錄 ),新增相關 js 檔案套件,然後新建一個 index.html 檔案,內容如下:
<!DOCTYPE html>
<html>
  <head>
    <meta charset="utf-8" />
    <title></title>
    <style type="text/css"></style>
    <script src="res/scripts/jquery-1.10.2.min.js"></script>
    <script src="res/scripts/jquery.form.js"></script>
    <script type="text/javascript">
      //方法1
      function AjaxUploadfile() {
        var upload = $("#files").get(0);
        var files = upload.files;
        var data = new FormData();
        for (var i = 0; i < files.length; i++) {
          data.append("files", files[i]);
        }

        //此處data的構建也可以換成:var data = new FormData(document.getElementById("myform"));

        $.ajax({
          type: "POST",
          url: "/api/upload/uploadfile",
          contentType: false,
          processData: false,
          data: data,
          success: function (result) {
            alert("success");
            $.each(result.data.files, function (i, filename) {
              $("#filePanel").append("<p>" + filename + "</p>");
            });
          },
          error: function () {
            alert("上傳檔案錯誤");
          },
        });
      }

      //方法2
      function AjaxUploadfile2() {
        $("#myform").ajaxSubmit({
          success: function (result) {
            if (result.isSuccess) {
              $.each(result.data.files, function (i, filename) {
                $("#filePanel").append("<p>" + filename + "</p>");
              });
            } else {
              alert(result.message);
            }
          },
        });
      }
    </script>
  </head>
  <body>
    <form
      id="myform"
      method="post"
      action="/api/upload/uploadfile"
      enctype="multipart/form-data"
    >
      <input type="file" id="files" name="files" multiple /> <br /><br />
      <input
        type="button"
        value="FormData Upload"
        onclick="AjaxUploadfile();"
      /><br /><br />
      <input
        type="button"
        value="ajaxSubmit Upload"
        onclick="AjaxUploadfile2();"
      /><br /><br />
      <div id="filePanel"></div>
    </form>

    <script type="text/javascript">
      $(function () {});
    </script>
  </body>
</html>
上述透過建構 FormData 和 ajaxSubmit 兩種方式進行上傳,需要注意的是 contentType 和 processData 兩個參數的設定;另外允許一次上傳多個檔案,需設定 multipart 屬性。
在存取 wwwroot 下的靜態檔案之前,必須先在 Startup 類別的 Configure 方法下進行註冊:
public void Configure(IApplicationBuilder app)
{
    app.UseStaticFiles();//用於存取wwwroot下的檔案
}
啟動專案,透過存取路徑:http://localhost:***/index.html,進行上傳測試,成功後,將在 wwwroot 下的 Files 目錄下看到上傳的檔案。
五、統一 WebApi 資料回傳格式
定義統一回傳格式
為了方便前後端使用約定好的資料格式,通常我們會定義統一的資料回傳,其包括是否成功、回傳狀態、具體資料等;為便於說明,定義一個資料回傳類別如下:
public class ApiResult
{
    public bool IsSuccess { get; set; }
    public string Message { get; set; }
    public string Code { get; set; }
    public Dictionary<string, object> Data { get; set; } = new Dictionary<string, object>();
}
這樣,我們將每一個 action 介面操作封裝為 ApiResult 格式進行回傳。新建一個 ProductController 示例如下:
[Produces("application/json")]
[Route("api/[controller]")]
[ApiController]
public class ProductController : ControllerBase
{
    [HttpGet]
    public ApiResult Get()
    {
        var result = new ApiResult();

        var rd = new Random();

        result.Data["dataList"] = Enumerable.Range(1, 5).Select(index => new
        {
            Name = $"商品-{index}",
            Price = rd.Next(100, 9999)
        });

        result.IsSuccess = true;
        return result;
    }
}
- Produces:定義資料回傳的方式,給每個 Controller 打上[Produces("application/json")]標識,即表示以 json 方式進行資料輸出。
- ApiController:確保每個 Controller 有 ApiController 標識,通常,我們會定義一個基底類別如:BaseController,其繼承自 ControllerBase,並將其打上[ApiController]標識,新建的 controller 都繼承該類別;
- Route:路由存取方式,如不喜歡 RESTful 方式,可加上 Action,即:[Route("api/[controller]/[action]")];
- HTTP 請求:結合前面配置的 Swagger,必須確保每個 Action 都有具體的請求方式,即必須是 HttpGet、HttpPost、HttpPut、HttpDelete 中的一種,通常情況下,我們使用 HttpGet、HttpPost 足以。
如此,即完成的資料回傳的統一。
解決 T 時間格式
.NET Core Web Api 預設以首字母小寫的類別駝峰式命名回傳,但遇到 DateTime 類型的資料,會回傳 T 格式時間,如要解決 T 時間格式,定義一個時間格式轉換類別如下:
public class DatetimeJsonConverter : JsonConverter<DateTime>
{
    public override DateTime Read(ref Utf8JsonReader reader, Type typeToConvert, JsonSerializerOptions options)
    {
        if (reader.TokenType == JsonTokenType.String)
        {
            if (DateTime.TryParse(reader.GetString(), out DateTime date))
                return date;
        }
        return reader.GetDateTime();
    }

    public override void Write(Utf8JsonWriter writer, DateTime value, JsonSerializerOptions options)
    {
        writer.WriteStringValue(value.ToString("yyyy-MM-dd HH:mm:ss"));
    }
}
然後在 Startup 類別的 ConfigureServices 中調整 services.AddControllers 程式碼如下:
services.AddControllers()
    .AddJsonOptions(configure =>
    {
        configure.JsonSerializerOptions.Converters.Add(new DatetimeJsonConverter());
    });
六、模型驗證
模型驗證在 ASP.NET MVC 已存在,使用方式基本一致。指對向介面提交過來的資料進行參數校驗,包括必填項、資料格式、字元長度、範圍等等。一般的,我們會將 POST 提交過來的物件定義為一個實體類別進行接收,譬如定義一個註冊類別如下:
public class RegisterEntity
{
    /// <summary>
    /// 手機號碼
    /// </summary>
    [Display(Name = "手機號碼")]
    [Required(ErrorMessage = "{0}不能為空")]
    [StringLength(11, ErrorMessage = "{0}最多{1}個字元")]
    public string Mobile { get; set; }

    /// <summary>
    /// 驗證碼
    /// </summary>
    [Display(Name = "驗證碼")]
    [Required(ErrorMessage = "{0}不能為空")]
    [StringLength(6, ErrorMessage = "{0}最多{1}個字元")]
    public string Code { get; set; }

    /// <summary>
    /// 密碼
    /// </summary>
    [Display(Name = "密碼")]
    [Required(ErrorMessage = "{0}不能為空")]
    [StringLength(16, ErrorMessage = "{0}最多{1}個字元")]
    public string Pwd { get; set; }
}
Display 標識提示欄位的名稱,Required 表示必填,StringLength 限制欄位的長度,當然還有其他一些內建特性,具體可參考官方文件,列舉一些常見的驗證特性如下:
- [CreditCard]:驗證屬性是否具有信用卡格式。 需要 JQuery 驗證其他方法。
- [Compare]:驗證模型中的兩個屬性是否匹配。
- [EmailAddress]:驗證屬性是否具有電子郵件格式。
- [Phone]:驗證屬性是否具有電話號碼格式。
- [Range]:驗證屬性值是否在指定的範圍內。
- [RegularExpression]:驗證屬性值是否與指定的正則表達式匹配。
- [Required]:驗證欄位是否不為 null。 有關此屬性的行為的詳細資訊,請參閱 [Required] 特性。
- [StringLength]:驗證字串屬性值是否不超過指定長度限制。
- [Url]:驗證屬性是否具有 URL 格式。
- [Remote]:透過在伺服器上呼叫操作方法來驗證用戶端上的輸入。
上述說明了基本的模型驗證使用方法,以這種方式,同時結合 T4 模板,透過表物件生成模型驗證實體,省卻了在 action 中編寫大量驗證程式碼的工作。當然,一些必要的較為複雜的驗證,或結合資料庫操作的驗證,則單獨寫到 action 或其他應用模組中。
那麼上述模型驗證在 Web API 中是怎麼工作的呢?在 Startup 類別的 ConfigureServices 新增如下程式碼:
//模型參數驗證
services.Configure<ApiBehaviorOptions>(options =>
{
options.InvalidModelStateResponseFactory = (context) =>
{
    var error = context.ModelState.FirstOrDefault().Value;
    var message = error.Errors.FirstOrDefault(p => !string.IsNullOrWhiteSpace(p.ErrorMessage))?.ErrorMessage;

    return new JsonResult(new ApiResult { Message = message });
};
});
新增註冊範例 Action 程式碼:
/// <summary>
/// 註冊
/// </summary>
/// <param name="model"></param>
/// <returns></returns>
[HttpPost]
public async Task<ApiResult> Register(RegisterEntity model)
{
    ApiResult result = new ApiResult();

    var _code = CacheHelper.GetCache(model.Mobile);
    if (_code == null)
    {
        result.Message = "驗證碼過期或不存在";
        return result;
    }
    if (!model.Code.Equals(_code.ToString()))
    {
        result.Message = "驗證碼錯誤";
        return result;
    }

    /**
    相關邏輯程式碼
    **/
    return result;
}
如此,透過配置 ApiBehaviorOptions 的方式,並讀取驗證錯誤資訊的第一條資訊並回傳,即完成了 Web API 中 Action 對請求參數的驗證工作,關於錯誤資訊 Message 的回傳,也可略作封裝,在此略。
七、日誌使用
雖然.NET Core WebApi 有自帶的日誌管理功能,但不一定能較容易地滿足我們的需求,通常會採用第三方日誌框架,典型的如:NLog、Log4Net,簡單介紹 NLog 日誌元件的使用;
NLog 的使用
① 透過 NuGet 安裝套件:NLog.Web.AspNetCore,當前專案版本 4.9.2;
② 專案根目錄新建一個 NLog.config 檔案,關鍵 NLog.config 的其他詳細配置,可參考官方文件,這裡作簡要配置如下;
<?xml version="1.0" encoding="utf-8"?>
<nlog xmlns="http://www.nlog-project.org/schemas/NLog.xsd"
      xmlns:xsi="http://www.w3.org/2001/XMLSchema-instance"
      autoReload="true"
      throwExceptions="false"
      internalLogLevel="Off"
      internalLogFile="NlogRecords.log">
  <!--Nlog內部日誌記錄為Off關閉-->
  <extensions>
    <add assembly="NLog.Web.AspNetCore" />
  </extensions>
  <targets>
    <target name="log_file" xsi:type="File" fileName="${basedir}/logs/${shortdate}.log"
            layout="${longdate} | ${level:uppercase=false} | ${message} ${onexception:${exception:format=tostring} ${newline} ${stacktrace} ${newline}" />
  </targets>

  <rules>
    <!--跳過所有級別的Microsoft元件的日誌記錄-->
    <logger name="Microsoft.*" final="true" />
    <!--<logger name="logdb" writeTo="log_database" />-->
    <logger name="*" minlevel="Trace" writeTo="log_file" />

  </rules>
</nlog>

<!--https://github.com/NLog/NLog/wiki/Getting-started-with-ASP.NET-Core-3-->
③ 調整 Program.cs 檔案如下;
public class Program
{
    public static void Main(string[] args)
    {
        //CreateHostBuilder(args).Build().Run();

        var logger = NLog.Web.NLogBuilder.ConfigureNLog("nlog.config").GetCurrentClassLogger();
        try
        {
            logger.Debug("init main");
            CreateHostBuilder(args).Build().Run();
        }
        catch (Exception exception)
        {
            //NLog: catch setup errors
            logger.Error(exception, "Stopped program because of exception");
            throw;
        }
        finally
        {
            // Ensure to flush and stop internal timers/threads before application-exit (Avoid segmentation fault on Linux)
            NLog.LogManager.Shutdown();
        }
    }

    public static IHostBuilder CreateHostBuilder(string[] args) =>
        Host.CreateDefaultBuilder(args)
            .ConfigureWebHostDefaults(webBuilder =>
            {
                webBuilder.UseStartup<Startup>();
            }).ConfigureLogging(logging => {
                logging.ClearProviders();
                logging.SetMinimumLevel(Microsoft.Extensions.Logging.LogLevel.Trace);
            }).UseNLog();//依賴注入Nlog;
}
其中 Main 函式裡的捕獲異常程式碼配置省略也是可以的,CreateHostBuilder 下的 UseNLog 為必設項。
Controller 透過注入呼叫如下:
public class WeatherForecastController : ControllerBase
{
    private static readonly string[] Summaries = new[]
    {
        "Freezing", "Bracing", "Chilly", "Cool", "Mild", "Warm", "Balmy", "Hot", "Sweltering", "Scorching"
    };

    private readonly ILogger<WeatherForecastController> _logger;

    public WeatherForecastController(ILogger<WeatherForecastController> logger)
    {
        _logger = logger;
    }

    [HttpGet]
    public IEnumerable<WeatherForecast> Get()
    {
        _logger.LogInformation("測試一條日誌");

        var rng = new Random();
        return Enumerable.Range(1, 5).Select(index => new WeatherForecast
        {
            Date = DateTime.Now.AddDays(index),
            TemperatureC = rng.Next(-20, 55),
            Summary = Summaries[rng.Next(Summaries.Length)]
        })
        .ToArray();
    }
本地測試後,即可在 debug 下看到 logs 目錄下生成的日誌檔案。
八、依賴注入
使用.NET Core 少不了和依賴注入打交道,這也是.NET Core 的設計思想之一,關於什麼是依賴注入(DI),以及為什麼要使用依賴注入,這裡不再贅述,先來看一個簡單範例的依賴注入。
public interface IProductRepository
{
    IEnumerable<Product> GetAll();
}

public class ProductRepository : IProductRepository
{
    public IEnumerable<Product> GetAll()
    {

    }
}
Startup 類別進行註冊:
public void ConfigureServices(IServiceCollection services)
{
    services.AddScoped<IProductRepository, ProductRepository>();
}
請求 IProductRepository 服務並用於呼叫 GetAll 方法:
public class ProductController : ControllerBase
{
    private readonly IProductRepository _productRepository;
   public ProductController(IProductRepository productRepository)
    {
        _productRepository = productRepository;
    }

    public IEnumerable<Product> Get()
    {
        return _productRepository.GetAll();
    }
}
透過使用 DI 模式,來實現 IProductRepository 介面。其實前述已多次出現透過建構子進行注入呼叫的範例。
生命週期
services.AddScoped<IMyDependency, MyDependency>();
services.AddTransient<IMyDependency, MyDependency>();
services.AddSingleton<IMyDependency, MyDependency>();
- Transient:每一次請求都會建立一個新實例;
- Scoped:每個作用域生成週期內建立一個實例;
- Singleton:單例模式,整個應用程式生命週期內只建立一個實例;
這裡,需要根據具體的業務邏輯場景需求選擇注入相應的生命週期服務。
實際應用中,我們會有很多個服務需要註冊到 ConfigureServices 內,一個個寫入顯然繁瑣,而且容易忘記漏寫,一般地,我們可能會想到利用反射進行批次注入,並透過擴充的方式進行注入,譬如:
public static class AppServiceExtensions
{
    /// <summary>
    /// 註冊應用程式域中的服務
    /// </summary>
    /// <param name="services"></param>
    public static void AddAppServices(this IServiceCollection services)
    {
        var ts = System.Reflection.Assembly.Load("CoreAPI.Data").GetTypes().Where(s => s.Name.EndsWith("Repository") || s.Name.EndsWith("Service")).ToArray();
        foreach (var item in ts.Where(s => !s.IsInterface))
        {
            var interfaceType = item.GetInterfaces();
            foreach (var typeArray in interfaceType)
            {
                services.AddTransient(typeArray, item);
            }
        }
    }
}
public void ConfigureServices(IServiceCollection services)
{
    services.AddAppServices();//批次註冊服務
}
誠然,這樣配合系統自帶 DI 注入是能完成我們的批次注入需求的。但其實也有更多選擇,來幫助我們簡化 DI 註冊,譬如選擇其他第三方元件:Scrutor、Autofac…
- Scrutor 的使用
Scrutor 是基於微軟注入元件的一個擴充庫,簡單示例如下:
services.Scan(scan => scan
    .FromAssemblyOf<Startup>()
        .AddClasses(classes => classes.Where(s => s.Name.EndsWith("Repository") || s.Name.EndsWith("Service")))
        .AsImplementedInterfaces()
        .WithTransientLifetime()
    );
以上程式碼透過 Scan 方式批次註冊了以 Repository、Service 結尾的介面服務,其生命週期為 Transient,該方式等同於前述的以反射方式的批次註冊服務。
關於 Scrutor 的其他用法,大家可以參見官方文件,這裡只做下引子。
- Autofac
一般情況下,使用 MS 自帶的 DI 或採用 Scrutor,即可滿足實際需要,如果有更高的應用需求,如要求屬性注入、甚至接管或取代 MS 自帶的 DI,那麼你可以選擇 Autofac,關於 Autofac 的具體使用,在此不作詳敘。
九、快取
MemoryCache 使用
按官方說明,開發人員需合理說用快取,以及限制快取大小,Core 執行時不會根據內容壓力限制快取大小。對於使用方式,依舊還是先行註冊,然後控制器呼叫:
public void ConfigureServices(IServiceCollection services)
{
    services.AddMemoryCache();//快取中介軟體
}
public class ProductController : ControllerBase
    {
        private IMemoryCache _cache;

        public ProductController(IMemoryCache memoryCache)
        {
            _cache = memoryCache;
        }

        [HttpGet]
        public DateTime GetTime()
        {
            string key = "_timeKey";

            // Look for cache key.
            if (!_cache.TryGetValue(key, out DateTime cacheEntry))
            {
                // Key not in cache, so get data.
                cacheEntry = DateTime.Now;

                // Set cache options.
                var cacheEntryOptions = new MemoryCacheEntryOptions()
                    // Keep in cache for this time, reset time if accessed.
                    .SetSlidingExpiration(TimeSpan.FromSeconds(3));

                // Save data in cache.
                _cache.Set(key, cacheEntry, cacheEntryOptions);
            }

            return cacheEntry;
        }
    }
上述程式碼快取了一個時間,並設定了滑動過期時間(指最後一次存取後的過期時間)為 3 秒;如果需要設定絕對過期時間,將 SetSlidingExpiration 改為 SetAbsoluteExpiration 即可。瀏覽重新整理,每 3 秒後時間將更新。
附一個封裝好的 Cache 類別如下:
public class CacheHelper
{
    public static IMemoryCache _memoryCache = new MemoryCache(new MemoryCacheOptions());

    /// <summary>
    /// 快取絕對過期時間
    /// </summary>
    ///<param name="key">Cache鍵</param>
    ///<param name="value">快取的值</param>
    ///<param name="minute">minute分鐘後絕對過期</param>
    public static void SetChache(string key, object value, int minute)
    {
        if (value == null) return;
        _memoryCache.Set(key, value, new MemoryCacheEntryOptions()
                .SetAbsoluteExpiration(TimeSpan.FromMinutes(minute)));
    }

    /// <summary>
    /// 快取相對過期,最後一次存取後minute分鐘後過期
    /// </summary>
    ///<param name="key">Cache鍵</param>
    ///<param name="value">快取的值</param>
    ///<param name="minute">滑動過期分鐘</param>
    public static void SetChacheSliding(string key, object value, int minute)
    {
        if (value == null) return;
        _memoryCache.Set(key, value, new MemoryCacheEntryOptions()
                .SetSlidingExpiration(TimeSpan.FromMinutes(minute)));
    }

    /// <summary>
    ///設定快取,如果不主動清空,會一直儲存在記憶體中.
    /// </summary>
    ///<param name="key">Cache鍵值</param>
    ///<param name="value">給Cache[key]賦的值</param>
    public static void SetChache(string key, object value)
    {
        _memoryCache.Set(key, value);
    }

    /// <summary>
    ///清除快取
    /// </summary>
    ///<param name="key">cache鍵</param>
    public static void RemoveCache(string key)
    {
        _memoryCache.Remove(key);
    }

    /// <summary>
    ///根據key值,返回Cache[key]的值
    /// </summary>
    ///<param name="key"></param>
    public static object GetCache(string key)
    {
        //return _memoryCache.Get(key);
        if (key != null && _memoryCache.TryGetValue(key, out object val))
        {
            return val;
        }
        else
        {
            return default;
        }
    }

    /// <summary>
    /// 透過Key值返回泛型物件
    /// </summary>
    /// <typeparam name="T"></typeparam>
    /// <param name="key"></param>
    /// <returns></returns>
    public static T GetCache<T>(string key)
    {
        if (key != null && _memoryCache.TryGetValue<T>(key, out T val))
        {
            return val;
        }
        else
        {
            return default;
        }
    }

}
十、例外處理
定義例外處理中介軟體
這裡主要針對全域例外進行捕獲處理並記錄日誌,並以統一的 json 格式回傳給介面呼叫者;說例外處理前先提下中介軟體,關於什麼是中介軟體,在此不在贅述,一個中介軟體其基本的結構如下:
public class CustomMiddleware
{
    private readonly RequestDelegate _next;

    public CustomMiddleware(RequestDelegate next)
    {
        _next = next;
    }

    public async Task Invoke(HttpContext httpContext)
    {
        await _next(httpContext);
    }
}
下面我們定義自己的全域例外處理中介軟體,程式碼如下:
public class CustomExceptionMiddleware
{
    private readonly RequestDelegate _next;
    private readonly ILogger<CustomExceptionMiddleware> _logger;

    public CustomExceptionMiddleware(RequestDelegate next, ILogger<CustomExceptionMiddleware> logger)
    {
        _next = next;
        _logger = logger;
    }

    public async Task Invoke(HttpContext httpContext)
    {
        try
        {
            await _next(httpContext);
        }
        catch (Exception ex)
        {
            _logger.LogError(ex,"Unhandled exception...");
            await HandleExceptionAsync(httpContext, ex);
        }
    }

    private Task HandleExceptionAsync(HttpContext httpContext, Exception ex)
    {
        var result = JsonConvert.SerializeObject(new { isSuccess = false, message = ex.Message });
        httpContext.Response.ContentType = "application/json;charset=utf-8";
        return httpContext.Response.WriteAsync(result);
    }
}

/// <summary>
/// 以擴充方式新增中介軟體
/// </summary>
public static class CustomExceptionMiddlewareExtensions
{
    public static IApplicationBuilder UseCustomExceptionMiddleware(this IApplicationBuilder builder)
    {
        return builder.UseMiddleware<CustomExceptionMiddleware>();
    }
}
然後在 Startup 類別的 Configure 方法裡新增上述擴充的中介軟體,見加粗部分:
public void Configure(IApplicationBuilder app, IWebHostEnvironment env)
{
    if (env.IsDevelopment())
    {
        app.UseDeveloperExceptionPage();
    }

    //全域例外處理
    app.UseCustomExceptionMiddleware();
}
在 HandleExceptionAsync 方法中,為方便開發和測試,這裡將系統的錯誤回傳給了介面呼叫者,實際生產環境中可統一回傳固定的錯誤 Message 訊息。
例外狀態碼的處理
關於 http 狀態碼,常見的如正常回傳的 200,其他 401、403、404、502 等等等等,因為系統有時候並不總是回傳 200 成功,對於回傳非 200 的例外狀態碼,WebApi 也要做到相應的處理,以便介面呼叫者能正確接收,譬如緊接下來的JWT認證,當認證令牌過期或沒有權限時,系統實際會回傳 401、403,但介面並不提供有效的可接收的回傳,因此,這裡列舉一些常見的例外狀態碼,並以 200 方式提供給介面呼叫者,在 Startup 類別的 Configure 方法裡新增程式碼如下:
app.UseStatusCodePages(async context =>
{
    //context.HttpContext.Response.ContentType = "text/plain";
    context.HttpContext.Response.ContentType = "application/json;charset=utf-8";

    int code = context.HttpContext.Response.StatusCode;
    string message =
        code switch
        {
            401 => "未登入",
            403 => "存取拒絕",
            404 => "未找到",
            _ => "未知錯誤",
        };

    context.HttpContext.Response.StatusCode = StatusCodes.Status200OK;
    await context.HttpContext.Response.WriteAsync(Newtonsoft.Json.JsonConvert.SerializeObject(new
    {
        isSuccess = false,
        code,
        message
    }));

});
程式碼很簡單,這裡使用系統自帶的例外處理中介軟體 UseStatusCodePages,當然,你還可以自訂過濾器處理例外,不過不推薦,簡單高效直接才是需要的。
關於.NET Core 的例外處理中介軟體,還有其他諸如 UseExceptionHandler、UseStatusCodePagesWithRedirects 等等,不同的中介軟體有其適用的環境,有的可能更適用於 MVC 或其他應用場景上,找到合適的即可。
題外話:大家也可以將 UseStatusCodePages 處理例外狀態碼的操作封裝到前述的全域例外處理中介軟體中。
十一、應用安全與 JWT 認證
關於什麼是 JWT,在此不作贅述。實際應用中,為了部分介面的安全性,譬如需要身份認證才能存取的介面資源,對於 Web API 而言,一般會採用 token 令牌進行認證,服務端結合快取來實現。
那為什麼要選擇 JWT 認證呢?原因無外乎以下:服務端不進行儲存、無狀態、適合行動端、適合分散式、標準化等等。關於 JWT 的使用如下:
透過 NuGget 安裝套件:Microsoft.AspNetCore.Authentication.JwtBearer,當前範例版本 3.1.5;
ConfigureServices 進行注入,預設以 Bearer 命名,這裡你也可以改成其他名字,保持前後一致即可,注意加粗部分,程式碼如下:
appsettings.json 新增 JWT 配置節點(見前述【設定檔案】),新增 JWT 相關認證類別:
public static class JwtSetting
{
    public static JwtConfig Setting { get; set; } = new JwtConfig();
}

public class JwtConfig
{
    public string Secret { get; set; }
    public string Issuer { get; set; }
    public string Audience { get; set; }
    public int AccessExpiration { get; set; }
    public int RefreshExpiration { get; set; }
}
採用前述繫結靜態類別的方式讀取 JWT 配置,並進行注入:
public Startup(IConfiguration configuration, IWebHostEnvironment env)
{
    //Configuration = configuration;

    var builder = new ConfigurationBuilder()
        .SetBasePath(env.ContentRootPath)
        .AddJsonFile("appsettings.json", optional: true, reloadOnChange: true);

    Configuration = builder.Build();

    configuration.GetSection("SystemConfig").Bind(MySettings.Setting);//繫結靜態設定類別
    configuration.GetSection("JwtTokenConfig").Bind(JwtSetting.Setting);//同上

}

public IConfiguration Configuration { get; }

// This method gets called by the runtime. Use this method to add services to the container.
public void ConfigureServices(IServiceCollection services)
{

    #region JWT認證注入

    JwtSecurityTokenHandler.DefaultInboundClaimTypeMap.Clear();
    services.AddAuthentication("Bearer")
        .AddJwtBearer("Bearer", options =>
        {
            options.RequireHttpsMetadata = false;

            options.TokenValidationParameters = new TokenValidationParameters
            {
                ValidateIssuer = true,
                ValidateAudience = true,
                ValidateLifetime = true,
                ValidateIssuerSigningKey = true,
                ValidIssuer = JwtSetting.Setting.Issuer,
                ValidAudience = JwtSetting.Setting.Audience,
                IssuerSigningKey = new SymmetricSecurityKey(System.Text.Encoding.UTF8.GetBytes(JwtSetting.Setting.Secret))
            };
        });

    #endregion

}
給 Swagger 新增 JWT 認證支援,完成後,Swagger 頁面會出現鎖的標識,取得 token 後填入 Value(Bearer token 形式)項進行 Authorize 登入即可,Swagger 配置 JWT 見加粗部分:
services.AddSwaggerGen(c =>
{
    c.SwaggerDoc("v1", new OpenApiInfo
    {
        Title = "My API",
        Version = "v1",
        Description = "API文件描述",
        Contact = new OpenApiContact
        {
            Email = "5007032@qq.com",
            Name = "測試專案",
            //Url = new Uri("http://t.abc.com/")
        },
        License = new OpenApiLicense
        {
            Name = "BROOKE授權",
            //Url = new Uri("http://t.abc.com/")
        }
    });


    // 為 Swagger JSON and UI設定xml文件註解路徑
    //var basePath = Path.GetDirectoryName(typeof(Program).Assembly.Location);//取得應用程式所在目錄(不受工作目錄影響)
    //var xmlPath = Path.Combine(basePath, "CoreAPI_Demo.xml");
    //c.IncludeXmlComments(xmlPath, true);

    var xmlFile = $"{Assembly.GetExecutingAssembly().GetName().Name}.xml";
    var xmlPath = Path.Combine(AppContext.BaseDirectory, xmlFile);
    c.IncludeXmlComments(xmlPath);

    #region JWT認證Swagger授權

    c.AddSecurityDefinition("Bearer", new OpenApiSecurityScheme
    {
        Description = "JWT授權(資料將在請求頭header中進行傳輸) 直接在下框中輸入Bearer {token}(中間是空格)",
        Name = "Authorization",
        In = ParameterLocation.Header,
        Type = SecuritySchemeType.ApiKey,
        BearerFormat = "JWT",
        Scheme = "Bearer"
    });

    c.AddSecurityRequirement(new OpenApiSecurityRequirement()
    {
        {
            new OpenApiSecurityScheme
            {
                Reference = new OpenApiReference {
                    Type = ReferenceType.SecurityScheme,
                    Id = "Bearer"
                }
            },
            new string[] { }
        }
    });

    #endregion

});
Starup 類別新增 Configure 註冊,注意,需放到 app.UseAuthorization();前面:
public void Configure(IApplicationBuilder app, IWebHostEnvironment env)
{
    app.UseAuthentication();//jwt認證

    app.UseAuthorization();

}
這樣,JWT 就基本配置完畢,接下來實施認證登入和授權,模擬操作如下:
[HttpPost]
public async Task<ApiResult> Login(LoginEntity model)
{
    ApiResult result = new ApiResult();

    //驗證使用者名稱和密碼
    var userInfo = await _memberService.CheckUserAndPwd(model.User, model.Pwd);
    if (userInfo == null)
    {
        result.Message = "使用者名稱或密碼不正確";
        return result;
    }
    var claims = new Claim[]
    {
        new Claim(ClaimTypes.Name,model.User),
        new Claim(ClaimTypes.Role,"User"),
        new Claim(JwtRegisteredClaimNames.Sub,userInfo.MemberID.ToString()),

    };

    var key = new SymmetricSecurityKey(System.Text.Encoding.UTF8.GetBytes(JwtSetting.Setting.Secret));
    var expires = DateTime.Now.AddDays(1);
    var token = new JwtSecurityToken(
                issuer: JwtSetting.Setting.Issuer,
                audience: JwtSetting.Setting.Audience,
                claims: claims,
                notBefore: DateTime.Now,
                expires: expires,
                signingCredentials: new SigningCredentials(key, SecurityAlgorithms.HmacSha256));

    //生成Token
    string jwtToken = new JwtSecurityTokenHandler().WriteToken(token);

    //更新最後登入時間
    await _memberService.UpdateLastLoginTime(userInfo.MemberID);

    result.IsSuccess= 1;
    result.ResultData["token"] = jwtToken;
    result.Message = "授權成功!";
    return result;

}
上述程式碼模擬登入操作(帳號密碼登入,成功後設定有效期一天),生成 token 並回傳,前端呼叫者拿到 token 後以諸如 localstorage 方式進行儲存,調取授權介面時,新增該 token 到 header(Bearer token)進行介面請求。接下來,給需要身份授權的 Controller 或 Action 打上 Authorize 標識:
[Authorize]
[Route("api/[controller]/[action]")]
public class UserController : ControllerBase
{
}
如果要新增基於角色的授權,可限制操作如下:
[Authorize(Roles = "user")]
[Route("api/[controller]/[action]")]
public class UserController : ControllerBase
{
}

//多個角色也可以逗號分隔
[Authorize(Roles = "Administrator,Finance")]
[Route("api/[controller]/[action]")]
public class UserController : ControllerBase
{
}
不同的角色資訊,可透過登入設定 ClaimTypes.Role 進行配置;當然,這裡只是簡單的範例說明角色服務的應用,複雜的可透過註冊策略服務,並結合資料庫進行動態配置。
這樣,一個簡單的基於 JWT 認證授權的工作就完成了。
十二、跨域
前後端分離,會涉及到跨域問題,簡單的支援跨域操作如下:
新增擴充支援
public static class CrosExtensions
{
    public static void ConfigureCors(this IServiceCollection services)
    {

        services.AddCors(options => options.AddPolicy("CorsPolicy",
            builder =>
            {
                builder.AllowAnyMethod()
                    .SetIsOriginAllowed(_ => true)
                    .AllowAnyHeader()
                    .AllowCredentials();
            }));

        //services.AddCors(options => options.AddPolicy("CorsPolicy",
        //builder =>
        //{
        //    builder.WithOrigins(new string[] { "http://localhost:13210" })
        //        .AllowAnyMethod()
        //        .AllowAnyHeader()
        //        .AllowCredentials();
        //}));


    }
}
Startup 類別新增相關註冊如下:
public void ConfigureServices(IServiceCollection services)
{
    services.ConfigureCors();
}
public void Configure(IApplicationBuilder app, IWebHostEnvironment env)
{
    app.UseCors("CorsPolicy");//跨域
}
這樣,一個簡單跨域操作就完成了,你也可以透過設定 WithOrigins、WithMethods 等方法限制請求位址來源和請求方式。
至此,全篇結束,本篇涉及到的原始碼位址:https://github.com/Brooke181/CoreAPI_Demo
下一篇介紹 Dapper 在.NET Core 中的使用,謝謝支持!