閱讀導航
- 前言
- 案例一
- 案例二
- 案例三(本文介紹的方式)
- 如何使用?
- 控制項如何開發的?
- 總結
1. 前言
案例一
站長分享過 眾尋 大佬的一篇 WPF 簡易新手引導 一文,新手引導的效果挺不錯的,如下圖:
該文給出的程式碼未使用 MVVM 的開發方式,提示框使用的使用者控制項、蒙版表單樣式與後臺程式碼未分離,但給大家分享了開發新手引導功能的一個參考。
案例二
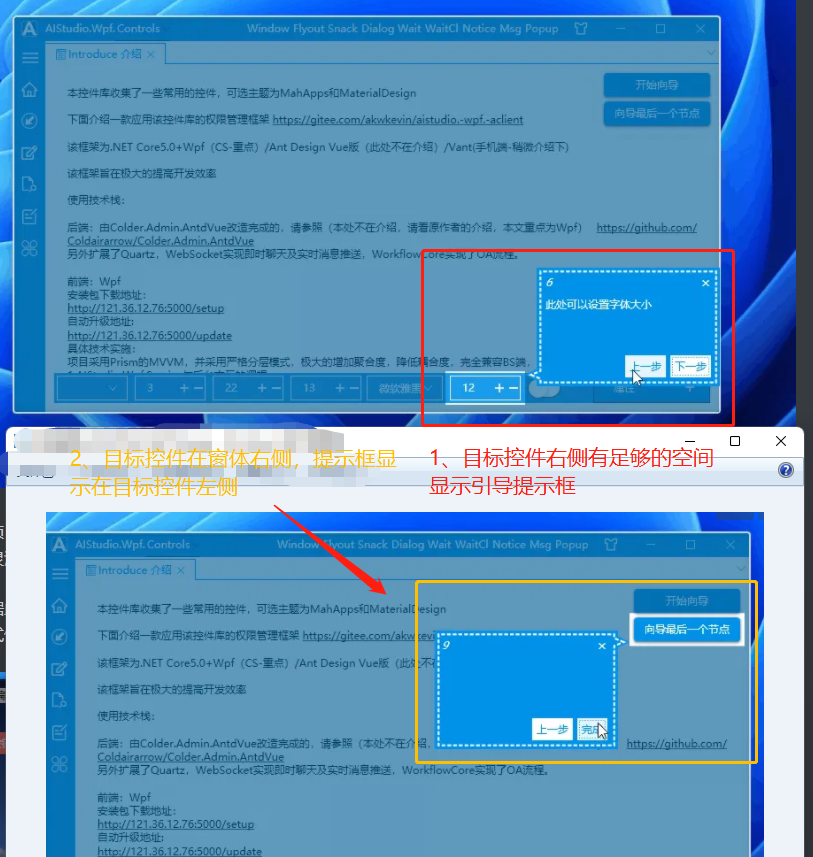
開源專案 AIStudio.Wpf.Controls 的新手引導效果如下:
此開源專案也有參考上文(WPF 簡易新手引導),並且重構為 MVVM 版本,方便繫結使用。
並且提示框顯示的位置還跟隨目標控制項在主表單中的位置靈活變換,不至於顯示在蒙版表單之外,如下圖所示:
當目標控制項右側空間足夠顯示引導提示框時,引導提示框就顯示在目標控制項右側;在右側空間不足時,則將引導提示框顯示在目標控制項左側:
案例三(本文介紹的方式)
站長根據上面的開源專案 AIStudio.Wpf.Controls 做了一個自己的版本 Dotnet9WPFControls,去掉了上一步按鈕、增加標題繫結、下一步按鈕內容繫結、提示框樣式修改等,效果如下:
後面段落就介紹怎麼使用 Dotnet9WPFControls 添加新手引導功能,並簡單提及這個自訂控制項的開發細節,主要原理還是看上文 WPF 簡易新手引導 哈。
希望對有需要給自己的專案添加新手引導功能的朋友有一定幫助,透過此文你也能修改出滿足自己需求的效果。
2. 如何使用?
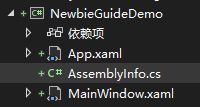
2.1 建立一個 WPF 專案
使用 .NET 6|7 建立一個名為 "NewbieGuideDemo" 的 WPF 解決方案:
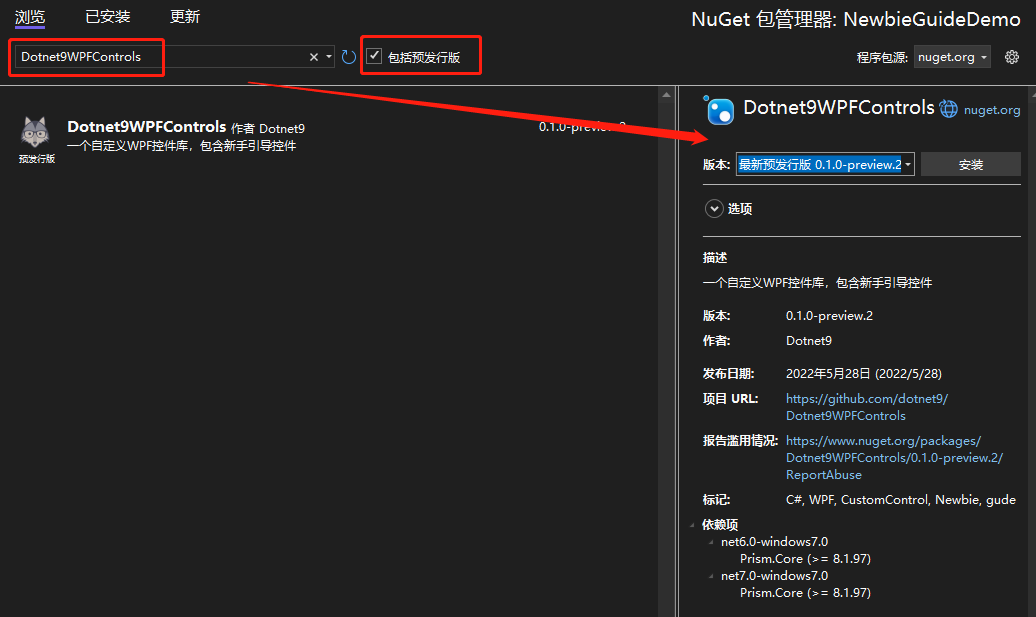
2.2 引入 NuGet 套件
- 新增 NuGet 套件 1:Dotnet9WPFControls
該套件提供引導控制項及其樣式,記得勾選「包含發行前版本」,然後點選安裝。
- 新增 NuGet 套件 2:Prism.DryIoc
使用該套件,主要是使用 Prism 封裝的一些 MVVM、IOC 功能,方便協助開發。
新增上述兩個 NuGet 套件後,專案工程檔案定義如下:
<Project Sdk="Microsoft.NET.Sdk">

  <PropertyGroup>
    <OutputType>WinExe</OutputType>
    <TargetFramework>net6.0-windows</TargetFramework>
    <Nullable>enable</Nullable>
    <UseWPF>true</UseWPF>
  </PropertyGroup>

  <ItemGroup>
    <PackageReference Include="Dotnet9WPFControls" Version="0.1.0-preview.2" />
    <PackageReference Include="Prism.DryIoc" Version="8.1.97" />
  </ItemGroup>

</Project>
2.3 新增樣式檔案
開啟 App.xaml 檔案,引入 Dotnet9WPFControls 預設主題檔案:
<prism:PrismApplication
    x:Class="NewbieGuideDemo.App"
    xmlns="http://schemas.microsoft.com/winfx/2006/xaml/presentation"
    xmlns:x="http://schemas.microsoft.com/winfx/2006/xaml"
    xmlns:prism="http://prismlibrary.com/">
    <prism:PrismApplication.Resources>

        <ResourceDictionary>
            <ResourceDictionary.MergedDictionaries>
                <ResourceDictionary Source="pack://application:,,,/Dotnet9WPFControls;component/Themes/Dotnet9WPFControls.xaml" />
            </ResourceDictionary.MergedDictionaries>
        </ResourceDictionary>
    </prism:PrismApplication.Resources>
</prism:PrismApplication>
注意上面的根節點 <prism:PrismApplication />,同時修改 App.xaml.cs 檔案,這裡不做過多說明,具體使用請參考 Prism:
using Prism.DryIoc;
using Prism.Ioc;
using System.Windows;

namespace NewbieGuideDemo
{
    public partial class App : PrismApplication
    {
        protected override void RegisterTypes(IContainerRegistry containerRegistry)
        {
        }

        protected override Window CreateShell()
        {
            return Container.Resolve<MainWindow>();
        }
    }
}
2.4 定義引導資訊
給主表單 MainWindow 新增一個 ViewModel 類別:MainWindowViewModel.cs:
using Dotnet9WPFControls.Controls;
using Prism.Mvvm;
using System.Collections.Generic;

namespace NewbieGuideDemo
{
    public class MainWindowViewModel : BindableBase
    {
        private GuideInfo? _guide;

        public GuideInfo Guide =>
            _guide ??= new GuideInfo("快速新增新手引導", "這樣新增新手引導,或許比較優雅");

        public List<GuideInfo> Guides => new() {Guide};
    }
}
在上面的 ViewModel 中,定義了一個引導屬性 Guide,這個屬性是與提示框繫結展示:
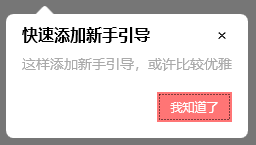
- 第一個參數定義了引導提示框的標題
「快速新增新手引導」 - 第二個參數定義了引導提示框的提示內容
「這樣新增新手引導,或許比較優雅」
第二個屬性 Guides,是一個引導資訊列表,可繫結多個引導資訊,點選按鈕即會檢視下一個引導,本範例為了演示,只寫了一個引導。
2.5 介面繫結引導資訊
先貼上 MainWindow.xaml 所有程式碼:
<Window
    x:Class="NewbieGuideDemo.MainWindow"
    xmlns="http://schemas.microsoft.com/winfx/2006/xaml/presentation"
    xmlns:x="http://schemas.microsoft.com/winfx/2006/xaml"
    xmlns:d="http://schemas.microsoft.com/expression/blend/2008"
    xmlns:prism="http://prismlibrary.com/"
    xmlns:i="http://schemas.microsoft.com/xaml/behaviors"
    xmlns:dotnet9="https://dotnet9.com"
    xmlns:mc="http://schemas.openxmlformats.org/markup-compatibility/2006"
    Title="Dotnet9 WPF新手引導功能" Width="800" Height="450"
    prism:ViewModelLocator.AutoWireViewModel="True"
    AllowsTransparency="True" Background="Transparent" WindowStyle="None"
    WindowStartupLocation="CenterScreen"
    mc:Ignorable="d">
    <Window.Resources>
        <dotnet9:BindControlToGuideConverter x:Key="BindControlToGuideConverter" />
    </Window.Resources>
    <Border
        Background="White" BorderBrush="#ccc" BorderThickness="1" MouseLeftButtonDown="Border_MouseDown">
        <Grid>
            <Button HorizontalAlignment="Center" VerticalAlignment="Center" Content="點選測試新手引導">
                <dotnet9:GuideHelper.GuideInfo>
                    <MultiBinding Converter="{StaticResource BindControlToGuideConverter}">
                        <Binding RelativeSource="{RelativeSource Self}" />
                        <Binding Path="Guide" />
                    </MultiBinding>
                </dotnet9:GuideHelper.GuideInfo>
                <i:Interaction.Triggers>
                    <i:EventTrigger EventName="Click">
                        <i:ChangePropertyAction PropertyName="Display" TargetName="GuideControl" Value="True" />
                    </i:EventTrigger>
                </i:Interaction.Triggers>
            </Button>

            <dotnet9:GuideControl x:Name="GuideControl" Guides="{Binding Guides}">
                <i:Interaction.Triggers>
                    <i:EventTrigger EventName="Loaded">
                        <i:ChangePropertyAction PropertyName="Display" Value="True" />
                    </i:EventTrigger>
                </i:Interaction.Triggers>
            </dotnet9:GuideControl>
        </Grid>
    </Border>
</Window>
下面快速過一遍。
2.5.1 引入的命名空間說明
看上面的程式碼,引入了 dotnet9 和 prism、i三個命名空間:
dotnet9命名空間
引入引導控制項 GuideControl 及轉換器 BindControlToGuideConverter。
prism命名空間
主要用途在 prism:ViewModelLocator.AutoWireViewModel="True" 這句程式碼,將檢視 MainWindow.xaml 與 MainWindowViewModel.cs進行繫結,有興趣可以看 Prism 原始碼,瞭解檢視是如何發現 ViewModel 的約定規則。
i命名空間
主要用此命名空間下的觸發器,事件觸發屬性更改。
2.5.2 幾處關鍵程式碼簡單說明
上面程式碼貼的是引導控制項(自訂控制項)的使用方式(站長註:Dotnet9WPFControls 中還有引導表單的方式,本文不做說明,要不然太佔篇幅了,請檢視控制項 Demo GuideWindowView)。
a: 將引導控制項加到容器最上層
先關注後面的幾行程式碼:
<Grid>
    <!--這裡省略業務控制項佈局-->
    <dotnet9:GuideControl x:Name="GuideControl" Guides="{Binding Guides}">
        <i:Interaction.Triggers>
            <i:EventTrigger EventName="Loaded">
                <i:ChangePropertyAction PropertyName="Display" Value="True" />
            </i:EventTrigger>
        </i:Interaction.Triggers>
    </dotnet9:GuideControl>
</Grid>
- 將引導控制項加到
Grid容器最後,意圖是讓引導控制項顯示在所有控制項的最上層(同一層級新增了多個控制項,如果位置重疊,那麼後加入的控制項會顯示在先新增的控制項上方,呈現遮擋效果); - 繫結了前面
MainWindowViewModel中定義的引導資訊列表Guides,點選下一步按鈕(本文顯示為我知道了)時,會按列表新增順序切換引導資訊; - 使用
i:Interaction.Triggers實現控制項載入完成時,自動顯示引導提示資訊,見上面的 示例三效果;
b:繫結目標控制項與引導屬性
目標控制項的引導屬性與目標控制項參考繫結,引導介面顯示時透過目標控制項計算出目標控制項的位置和大小,準確將目標控制項標識出來,引導提示框定位也才能正確設定:
<dotnet9:BindControlToGuideConverter x:Key="BindControlToGuideConverter" />
<Button HorizontalAlignment="Center" VerticalAlignment="Center" Content="點選測試新手引導">
    <dotnet9:GuideHelper.GuideInfo>
        <MultiBinding Converter="{StaticResource BindControlToGuideConverter}">
            <Binding RelativeSource="{RelativeSource Self}" />
            <Binding Path="Guide" />
        </MultiBinding>
    </dotnet9:GuideHelper.GuideInfo>
    <i:Interaction.Triggers>
        <i:EventTrigger EventName="Click">
            <i:ChangePropertyAction PropertyName="Display" TargetName="GuideControl" Value="True" />
        </i:EventTrigger>
    </i:Interaction.Triggers>
</Button>
如上程式碼引入 BindControlToGuideConverter 轉換器, 該轉換器是個黏合類,將目標控制項的參考新增到引導物件上,轉換器具體定義如下:
public class BindControlToGuideConverter : IMultiValueConverter
{
    public object? Convert(object[] values, Type targetType, object parameter, CultureInfo culture)
    {
        if (values.Length < 2)
        {
            return null;
        }

        var element = values[0] as FrameworkElement;
        var guide = values[1] as GuideInfo;
        if (guide != null)
        {
            guide.TargetControl = element;
        }

        return guide;
    }

    public object[] ConvertBack(object value, Type[] targetTypes, object parameter, CultureInfo culture)
    {
        throw new NotImplementedException();
    }
}
目標控制項的參考指派給引導物件的 TargetControl 屬性。
Demo 程式碼完畢,直接執行專案,效果如下,原始碼在這 NewbieGuideDemo:
3. 控制項如何開發的?
關於原理,WPF 簡易新手引導 這篇介紹得不錯,可以先看看。
關於本範例的實現方式,暫時不做太多說明,詳細請直接檢視原始碼 Dotnet9WPFControls,本文後半截大概提一下。
程式碼組織結構如下:
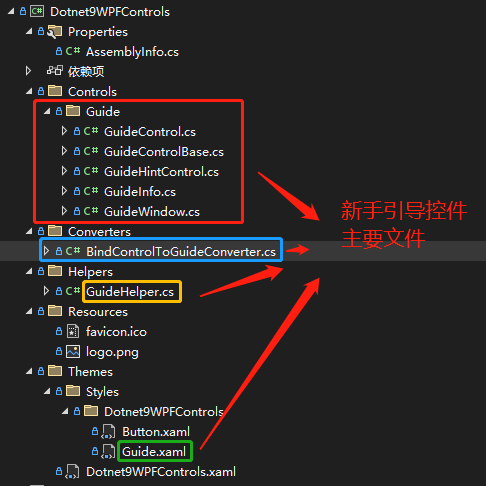
- GuideInfo:定義引導資訊類別,如標題、內容、下一步按鈕顯示內容。
- GuideHintControl:引導提示框控制項,顯示引導標題、引導內容、下一步按鈕,即
GuideInfo繫結的控制項。 - GuideControl:引導控制項,用於目標控制項無法獲取到自己的表單這種(即無法獲取在表單中的位置),比如您開發的程式為第三方程式外掛這種,上面的程式碼即是使用此引導控制項實現的效果。
- GuideWindow:引導表單,
GuideControl引導控制項的相互補充。 - GuideControlBase:引導控制項輔助類別
- BindControlToGuideConverter:引導資訊與引導的目標控制項繫結轉換器
- GuideHelper:引導幫助類別,繫結目標控制項的引導資訊使用,外加一個顯示 引導表單 的靜態命令。
- Guide.xaml:定義引導遮罩層(
GuideControl和GuideWindow)、引導提示框(GuideHintControl)樣式的資源檔案,定義外觀請改這個檔案
重點:
a) GuideControlBase
GuideControlBase 是 GuideControl 和 GuideWindow 的輔助類別,因為這兩個類別實現的功能是類似的,所以封裝大部分功能在 GuideControlBase 中,比如將目標控制項區域從遮罩層 Clip 出來,並將 GuideHintControl 提示框控制項新增到遮罩層之上,顯示出新手引導的效果。
b) GuideControl 和 GuideWindow
GuideControl 是用於顯示在包含目標控制項的容器內使用的,GuideControl放置的容器不一定是目標控制項的直接容器,可以有巢狀,比如目標控制項在ListBox子項ListBoxItem內,而引導控制項GuideControl可以在ListBox的外層容器之上;
GuideWindow 用於貼在目標控制項所在的表單上,GuideWindow 作為目標控制項表單的子表單,Show()在目標控制項表單上,不能使用ShowDialog()的方式(為啥?ShowDialog()會使除引導表單之外的表單處於無效狀態(disable))。
這兩種方式(GuideControl 和 GuideWindow)總體呈現效果是一樣的,目標控制項所在的表單是自訂表單,Demo 能正常顯示下面的效果,普通表單需要對目標控制項 Clip 的位置和提示框的位置進行偏移處理,修改位置見 GuideControl 和 GuideWindow的方法 ShowGuide(FrameworkElement? targetControl, GuideInfo guide)。
控制項帶的兩個新手引導 Demo 如下:
新手引導 Demo 一
GuideControl 方式,站長推薦,即以控制項的方式顯示新手引導,點選看程式碼:
新手引導 Demo 二
GuideWindow 方式,即以子表單的方式顯示新手引導,點選看程式碼:
詳細開發不展開了,一切都在程式碼中。
4. 總結
前面寫了不少,其實不多,謝謝開源帶來的力量。
- 參考文章:WPF 簡易新手引導
- 參考開源專案:AIStudio.Wpf.Controls
- 本文 Demo
NewbieGuideDemo:GitHub、Gitee - Dotnet9Controls 新手引導 Demo 一 原始碼:GitHub、Gitee
- Dotnet9Controls 新手引導 Demo 二 原始碼
GuideWindowView:GitHub、Gitee - Dotnet9Controls 控制項:GitHub、Gitee