
这里是笔者在开发 MAUI 应用时踩的坑,以及一些笔记的汇总。
不得不说 MAUI 挺垃圾的。
如果不是 Mono 金玉在前,估计社区不会有多少人关注败絮 MAUI。
目前 .NET 已经升级到 7.0,但是 MAUI 还是一如既往的拉跨,如果开发过 MAUI,做过定制,自定义标题栏之类的,便会发现 MAUI 有多难受。
MAUI 不知道跟 UWP 有啥关系,但是 MAUI 很多东西感觉都是在延续 UWP 的设计,而且 MAUI 也很可能是下一个 UWP。
如果是 Windows 或者 Linux 桌面开发,建议 WPF 或 Avalonia, MAUI 真上不来台面,在 WPF 下面可以找到 好多 API ,但是 MAUI 都没有。。。
MAUI Windows 基于 WINUI 开发的,但是你按照 WINUI 去找资料,找到的东西 MAUI 又用不了。。。
这里笔者推荐一个好用的前端打包客户端工具 tauri ,tauri 是用 rust 实现的,然后可以结合其他前端框架开发应用。
其开发模式比 MAUI Blazor 好很多,开发体验也非常好,生成的软件体积也是出奇的小,而且生成的 app 自带安装界面,生成的程序就是已经打包好的,省得自己手动重新打包。
文章介绍:https://www.whuanle.cn/archives/21062
与其他桌面开相比, MAUI 真的非常臃肿,而且 MAUI Blazor 开发得真的不爽,包括 Visual Studio 本身的开发体验,框架本身的使用,以及 Blazor UI 框架,三个方面的体验都不够好。
能打的 Blazor 框架少,可以轻易扩展容易改造的 UI 框架更加少,目前发现能够使用的 Blazor 框架,比较好的有 MASA Blazor。
为什么这么说呢,首先是 Blazor 编写过程中,编辑器对 Razor 的支持不好,会经常出现没有语法提示,代码有错误但是编辑器没有提示,编辑器提示有错误实际上代码没有错误,等等。。。
其次,关于 MAUI 下 Blazor 的使用和 Blazor 框架的选型。在 MAUI 下使用 Blazor,如果使用第三方 UI 框架,引入之后,会发现其天然有一种封闭性。
如果使用纯前端框架开发,你会发现依赖引用关系很清晰,需要引用什么包,编译器会提示,编译时会提示。
而 Blazor 框架,很难知道里面用了哪些 js,Blazor dll 里面嵌套了 js 等文件,其本身就是一种封闭性,而关于内部的情况更加难以了解,出现了 Bug 调试难。
而且 Blazor 框架封装的代码 是 C# + js 写的,由于 C# 代码编译后无法修改,因此引用的 Blazor 库出问题时,难以查看调试源代码。还有,笔者从目前的 Blazor 框架中,看到了很多框架本身的代码非常臃肿,里面的设计和逻辑也不清晰,很多地方的代码限制了组件的扩展,开发者难以替换里面的实现。
过度设计也是一种毛病,因为为了支持而支持,为了灵活而灵活,过多的 API 设计和过多的参数呈现,过多的逻辑封装,实际上会让这些组件更加难用。
大多数 Blazor 框架都是个人仓库维护。而市面上精品的前端框架,几乎都是有大公司做背书,ViewJS、Ant Design 等,其框架本身有专业团队维护和大佬对框架进行设计,共同维护一个精品。
但是目前的 Blazor,我觉得,除了 MASA 做的,其他很难提得上 “精品”。
要夸 MASA ,笔者也是有理由的。
MASA 是真的用心在做生态,吸引了很多开发者和粉丝活跃参与,其开源共享精神值得敬佩。
如果你对 Blazor 有问题,对 MAUI 开发有问题,即使你用的不是 MASA 框架,你也可以到 MASA 群众提问,不会出现付费解答问题,也不会有人笑你菜,也不会有人笑你这都不懂。当然笔者并不是说开源项目付费解答有问题,我只是称赞 MASA 的开源精神。
官网:https://www.masastack.com/blazor
期待 MASA 团队做出一个精品出来。
不过就目前来说, MAUI + Blazor 桌面开发,没啥优势。。。还会带来很多问题。。。
如果可以,不想再碰 MAUI。
下面来介绍一些 MAUI 的知识点。
窗口
首先,创建项目后, APP.cs 中,有个 Microsoft.Maui.Controls.Window。

MauiProgram.cs 中,有个 Microsoft.UI.Xaml.Window ,然后在 Windows 下 Microsoft.UI.Xaml.Window 是 Microsoft.Maui.MauiWinUIWindow, Microsoft.UI.Xaml.Window 多种平台统一的抽象。

然后 Microsoft.UI.Xaml.Window 可以获取一个 AppWindow。
AppWindow appWindow = nativeWindow.GetAppWindow()!;
MAUI 里面的 Window 类 API 很混乱,大多数是从 UWP 写法继承,然后有很多 API 是 UWP 有的,但是 MAUI 没有。
混乱。
如果自己写了一个页面,要弹出这个窗口页面,那么应该使用 Microsoft.Maui.Controls.Window ,但是自己写的页面是 ContentPage,并不是 Window。
因此并不能直接使用 Window,而是将 ContentPage 放到 Window 中,生成 Window 后再操作。
private Microsoft.Maui.Controls.Window BuildUpdateWindow(ContentPage updatePage)
{
    Window window = new Window(updatePage);
    window.Title = "更新通知";
    return window;
}
然后弹出这个窗口。
Application.Current!.OpenWindow(updateWindow!);
如果要异步打开窗口,请使用 Application.Current!.Dispatcher.DispatchAsync。
await Application.Current!.Dispatcher.DispatchAsync(async () =>
{
    try
    {
        Application.Current!.OpenWindow(updateWindow!);
    }
    catch (Exception ex)
    {
        Logger.LogError("无法启动更新窗口", ex);
    }
});
如果想关闭所有窗口:
await Application.Current!.Dispatcher.DispatchAsync(async () =>
{
    var windows = Application.Current!.Windows.ToArray();
    foreach (var window in windows)
    {
        try
        {
            Application.Current.CloseWindow(window);
        }
        catch (Exception ex)
        {
            Debug.Assert(ex != null);
        }
    }
});
虽然你获得了 Microsoft.Maui.Controls.Window ,但是不能直接管理这个 Window,而是应该通过 Microsoft.UI.Xaml.Window 或 Microsoft.UI.Windowing.AppWindow 管理。
也就是在依赖注入里面的窗口生命周期管理里面写。
或者除非你可以拿到 AppWindow 实例。
遗憾的是,Microsoft.Maui.Controls.Window 转不了 Microsoft.UI.Xaml.Window 或 Microsoft.UI.Windowing.AppWindow。
你应该这样写:
builder.ConfigureLifecycleEvents(events =>
{
    events.AddWindows(wndLifeCycleBuilder =>
    {
        wndLifeCycleBuilder.OnWindowCreated(window =>
        {
            var nativeWindow = (window as Microsoft.Maui.MauiWinUIWindow)!;
            ... ...
        })
        .OnActivated((window, args) =>
        {
        })
        .OnClosed((window, args) =>
        {
        });
    });
});
private static void MainWindowCreated(MauiWinUIWindow nativeWindow)
{
    const int width = 1440;
    const int height = 900;

    AppWindow appWindow = nativeWindow.GetAppWindow()!;

    // 扩展标题栏,要自定义标题栏颜色,必须 true

    nativeWindow.ExtendsContentIntoTitleBar = true;

    // 这里必须设置为 Overlapped,之后窗口 Presenter 就是 OverlappedPresenter,便于控制
    appWindow.SetPresenter(AppWindowPresenterKind.Overlapped);

    //if (appWindow.Presenter is OverlappedPresenter p)
    //{
    //   // p.SetBorderAndTitleBar(hasBorder: false, hasTitleBar: true);
    //}

    // 重新设置默认打开大小
    appWindow.MoveAndResize(new RectInt32(1920 / 2 - width / 2, 1080 / 2 - height / 2, width, height));

    // 窗口调整的各类事件
    appWindow.Changed += (w, e) =>
    {
        // 位置发生变化
        if (e.DidPositionChange)
        {
        }
        if (e.DidPresenterChange) { }
        // 大小发生变化
        if (e.DidSizeChange) { }
        if (e.DidVisibilityChange) { }
        if (e.DidZOrderChange) { }
    };
    appWindow.Closing += async (w, e) =>
    {
        try
        {
            Environment.Exit(0);
        }
        catch (Exception ex)
        {
            var log = AppHelpers.LoggerFactory.CreateLogger<AppWindow>();
            log.LogError(ex, "Can't close WebHost");
            ProcessManager.ReleaseLock();
        }
        finally
        {
            ProcessManager.ExitProcess(0);
        }
    };
    appWindow.MoveInZOrderAtTop();
}
其次,你想直接获取当前的窗口实例,也是麻烦。
可以通过以下代码获取当前程序打开的所有窗口。
App.Current.Windows
Application.Current.Windows
如果你想获取当前正在使用或激活的窗口,笔者并不知道怎么通过里面的 API 获取。。。如果用 Win32 那么倒是可以。
问:有没有一种这样的 API 呢?
Current.GetWindos()
另外,MAUI 做不到自定义标题栏,天王老子来了都不行。
你想给标题栏改个背景色,估计都得累死。
如果要修改窗口标题,只能在窗口创建时修改,也就是 Microsoft.Maui.Controls.Windows,用 Microsoft.UI.Xaml.Window,或 Microsoft.UI.Windowing.AppWindow 都改不了。
Microsoft.Maui.Controls.Window window = base.CreateWindow(activationState);
window.Title = Constants.Name;
如果要获取原生的 Window 句柄,可以使用:
var nativeWindow = mauiWindow.Handler.PlatformView;
IntPtr windowHandle = WinRT.Interop.WindowNative.GetWindowHandle(nativeWindow);
窗口管理
前面提到,想管理窗口,API 要用 Microsoft.UI.Xaml.Window,或 Microsoft.UI.Windowing.AppWindow 的。
有些地方只能用原生的 Window 窗口句柄,然后用 Win32 操作。
自定义窗口生命周期时,一定要使用:
// 这里必须设置为 Overlapped,之后窗口 Presenter 就是 OverlappedPresenter,便于控制
appWindow.SetPresenter(AppWindowPresenterKind.Overlapped);
然后常用的窗口方法有:
/*
    AppWindow 的 Presenter ,一定是 OverlappedPresenter
    */
public class WindowService : IWindowService
{
    private readonly AppWindow _appWindow;
    private readonly Window _window;

    private WindowService(AppWindow appWindow, Window window)
    {
        _appWindow = appWindow;
        _window = window;
    }

    // 检查当前窗口是否全屏
    public bool FullScreenState
    {
        get
        {
            switch (_appWindow.Presenter)
            {
                case OverlappedPresenter p:return p.State == OverlappedPresenterState.Maximized;
                case FullScreenPresenter p:return p.Kind == AppWindowPresenterKind.FullScreen;
                case CompactOverlayPresenter p: return p.Kind == AppWindowPresenterKind.FullScreen;
                case AppWindowPresenter p: return p.Kind == AppWindowPresenterKind.FullScreen;
                default:return false;
            }
        }
    }

    // 让窗口全屏
    public void FullScreen()
    {
        switch (_appWindow.Presenter)
        {
            case OverlappedPresenter overlappedPresenter:
                overlappedPresenter.SetBorderAndTitleBar(true, true);
                overlappedPresenter.Maximize();
                break;
        }
        // 全屏时去掉任务栏
        // _appWindow.SetPresenter(AppWindowPresenterKind.FullScreen);
    }

    // 退出全屏
    public void ExitFullScreen()
    {
        switch (_appWindow.Presenter)
        {
            case OverlappedPresenter p: p.Restore();break;
            default: _appWindow.SetPresenter(AppWindowPresenterKind.Default); break;
        }
    }

    // 最小化到任务栏
    public void Minmize()
    {
#if WINDOWS
        var mauiWindow = App.Current.Windows.First();
        var nativeWindow = mauiWindow.Handler.PlatformView;
        IntPtr windowHandle = WinRT.Interop.WindowNative.GetWindowHandle(nativeWindow);

        PInvoke.User32.ShowWindow(windowHandle, PInvoke.User32.WindowShowStyle.SW_MINIMIZE);
#endif
    }

    /// <summary>
    /// 激活当前窗口
    /// </summary>
    public void Active()
    {
        _appWindow.Show(true);
    }

    // 关闭窗口
    public void Exit()
    {
        _window.Close();
    }

    public void SetSize(int _X, int _Y, int _Width, int _Height)
    {
        _appWindow.MoveAndResize(new RectInt32(_X, _Y, _Width, _Height));
    }

    public (int X, int Y) GetPosition()
    {
        var p = _appWindow.Position;
        return (p.X, p.Y);
    }

    public (int X, int Y) Move(int x, int y)
    {
        _appWindow.Move(new PointInt32(x, y));
        return GetPosition();
    }

    public (int Width, int Height, int ClientWidth, int ClientHeight) GetSize()
    {
        var size = _appWindow.Size;
        var clientSize = _appWindow.ClientSize;
        return (size.Width, size.Height, clientSize.Width, clientSize.Height);
    }

    public (PointInt32 Position, SizeInt32 Size, SizeInt32 ClientSize) GetAppSize()
    {
        return (_appWindow.Position, _appWindow.Size, _appWindow.ClientSize);
    }
}
让窗口全屏有两种方法,一种是全屏时,窗口把任务栏吞了,真正意义上的的全屏,另一种是保留任务栏。
// 保留任务栏
switch (_appWindow.Presenter)
{
    case OverlappedPresenter overlappedPresenter:
        overlappedPresenter.SetBorderAndTitleBar(true, true);
        overlappedPresenter.Maximize();
        break;
}
// 全屏时去掉任务栏
// _appWindow.SetPresenter(AppWindowPresenterKind.FullScreen);
最小化只能通过 Win32 API 处理,你要先获取 Microsoft.Maui.Controls.Windows,然后转换为 Window 句柄。
var nativeWindow = mauiWindow.Handler.PlatformView;
IntPtr windowHandle = WinRT.Interop.WindowNative.GetWindowHandle(nativeWindow);

PInvoke.User32.ShowWindow(windowHandle, PInvoke.User32.WindowShowStyle.SW_MINIMIZE);
此时
Microsoft.UI.Xaml.Window,或Microsoft.UI.Windowing.AppWindow就用不上了。
前面提到,要使用 Microsoft.UI.Xaml.Window,或 Microsoft.UI.Windowing.AppWindow ,例如在 MauiProgram.cs 里面记录了窗口的事件,创建窗口时控制大小。
但是,窗口运行中,要设置窗口大小或限制大小,则是要通过 Microsoft.Maui.Controls.Windows。
例如,控制主窗口大小不能太小,不能被无限缩小,要在 APP.cs 中这样写:
protected override Window CreateWindow(IActivationState? activationState)
{
    Window window = base.CreateWindow(activationState);
    window.Title ="窗口标题";

    var minSize = GetMinSize();
    window.MinimumWidth = minSize.MinWidth;
    window.MinimumHeight = minSize.MinHeight;

    // Give the Window time to resize
    window.SizeChanged += (sender, e) =>
    {
        var minSize = GetMinSize();
        window.MinimumWidth = minSize.MinWidth;
        window.MinimumHeight = minSize.MinHeight;
    };

    //window.Created += (s, e) =>
    //{
    //};

    //window.Stopped += (s, e) =>
    //{
    //};

    return window;

    (int MinWidth, int MinHeight) GetMinSize()
    {
        // 获取当前屏幕的长宽,用 X、Y 表示。
        var x = PInvoke.User32.GetSystemMetrics(PInvoke.User32.SystemMetric.SM_CXFULLSCREEN);
        var y = PInvoke.User32.GetSystemMetrics(PInvoke.User32.SystemMetric.SM_CYFULLSCREEN);
        // 设置窗口最小值,可以按照比例计算,也可以直接设置固定大小
        return (x / 3 * 2, y / 5 * 4);
    }
}
PS,在 AppWindow 里面的事件做大小限制,是做不到的,这里主要是观察,想做窗口大小等限制是不行的。
// 窗口调整的各类事件
appWindow.Changed += (w, e) =>
{
    // 位置发生变化
    if (e.DidPositionChange)
    {

    }
    if (e.DidPresenterChange) { }
    // 大小发生变化
    if (e.DidSizeChange) { }
    if (e.DidVisibilityChange) { }
    if (e.DidZOrderChange) { }
};
如何限制一次只能打开一个程序
场景,如果程序 D 已被运行 进程 A,那么再次启动程序 D 运行进程 B,B 会识别到已有相同的进程,此时 B 会将 A 窗口激活弹出来,然后 B 再退出。
这样不仅可以限制只能运行一个进程,而且可以让用户体验更加好。
锁可以使用 Mutex 来实现,在整个操作系统中,大家可以识别到同一个锁。
然后激活另一个窗口,可以使用 Win32。
// 进程管理器
internal static class ProcessManager
{
    private static Mutex ProcessLock;
    private static bool HasLock;

    /// <summary>
    /// 获取进程锁
    /// </summary>
    public static void GetProcessLock()
    {
        // 全局锁
        ProcessLock = new Mutex(false, "Global\\" + "自定义锁名称", out HasLock);

        if (!HasLock)
        {
            ActiveWindow();
            Environment.Exit(0);
        }
    }

    /// <summary>
    /// 激活当前进程并将其窗口放到屏幕最前面
    /// </summary>
    public static void ActiveWindow()
    {
        string pName = Constants.Name;
        Process[] temp = Process.GetProcessesByName(pName);
        if (temp.Length > 0)
        {
            IntPtr handle = temp[0].MainWindowHandle;
            SwitchToThisWindow(handle, true);
        }
    }

    /// <summary>
    /// 释放当前进程的锁
    /// </summary>
    /// <remarks>小心使用</remarks>
    public static void ReleaseLock()
    {
        if (ProcessLock != null && HasLock)
        {
            ProcessLock.Dispose();
            HasLock = false;
        }
    }

    // 将另一个窗口激活放到前台。
    // Win32 API
    [DllImport("user32.dll")]
    public static extern void SwitchToThisWindow(IntPtr hWnd, bool fAltTab);
}
然后在程序启动时使用。

MAUI 程序安装模式
如果直接使用原生的 MAUI 程序,安装时会特别麻烦,因为这种方式就是以前的 UWP。
因此,可以使用那种,不需要安装直接运行的方式。
但是这里我们要了解一下两种模式的区别。
如果使用原生 MAUI 模式,那么会被生成 Windows 应用市场应用,无论是发布、上架、安装,都是非常麻烦的。但是好在可以使用很多 Windows 应用的 API。
例如要获取应用程序安装目录:
ApplicationData appdata = Windows.Storage.ApplicationData.Current
获取本地存储目录和临时目录:
var localPath = Windows.Storage.ApplicationData.Current.LocalFolder.Path
var tempPath = Windows.Storage.ApplicationData.Current.TemporaryFolder.Path
目录一般安装位置:
"C:\\Users\\{用户名}\\AppData\\Local\\Packages\\{程序GUID}
还有其他一些语言处理等 API,使用商场应用模式是挺方便的。
接下来说一下自定义打包模式,就是直接编译生成一堆文件,然后直接启动 exe 就能运行的,不需要安装。如果想做成安装包,可以先发布,然后使用打包工具打包。
就是在项目文件中加上这两句即可:
<WindowsPackageType>None</WindowsPackageType>
<WindowsAppSDKSelfConatined>true</WindowsAppSDKSelfConatined>
之后会直接生成可执行文件,不需要安装安装包, 生成的程序,直接点击即可运行,不需要安装后才能启动,也不需要证书才能运行。
为 MAUI Blazor 设置语言
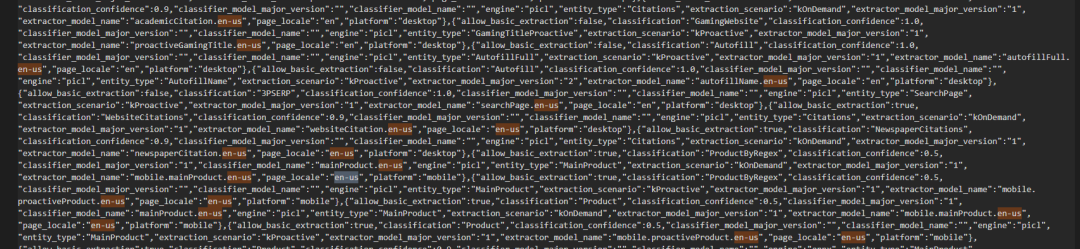
MAUI Blazor 在 Windows 上使用的是 WebView2,MAUI Blazor 运行环境是跟程序没关系的,即使是系统设置了中文语言,程序集设置了中文,本地文化设置了中文,CultureInfo 设置了中文,统统都没有用。
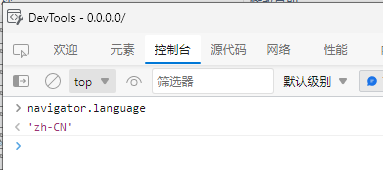
你可以在程序启动后,按下 F12,然后执行 JavaScript 代码,检查浏览器的运行环境是何种语言:
navigator.language
'en-US'

或者使用 API:
// using Windows.Globalization
var langs = ApplicationLanguages.Languages.ToList<string>();

坑 ①
首先,设置 Windows.Globalization:
ApplicationLanguages.PrimaryLanguageOverride = "zh-CN";
然后重新启动程序,发现:

但是浏览器语言环境依然没有变化:

原因是
Preferences文件需要重新生成才能起效,后面会提到。
坑 ②
程序启动后,会在 {Windows程序数据目录}/{你的程序ID}/LocalState\EBWebView\Default 下面生成一些 WebView2 的文件,其中 Preferences 文件,里面配置了 WebView2 的参数。
找到自己的程序数据目录:
var path = Windows.Storage.ApplicationData.Current.LocalFolder.Path;

因此,可以通过手动的方式修改文件,让 WebView2 使用中文环境。

var langs = ApplicationLanguages.Languages.ToList<string>();
var cultureInfo = CultureInfo.InstalledUICulture;
var index = langs.FindIndex((lang) => cultureInfo.Equals(CultureInfo.CreateSpecificCulture(lang)));
if (index > 0)
{
	ApplicationLanguages.PrimaryLanguageOverride = cultureInfo.Name;
	// "...this is immediately reflected in the ApplicationLanguages.Languages property."
	langs = ApplicationLanguages.Languages.ToList<string>();
}
var selectedLangs = string.Join(",", langs);
// Should check if this is the same as before but...
var preferences = Windows.Storage.ApplicationData.Current.LocalFolder.Path + "\\EBWebView\\Default\\Preferences";
if (File.Exists(preferences))
{
	var jsonString = File.ReadAllText(preferences);
	var jsonObject = JObject.Parse(jsonString);    // using Newtonsoft.JSON
	//var intl = jsonObject["intl"];
	jsonObject["intl"] = JObject.Parse($@"{{""selected_languages"": ""{selectedLangs}"",""accept_languages"": ""{selectedLangs}""}}");
	jsonString = JsonConvert.SerializeObject(jsonObject);
        File.WriteAllText(preferences, jsonString);
}
坑 ③
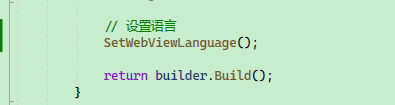
最后我发现, ① 的思路是对的,不起效的原因是 Preferences 文件需要删除等重新创建才行,只要在程序启动时(WebView 尚未启动),设置中文即可。

检查代码:
public static class MauiProgram
{
    private static void SetWebViewLanguage()
    {
        ApplicationLanguages.PrimaryLanguageOverride = "zh-CN";

        var basePath = Windows.Storage.ApplicationData.Current.LocalFolder.Path;
        var preferencesFile = Path.Combine(basePath, "EBWebView/Default/Preferences"); // Preferences
        if (!File.Exists(preferencesFile)) return;

        var jsonString = File.ReadAllText(preferencesFile);
        var jsonObject = JsonObject.Parse(jsonString).AsObject();
        var languages = jsonObject["intl"]["selected_languages"].Deserialize<string>() ?? "";
        // "zh-CN,en,en-GB,en-US"
        if (!languages.StartsWith("zh-CN"))
        {
            // File.Delete(preferencesFile);
            jsonObject.Remove("intl");
            jsonObject.Add("intl", JsonObject.Parse("{\"selected_languages\":\"zh-CN,en,en-GB,en-US\"}"));
            jsonString = JsonSerializer.Serialize(jsonObject);
            File.WriteAllText(preferencesFile, jsonString);
        }
    }
// 省略N多代码
}
在 public static MauiApp CreateMauiApp() 中使用:
配置 MAUI 项目使用管理员权限启动
问题背景
在 Windows 中,开发的应用可以使用 app.manifest 资产文件配置程序启动时,使用何种角色权限启动。
效果如下:

正常情况下,在 app.manifest 加上以下配置即可:
如果项目中没有这个文件,可以在项目中新建项-清单文件。
<trustInfo xmlns='urn:schemas-microsoft-com:asm.v2'>
<security>
    <requestedPrivileges xmlns='urn:schemas-microsoft-com:asm.v3'>
    <requestedExecutionLevel level='requireAdministrator' uiAccess='false' />
    </requestedPrivileges>
</security>
</trustInfo>

但是在 MAUI 应用中,是加不上去的,如果加上去,就会出现报错。
Platforms\Windows\app.manifest : manifest authoring error c1010001: Values of attribute "level" not equal in different manifest snippets.
因为 .NET 编译器中,已经默认为程序生成一个 app.manifest 文件,其文件内容中已经包含了 trustInfo 配置。
如果项目中开启了 <WindowsAppSDKSelfConatined>true</WindowsAppSDKSelfConatined>,那么应该查看 Microsoft.WindowsAppSDK.SelfContained.targets 文件:


所以如果要自定义 app.manifest ,要么就是把 Microsoft.WindowsAppSDK.SelfContained.targets 改了,但是这样不太好。
定制编译过程
如果观察编译过程,会发现 manifest 文件会生成到 obj 目录。

其中 mergeapp.manifest 便是项目中的 app.manifest ,.NET 编译的时候将开发者的文件改名字了。
程序编译时,首先从 Microsoft.WindowsAppSDK.SelfContained.targets 中生成默认的 app.manifest。
接着将开发者项目中的 app.manifest 复制为 mergeapp.manifest 文件,然后将 mergeapp.manifest 合并到 app.manifest。
如果 app.manifest 中已经存在配置,那么 mergeapp.manifest 中重复的记录就会导致编译报错。
既然了解到了编译过程,那么我们可以在编译过程中做手脚。
我们可以在编译生成 app.manifest 但是还没有编译主程序的时候,将 app.manifest 中的配置替换掉,替换命令是:
powershell -Command ";(gc app.manifest) -replace 'level=''asInvoker''', 'level=''requireAdministrator''' | Out-File -encoding ASCII app.manifest";

MSBuild 编译使用到的步骤可以参考官方文档:https://learn.microsoft.com/en-us/visualstudio/msbuild/msbuild-targets?view=vs-2022
在编译过程中,有两个重要的环境变量:
_DeploymentManifestFiles:清单文件所在目录;ApplicationManifest:app.manifest文件路径。
可以在 .csproj 文件中加入以下脚本,这样会在程序编译时,自动修改清单文件。
<Target Name="RequireAdministrator" BeforeTargets="GenerateManifests" Condition="'$(PublishDir)' != ''">
    <Exec WorkingDirectory="./" Command="echo $(ApplicationManifest)" />
    <Exec WorkingDirectory="./" Command="echo $(_DeploymentManifestFiles)" />
    <Exec WorkingDirectory="$(_DeploymentManifestFiles)" Command="dir" />
    <Exec WorkingDirectory="$(_DeploymentManifestFiles)" Command="powershell -Command "(gc app.manifest) -replace 'level=''asInvoker''', 'level=''requireAdministrator''' | Out-File -encoding ASCII app.manifest"" />
</Target>
BeforeTargets="GenerateManifests" 表明在 GenerateManifests 之前,执行里面的自定义命令。
Condition="'$(PublishDir)' != ''" 表示触发条件,在 MAUI 中,只有发布的时候才会有这个变量,也可以改成 Condition="'$(Release)' != ''"。
注意,有些情况下 _DeploymentManifestFiles 目录会不存在,因此可以多次测试一下。
当然,最保险的方法:
<Target Name="RequireAdministrator" BeforeTargets="GenerateManifests" Condition="'$(PublishDir)' != ''">
    <Exec WorkingDirectory="./" Command=" powershell -Command "(gc $(ApplicationManifest)) -replace 'level=''asInvoker''', 'level=''requireAdministrator''' | Out-File -encoding UTF8 $(ApplicationManifest)"" />
</Target>
编译过程主要在以下三步,其中只有 GenerateManifests 能够在 .csproj 中使用。
<Target Name="GenerateManifests"
        Condition="'$(GenerateClickOnceManifests)'=='true' or '@(NativeReference)'!='' or '@(ResolvedIsolatedComModules)'!='' or '$(GenerateAppxManifest)' == 'true'"
        DependsOnTargets="$(GenerateManifestsDependsOn)"/>

===================================================
GenerateApplicationManifest
Generates a ClickOnce or native application manifest.
An application manifest specifies declarative application identity, dependency and security information.
===================================================
<Target Name="GenerateApplicationManifest"
        DependsOnTargets="
                _DeploymentComputeNativeManifestInfo;
                _DeploymentComputeClickOnceManifestInfo;
                ResolveComReferences;
                ResolveNativeReferences;
                _GenerateResolvedDeploymentManifestEntryPoint"
        Inputs="
                $(MSBuildAllProjects);
                @(AppConfigWithTargetPath);
                $(_DeploymentBaseManifest);
                @(ResolvedIsolatedComModules);
                @(_DeploymentManifestDependencies);
                @(_DeploymentResolvedManifestEntryPoint);
                @(_DeploymentManifestFiles)"
        Outputs="@(ApplicationManifest)">
能够拿到参数:
$(_DeploymentBaseManifest);
@(ResolvedIsolatedComModules);
@(_DeploymentManifestDependencies);
@(_DeploymentResolvedManifestEntryPoint);
@(_DeploymentManifestFiles)
@(ApplicationManifest)
MAUI 实现前后端分离开发
背景
最先采用的是 Maui + Blazor 开发,使用社区热度比较高的 Blazor UI 框架。
可是开发进行过程中, Maui 巨多坑,Blazor UI 框架也是巨多坑,使用 Blazor UI 写的页面和样式,过不了设计师和产品经理的是法眼。
最终决定使用原生前端结合,生成静态内容放到 Maui 中,然后将两者结合起来打包发布。
先搞前端
对于前端来说,按照正常的开发模式就行,不对对前端的代码产生污染。
可以使用 VS 创建前端项目,将其放到解决方案中,也可以单独创建一个目录,将前端代码放到里面。

创建 MAUI Blazor 项目
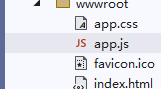
创建 MAUI Blazor 项目,然后解决方案如下所示:

首先将 wwwroot/css/app.css 文件移出来,放到 wwwroot中,然后新建一个 app.js 也是放到 wwwroot 中。
将 app.css 文件中的内容删除与 Blazor 无关的内容,只保留以下内容:
#blazor-error-ui {
  background: lightyellow;
  bottom: 0;
  box-shadow: 0 -1px 2px rgba(0, 0, 0, 0.2);
  display: none;
  left: 0;
  padding: 0.6rem 1.25rem 0.7rem 1.25rem;
  position: fixed;
  width: 100%;
  z-index: 1000;
}

#blazor-error-ui .dismiss {
  cursor: pointer;
  position: absolute;
  right: 0.75rem;
  top: 0.5rem;
}

.blazor-error-boundary {
  background: url(data:image/svg+xml;base64,PHN2ZyB3aWR0aD0iNTYiIGhlaWdodD0iNDkiIHhtbG5zPSJodHRwOi8vd3d3LnczLm9yZy8yMDAwL3N2ZyIgeG1sbnM6eGxpbms9Imh0dHA6Ly93d3cudzMub3JnLzE5OTkveGxpbmsiIG92ZXJmbG93PSJoaWRkZW4iPjxkZWZzPjxjbGlwUGF0aCBpZD0iY2xpcDAiPjxyZWN0IHg9IjIzNSIgeT0iNTEiIHdpZHRoPSI1NiIgaGVpZ2h0PSI0OSIvPjwvY2xpcFBhdGg+PC9kZWZzPjxnIGNsaXAtcGF0aD0idXJsKCNjbGlwMCkiIHRyYW5zZm9ybT0idHJhbnNsYXRlKC0yMzUgLTUxKSI+PHBhdGggZD0iTTI2My41MDYgNTFDMjY0LjcxNyA1MSAyNjUuODEzIDUxLjQ4MzcgMjY2LjYwNiA1Mi4yNjU4TDI2Ny4wNTIgNTIuNzk4NyAyNjcuNTM5IDUzLjYyODMgMjkwLjE4NSA5Mi4xODMxIDI5MC41NDUgOTIuNzk1IDI5MC42NTYgOTIuOTk2QzI5MC44NzcgOTMuNTEzIDI5MSA5NC4wODE1IDI5MSA5NC42NzgyIDI5MSA5Ny4wNjUxIDI4OS4wMzggOTkgMjg2LjYxNyA5OUwyNDAuMzgzIDk5QzIzNy45NjMgOTkgMjM2IDk3LjA2NTEgMjM2IDk0LjY3ODIgMjM2IDk0LjM3OTkgMjM2LjAzMSA5NC4wODg2IDIzNi4wODkgOTMuODA3MkwyMzYuMzM4IDkzLjAxNjIgMjM2Ljg1OCA5Mi4xMzE0IDI1OS40NzMgNTMuNjI5NCAyNTkuOTYxIDUyLjc5ODUgMjYwLjQwNyA1Mi4yNjU4QzI2MS4yIDUxLjQ4MzcgMjYyLjI5NiA1MSAyNjMuNTA2IDUxWk0yNjMuNTg2IDY2LjAxODNDMjYwLjczNyA2Ni4wMTgzIDI1OS4zMTMgNjcuMTI0NSAyNTkuMzEzIDY5LjMzNyAyNTkuMzEzIDY5LjYxMDIgMjU5LjMzMiA2OS44NjA4IDI1OS4zNzEgNzAuMDg4N0wyNjEuNzk1IDg0LjAxNjEgMjY1LjM4IDg0LjAxNjEgMjY3LjgyMSA2OS43NDc1QzI2Ny44NiA2OS43MzA5IDI2Ny44NzkgNjkuNTg3NyAyNjcuODc5IDY5LjMxNzkgMjY3Ljg3OSA2Ny4xMTgyIDI2Ni40NDggNjYuMDE4MyAyNjMuNTg2IDY2LjAxODNaTTI2My41NzYgODYuMDU0N0MyNjEuMDQ5IDg2LjA1NDcgMjU5Ljc4NiA4Ny4zMDA1IDI1OS43ODYgODkuNzkyMSAyNTkuNzg2IDkyLjI4MzcgMjYxLjA0OSA5My41Mjk1IDI2My41NzYgOTMuNTI5NSAyNjYuMTE2IDkzLjUyOTUgMjY3LjM4NyA5Mi4yODM3IDI2Ny4zODcgODkuNzkyMSAyNjcuMzg3IDg3LjMwMDUgMjY2LjExNiA4Ni4wNTQ3IDI2My41NzYgODYuMDU0N1oiIGZpbGw9IiNGRkU1MDAiIGZpbGwtcnVsZT0iZXZlbm9kZCIvPjwvZz48L3N2Zz4=)
      no-repeat 1rem/1.8rem, #b32121;
  padding: 1rem 1rem 1rem 3.7rem;
  color: white;
}

.blazor-error-boundary::after {
  content: "An error has occurred.";
}

.status-bar-safe-area {
  display: none;
}

@supports (-webkit-touch-callout: none) {
  .status-bar-safe-area {
    display: flex;
    position: sticky;
    top: 0;
    height: env(safe-area-inset-top);
    background-color: #f7f7f7;
    width: 100%;
    z-index: 1;
  }

  .flex-column,
  .navbar-brand {
    padding-left: env(safe-area-inset-left);
  }
}
接着,将以下代码放到 app.js 中,用于动态导入前端生成的 css 文件。
function InitializeCss(name) {
  document.getElementById("app-css").innerHTML =
    '<link rel="stylesheet" href="' + name + '">';
}
然后删除 js、css 目录。
剩下的文件如图所示:
然后修改 index.html,内容如下:
<!DOCTYPE html>
<html lang="en">
  <head>
    <meta charset="utf-8" />
    <meta
      name="viewport"
      content="width=device-width, initial-scale=1.0, maximum-scale=1.0, user-scalable=no, viewport-fit=cover"
    />
    <title>MauiApp3</title>
    <base href="/" />
    <link href="/app.css" rel="stylesheet" />
  </head>

  <body>
    <div id="app-css"></div>
    <div class="status-bar-safe-area"></div>
    <div id="app">Loading...</div>

    <div id="blazor-error-ui">
      An unhandled error has occurred.
      <a href="" class="reload">Reload</a>
      <a class="dismiss">🗙</a>
    </div>
    <script src="app.js"></script>
    <script src="_framework/blazor.webview.js" autostart="false"></script>
  </body>
</html>
增加的 <div id="app-css"></div>,用于动态加载 css 文件。
其他内容基本不变。
打开 MainLayout.razor,这里负责动态加载前端文件,其内容如下:
@using MauiApp3.Data
@inherits LayoutComponentBase
@code {
#region static fields
private static readonly string[] css;
private static readonly string[] js;
#endregion
#region instance fields
[Inject]
private IJSRuntime JS { get; set; }
#endregion
static MainLayout()
{
var path = Windows.ApplicationModel.Package.Current.InstalledLocation.Path;
if (Directory.Exists(Path.Combine(path, "wwwroot", "css")))
{
var cssList = Directory.GetFiles(Path.Combine(path, "wwwroot", "css"))
.Where(x => x.EndsWith(".css"))
.Select(x => Path.GetFileName(x)).ToArray();
css = cssList;
}
else css = Array.Empty<string>();
if (Directory.Exists(Path.Combine(path, "wwwroot", "js")))
{
var jsList = Directory.GetFiles(Path.Combine(path, "wwwroot", "js"))
.Where(x => x.EndsWith(".js"))
.Select(x => Path.GetFileName(x)).ToArray();
js = jsList;
}
else js = Array.Empty<string>();
}
protected override async Task OnInitializedAsync()
{
await Task.CompletedTask;
}
protected override async Task OnAfterRenderAsync(bool firstRender)
{
if (firstRender)
{
foreach (var item in css)
{
await JS.InvokeVoidAsync("InitializeCss", $"css/{item}");
}
foreach (var item in js)
{
await JS.InvokeAsync<IJSObjectReference>("import", $"/js/{item}");
}
}
}
}
然后为了能够将前端生成的内容自动复制到 Maui 中,可以设置脚本,在 Maui 的 .csproj 中,增加以下内容:
<Target Name="ClientBuild"   BeforeTargets="BeforeBuild">
    <Exec WorkingDirectory="../vueproject1" Command="npm install" />
    <Exec WorkingDirectory="../vueproject1" Command="npm run build" />
    <Exec WorkingDirectory="../vueproject1" Command="DEL "dist\index.html"" />
    <Exec WorkingDirectory="./" Command="RMDIR /s/q "css"" />
    <Exec WorkingDirectory="./" Command="RMDIR /s/q "js"" />
    <Exec WorkingDirectory="../vueproject1" Command="Xcopy "dist" "../MauiApp3/wwwroot"  /E/C/I/Y" />
    <Exec WorkingDirectory="./" Command="RMDIR /s/q "$(LayoutDir)""/>
</Target>

这样当启动 Maui 项目时,会编译前端项目,然后将生成的文件(不包括 index.html) 复制到 wwwroot 目录中。
启动后:
C# 自动化生成证书、本地安装证书、解决信任证书问题
背景
因为开发 Blazor 时 环境是 https://0.0.0.0/ ,也就是 MAUI Blazor 中只能发出 https 请求,既不能发出 http 请求,也不能发出不安全的 https 请求,但是内网的 https 是不安全的 https。
于是,只能再本地实现一个代理服务,然后让应用通过 https 访问,为了让 https 安全,需要安装自动化证书。

会导致 js 发不出请求。
为了让 https 安全,这里实现了本地 localhost 自动生成证书以及安装的过程。
写代码
生成证书使用的是 .NET 自带的库,不需要引入第三方包。
using System.Security.Cryptography;
using System.Security.Cryptography.X509Certificates;
using System.Text;
生成证书的方法参考 https://github.com/dotnetcore/FastGitHub 项目。
第一步是编写一个证书生成器,其中,代码直接从这里复制: https://github.com/dotnetcore/FastGitHub/blob/9f9cbce624310c207b01699de2a5818a742e11ca/FastGitHub.HttpServer/Certs/CertGenerator.cs
然后,定义管理生成证书的服务,原版作者使用的是 .NET 7,而且当前稳定版本是 .NET 6,很多 API 不能使用,因此需要对其改造。原版地址: https://github.com/dotnetcore/FastGitHub/blob/9f9cbce624310c207b01699de2a5818a742e11ca/FastGitHub.HttpServer/Certs/CertService.cs
定义证书位置和名称:
private const string CACERT_PATH = "cacert";

/// <summary>
/// 获取证书文件路径
/// </summary>
public string CaCerFilePath { get; } = OperatingSystem.IsLinux() ? $"{CACERT_PATH}/https.crt" : $"{CACERT_PATH}/https.cer";

/// <summary>
/// 获取私钥文件路径
/// </summary>
public string CaKeyFilePath { get; } = $"{CACERT_PATH}/https.key";
这里涉及到两个文件,客户端证书和私钥。
.key是私钥,可以通过私钥来生成服务端证书和客户端证书,因此这里只需要保存.key私钥,不需要导出服务器证书。.csr、.cer是客户端证书,在 Windows 下可以使用 .cer格式。导出客户端证书的原因是要安装证书,而且安装一次即可,不需要动态生成。
证书管理服务的规则是,如果 ssl 目录下没有证书,那么就生成并安装;如果发现文件已经存在,则加载文件到内存,不会重新安装。
完整代码如下:
    /// <summary>
    /// 证书生成服务
    /// </summary>
    internal class CertService
    {

        private const string CACERT_PATH = "cacert";

        /// <summary>
        /// 获取证书文件路径
        /// </summary>
        public string CaCerFilePath { get; } = OperatingSystem.IsLinux() ? $"{CACERT_PATH}/https.crt" : $"{CACERT_PATH}/https.cer";

        /// <summary>
        /// 获取私钥文件路径
        /// </summary>
        public string CaKeyFilePath { get; } = $"{CACERT_PATH}/https.key";

        private X509Certificate2? caCert;


        /*
         本地会生成 cer 和 key 两个文件,cer 文件导入到 Window 证书管理器中。
         key 文件用于每次启动时生成 X509 证书,让 Web 服务使用。
         */

        /// <summary>
        /// 生成 CA 证书
        /// </summary>
        public bool CreateCaCertIfNotExists()
        {
            if (!Directory.Exists(CACERT_PATH)) Directory.CreateDirectory(CACERT_PATH);
            if (File.Exists(this.CaCerFilePath) && File.Exists(this.CaKeyFilePath))
            {
                return false;
            }

            File.Delete(this.CaCerFilePath);
            File.Delete(this.CaKeyFilePath);

            var notBefore = DateTimeOffset.Now.AddDays(-1);
            var notAfter = DateTimeOffset.Now.AddYears(10);

            var subjectName = new X500DistinguishedName($"CN=运连网物流管理系统");
            this.caCert = CertGenerator.CreateCACertificate(subjectName, notBefore, notAfter);

            var privateKeyPem = ExportRSAPrivateKeyPem(this.caCert.GetRSAPrivateKey());
            File.WriteAllText(this.CaKeyFilePath, new string(privateKeyPem), Encoding.ASCII);

            var certPem = ExportCertificatePem(this.caCert);
            File.WriteAllText(this.CaCerFilePath, new string(certPem), Encoding.ASCII);

            return true;
        }

        /// <summary>
        /// 获取颁发给指定域名的证书
        /// </summary>
        /// <param name="domain"></param>
        /// <returns></returns>
        public X509Certificate2 GetOrCreateServerCert(string? domain)
        {
            if (this.caCert == null)
            {
                using var rsa = RSA.Create();
                rsa.ImportFromPem(File.ReadAllText(this.CaKeyFilePath));
                this.caCert = new X509Certificate2(this.CaCerFilePath).CopyWithPrivateKey(rsa);
            }

            var key = $"{nameof(CertService)}:{domain}";
            var endCert = GetOrCreateCert();
            return endCert!;

            // 生成域名的1年证书
            X509Certificate2 GetOrCreateCert()
            {
                var notBefore = DateTimeOffset.Now.AddDays(-1);
                var notAfter = DateTimeOffset.Now.AddYears(1);

                var extraDomains = GetExtraDomains();

                var subjectName = new X500DistinguishedName($"CN={domain}");
                var endCert = CertGenerator.CreateEndCertificate(this.caCert, subjectName, extraDomains, notBefore, notAfter);

                // 重新初始化证书,以兼容win平台不能使用内存证书
                return new X509Certificate2(endCert.Export(X509ContentType.Pfx));
            }
        }
        private static IEnumerable<string> GetExtraDomains()
        {
            yield return Environment.MachineName;
            yield return IPAddress.Loopback.ToString();
            yield return IPAddress.IPv6Loopback.ToString();
        }

        internal const string RasPrivateKey = "RSA PRIVATE KEY";

        private static string ExportRSAPrivateKeyPem(RSA rsa)
        {
            var key = rsa.ExportRSAPrivateKey();
            var chars = PemEncoding.Write(RasPrivateKey, key);
            return new string(chars);
        }

        private static string ExportCertificatePem(X509Certificate2 x509)
        {
            var chars = PemEncoding.Write(PemLabels.X509Certificate, x509.Export(X509ContentType.Cert));
            return new string(chars);
        }

        /// <summary>
        /// 安装ca证书
        /// </summary>
        /// <exception cref="Exception">不能安装证书</exception>
        public void Install( )
        {
            var caCertFilePath = CaCerFilePath;
            try
            {
                using var store = new X509Store(StoreName.Root, StoreLocation.LocalMachine);
                store.Open(OpenFlags.ReadWrite);

                var caCert = new X509Certificate2(caCertFilePath);
                var subjectName = caCert.Subject[3..];
                foreach (var item in store.Certificates.Find(X509FindType.FindBySubjectName, subjectName, false))
                {
                    if (item.Thumbprint != caCert.Thumbprint)
                    {
                        store.Remove(item);
                    }
                }
                if (store.Certificates.Find(X509FindType.FindByThumbprint, caCert.Thumbprint, true).Count == 0)
                {
                    store.Add(caCert);
                }
                store.Close();
            }
            catch (Exception ex)
            {
                throw new Exception($"请手动安装CA证书{caCertFilePath}到“将所有的证书都放入下列存储”\\“受信任的根证书颁发机构”" + ex);
            }
        }
    }
}
在 ASP.NET Core 中使用
在 ASP.NET Core 中加载服务端证书(每次启动时生成 X509 证书)。
var sslService = new CertService();
if(sslService.CreateCaCertIfNotExists())
{
    try
    {
        sslService.Install();
    }
    catch (Exception)
    {

    }
}

var webhost =  WebHost.CreateDefaultBuilder()
    .UseStartup<Startup>()
    .UseKestrel(serverOptions =>
    {
        serverOptions.ListenAnyIP(39999,
            listenOptions =>
            {
                var certificate = sslService.GetOrCreateServerCert("localhost");
                listenOptions.UseHttps(certificate);
            });
    })
    .Build();
await webhost.RunAsync();