1、前言 ✨
在進行 Winform 開發的過程中,經常需要做資料展示的功能,之前一直使用 GridControl 控制項,今天想透過一個範例,跟大家介紹一下如何在 Winform Blazor Hybrid 中使用 Ant Design Blazor 中的 Table 元件做資料展示。
2、效果 ✨
先來看看實作的效果:
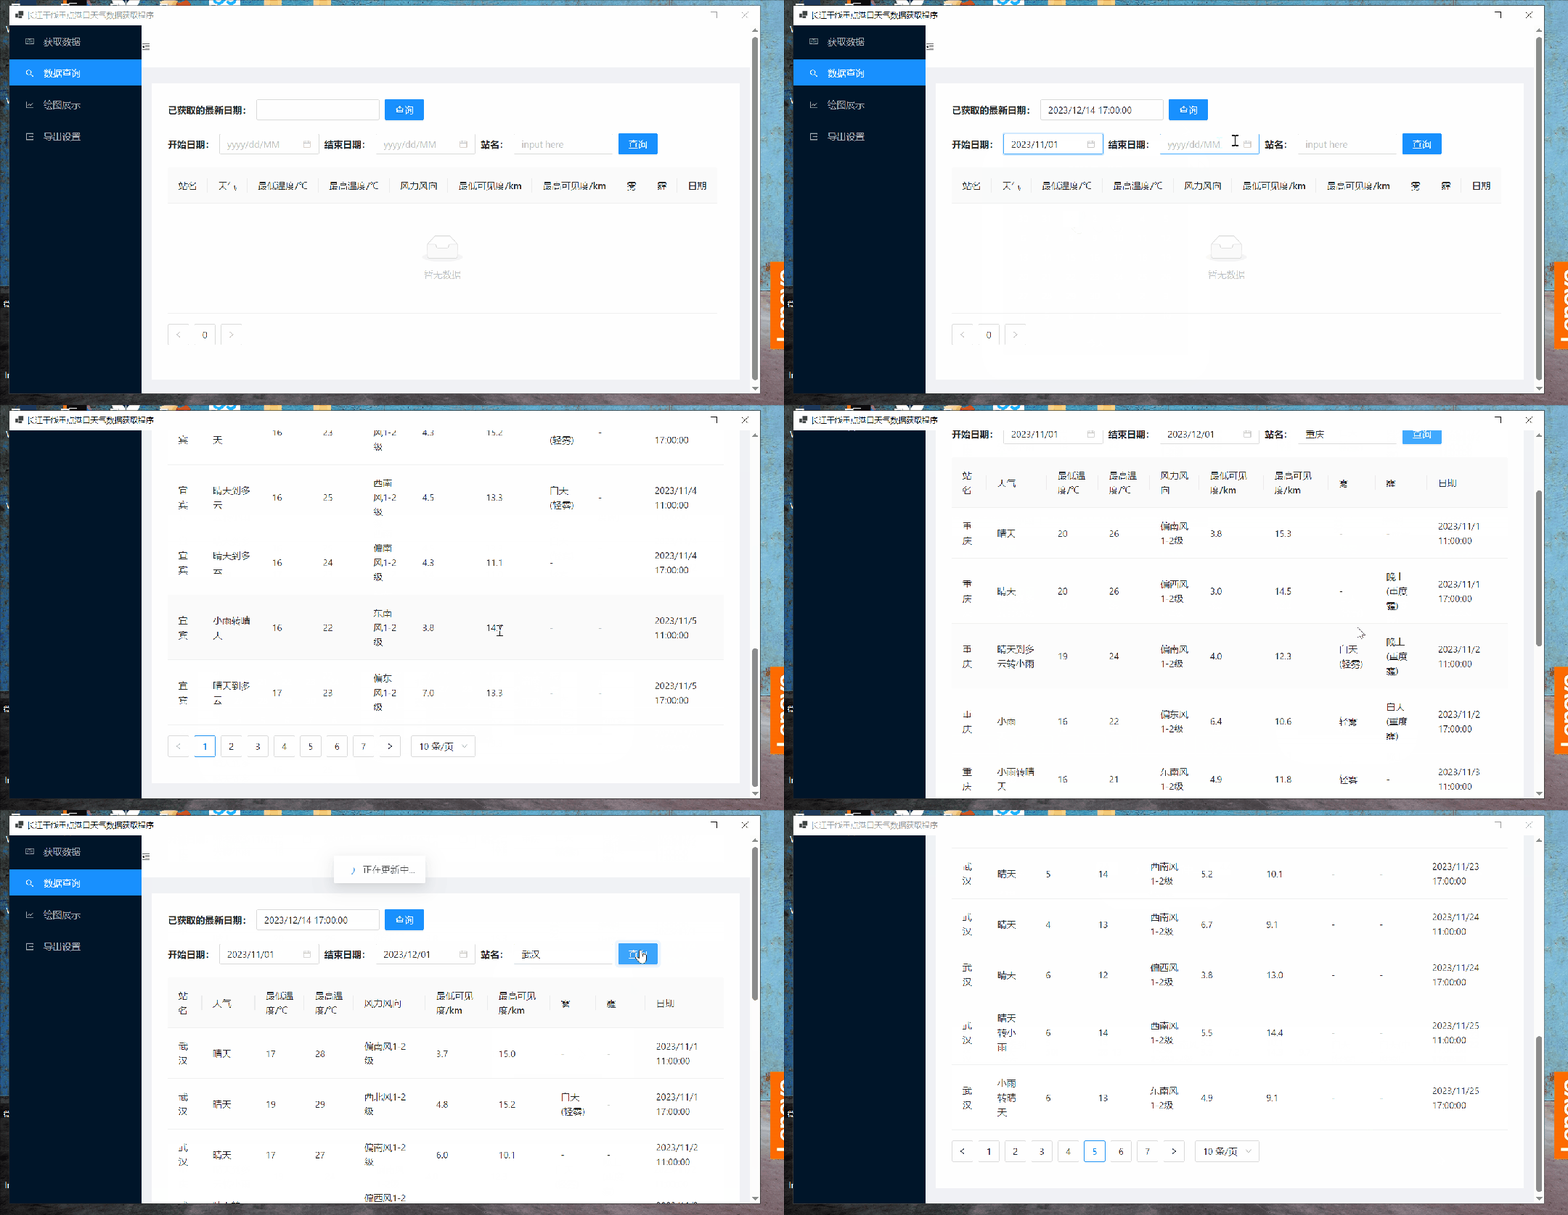

3、具體實作 ✨
如何在 Winform Blazor Hybrid 專案中使用 Ant Design Blazor 可以看我上篇文章。
引入 Ant Design Blazor 的 Table 元件:
<Table
  TItem="IData"
  DataSource="@datas"
  OnRowClick="OnRowClick"
  @ref="antTableRef"
>
  <PropertyColumn Property="c=>c.StationName"> </PropertyColumn>
  <PropertyColumn Property="c=>c.Weather"> </PropertyColumn>
  <PropertyColumn Property="c=>c.Tem_Low"> </PropertyColumn>
  <PropertyColumn Property="c=>c.Tem_High"> </PropertyColumn>
  <PropertyColumn Property="c=>c.Wind"> </PropertyColumn>
  <PropertyColumn Property="c=>c.Visibility_Low"> </PropertyColumn>
  <PropertyColumn Property="c=>c.Visibility_High"> </PropertyColumn>
  <PropertyColumn Property="c=>c.Fog"> </PropertyColumn>
  <PropertyColumn Property="c=>c.Haze"> </PropertyColumn>
  <PropertyColumn Property="c=>c.Date"> </PropertyColumn>
</Table>
其中:
TItem 表示 DataSource 中單一項目的型別,從 0.16.0 開始,Table 已支援一般類別、record、介面和抽象類別作為 DataSource 的型別。
這裡我的 TItem 設定為一個叫做 IData 的介面,它的定義如下:
public interface IData
{
    [DisplayName("站名")]
    public string? StationName { get; set; }
    [DisplayName("天氣")]
    public string? Weather { get; set; }
    [DisplayName("最低溫度/℃")]
    public string? Tem_Low { get; set; }
    [DisplayName("最高溫度/℃")]
    public string? Tem_High { get; set; }
    [DisplayName("風力風向")]
    public string? Wind { get; set; }
    [DisplayName("最低能見度/km")]
    public string? Visibility_Low { get; set; }
    [DisplayName("最高能見度/km")]
    public string? Visibility_High { get; set; }
    [DisplayName("霧")]
    public string? Fog { get; set; }
    [DisplayName("霾")]
    public string? Haze { get; set; }
    [DisplayName("日期")]
    public DateTime? Date { get; set; }
}
其中的 [DisplayName("站名")] 是一個屬性或成員的中繼資料註解,用於提供一個更友好的顯示名稱。Ant Design Blazor 會自動使用這個來顯示名稱。
DataSource 表示表格的資料來源,型別為 IEnumerable:

這裡 DataSource="@datas" 表示我將一個名為 datas 的資料來源指派給 Table 元件的 DataSource 屬性。
datas 的定義如下:
WeatherData[] datas = Array.Empty<WeatherData>();
WeatherData 是自訂類別,實作了 IData 介面:
public class WeatherData : IData
{
    [SugarColumn(IsPrimaryKey = true, IsIdentity = true)]
    public int Id { get; set; }
    public string? StationName { get; set; }
    public string? Weather { get; set; }
    public string? Tem_Low { get; set; }
    public string? Tem_High { get; set; }
    public string? Wind { get; set; }
    public string? Visibility_Low { get; set; }
    public string? Visibility_High { get; set; }
    public string? Fog { get; set; }
    public string? Haze { get; set; }
    public DateTime? Date { get; set; }
}
看到這裡大家可能會有一個疑問,那就是剛剛的 TItem 表示 DataSource 中單一項目的型別,但是現在這裡 DataSource 是 WeatherData[],那麼單一項目的型別是 WeatherData 而不是剛剛設定的 IData,這樣可以嗎?
透過以下這個簡單的範例,可能你就會解開疑惑:
public interface IFlyable
{
    void Fly();
}
public class Bird : IFlyable
{
    public void Fly()
    {
        Console.WriteLine("The bird is flying.");
    }

}
class Program
{
    // 主要方法
    static void Main()
    {
       Bird myBird = new Bird();
       IFlyable flyableObject = myBird; // 型別轉換

        // 呼叫介面方法
        flyableObject.Fly();
    }
}
定義了一個 IFlyable 介面、一個 Bird 類別,該類別實作了 IFlyable 介面,在 Main 函式中,實體化了一個 Bird 類別,然後該物件隱含轉換為介面型別,再透過介面呼叫實作類別的方法,輸出結果為:
The bird is flying.
這說明 C# 中當一個類別實作了一個介面時,該類別的實例可以被隱含轉換為該介面型別。這裡就是 WeatherData 會被隱含轉化為 IData。
DataSource 也是一樣,雖然官方文件上寫的型別是 IEnumerable,但是我們這裡卻是 WeatherData[] 這樣也可以,也是因為 Array 實作了 IEnumerable 介面,如下所示:

OnRowClick 表示行點選事件,型別為 EventCallback<RowData>,本例中實際上沒有用到。
在 Blazor 中,@ref 是一個用於在 Blazor 元件中參考 HTML 元素或元件實例的指示詞。透過使用 @ref,你可以在 Blazor 元件中取得對 DOM 元素或子元件的參考,然後在程式碼中進行操作或存取其屬性和方法。
這裡我在 Table 元件上添加了 @ref="antTableRef",在程式碼區域添加了:
Table<IData>? antTableRef;
就成功參考了 Table 元件實例。
<PropertyColumn> 表示屬性列,也就是要展示的列。它的 Property 屬性指定要繫結的屬性,型別為 Expression<Func<TItem, TProp>>。
這裡大家可能會有疑問,Expression<Func<TItem, TProp>> 到底是啥呀?
Expression<Func<TItem, TProp>> 是 C#中的一個運算式樹,用於表示一個參數為 TItem 型別且返回值為 TProp 型別的 lambda 運算式。
拆開來看,Expression<T> 是一個表示 lambda 運算式的樹狀結構的類別,其中 T 是委派型別。詳細學習,可以查看官方文件:

Func<TItem, TProp> 是一個泛型委派型別,表示一個帶有一個輸入參數和一個輸出參數的方法,詳細學習,也可以查看官方文件:
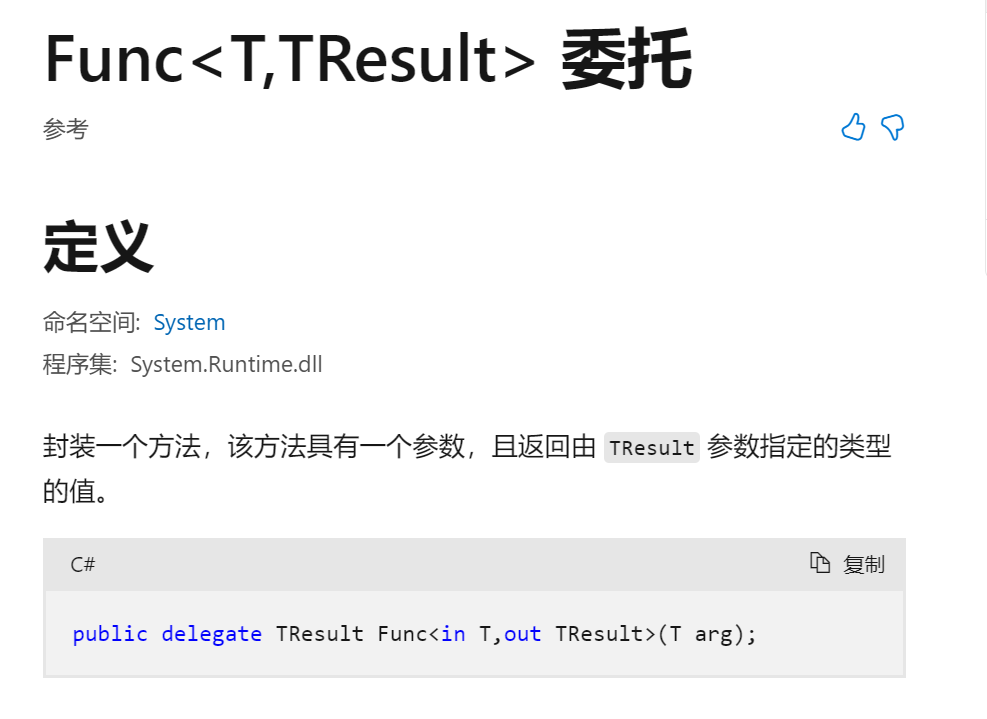
這裡也透過一個簡單的範例進行說明:
Expression<Func<Person, string>> getNameExpression = person => person.Name;
getNameExpression 表示一個 Lambda 運算式,一個什麼樣的 Lambda 運算式呢?一個輸入參數型別為 Person 對應這裡的 person、輸出型別為 string 對應這裡的 person.Name 的一個 Lambda 運算式。
所以程式碼:
<PropertyColumn Property="c=>c.StationName"> </PropertyColumn>
就可以理解了,Property 的型別是一個輸入參數型別為 TItem 這裡 TItem 的型別就是 IData、輸出型別為 TProp 這裡 TProp 型別就是 string 的一個 Lamda 運算式 c=>c.StationName。
理解了以上之後,我們看看這部分的程式碼:

程式碼如下:
<GridRow>
  <Space>
    <SpaceItem>
      <Text Strong>開始日期:</Text>
    </SpaceItem>
    <SpaceItem>
      <DatePicker TValue="DateTime?" Format="yyyy/MM/dd" Mask="yyyy/dd/MM"
      Placeholder="@("yyyy/dd/MM")" @bind-Value = "Date1"/>
    </SpaceItem>
    <SpaceItem>
      <Text Strong>結束日期:</Text>
    </SpaceItem>
    <SpaceItem>
      <DatePicker TValue="DateTime?" Format="yyyy/MM/dd" Mask="yyyy/dd/MM"
      Placeholder="@("yyyy/dd/MM")" @bind-Value = "Date2"/>
    </SpaceItem>
    <SpaceItem>
      <Text Strong>站名:</Text>
    </SpaceItem>
    <SpaceItem>
      <AutoComplete
        @bind-Value="@value"
        Options="@options"
        OnSelectionChange="OnSelectionChange"
        OnActiveChange="OnActiveChange"
        Placeholder="input here"
        Style="width:150px"
      />
    </SpaceItem>
    <SpaceItem>
      <button type="@ButtonType.Primary" OnClick="QueryButton_Clicked">
        查詢
      </button>
    </SpaceItem>
  </Space>
</GridRow>
站名自動填入:
<AutoComplete
  @bind-Value="@value"
  Options="@options"
  OnSelectionChange="OnSelectionChange"
  OnActiveChange="OnActiveChange"
  Placeholder="input here"
  Style="width:150px"
/>
這個的實作,在上篇文章中已經介紹了,這裡就不再重複講了。
兩個日期選擇元件都使用了資料繫結:
<SpaceItem>
  <DatePicker TValue="DateTime?" Format="yyyy/MM/dd" Mask="yyyy/dd/MM"
  Placeholder="@("yyyy/dd/MM")" @bind-Value = "Date1"/>
</SpaceItem>

<SpaceItem>
  <DatePicker TValue="DateTime?" Format="yyyy/MM/dd" Mask="yyyy/dd/MM"
  Placeholder="@("yyyy/dd/MM")" @bind-Value = "Date2"/>
</SpaceItem>
其中:
TValue 表示值的型別,這裡設定為 DateTime?。
@bind-Value 進行資料繫結,將日期選擇元件的值與 Date1 和 Date2 繫結起來:
DateTime? Date1;
DateTime? Date2;
查詢按鈕:
<button type="@ButtonType.Primary" OnClick="QueryButton_Clicked">查詢</button>
點選事件程式碼:
async void QueryButton_Clicked()
{
    if (Date1 != null && Date2 != null && value != null)
    {
        var cofig = new MessageConfig()
            {
                Content = "正在更新中...",
                Duration = 0
            };
        var task = _message.Loading(cofig);
        var condition = new Condition();
        condition.StartDate = (DateTime)Date1;
        condition.EndDate = (DateTime)Date2;
        condition.StationName = value;
        datas = weatherServer.GetDataByCondition(condition).ToArray();
        StateHasChanged();
        task.Start();
    }
    else
    {
        await _message.Error("請查看開始日期、結束日期與站名是否都已選擇!!!");
    }
}
當條件成立時,建立 Condition 型別,寫入開始日期、結束日期和站名,Condition 類別的定義如下:
public class Condition
 {
     public DateTime StartDate{ get; set; }
     public DateTime EndDate { get; set; }
     public string? StationName { get; set; }
 }
然後呼叫商業邏輯層的 weatherServer 中的 GetDataByCondition 方法:
datas = weatherServer.GetDataByCondition(condition).ToArray();
weatherServer 中的 GetDataByCondition 方法如下:
public List<WeatherData> GetDataByCondition(Condition condition)
 {
     return dataService.GetDataByCondition(condition);
 }
因為涉及資料庫的讀寫,因此呼叫了資料庫存取層中的 dataService 的 GetDataByCondition 方法。
資料庫存取層中的 dataService 的 GetDataByCondition 方法如下:
public List<WeatherData> GetDataByCondition(Condition condition)
  {
      return db.Queryable<WeatherData>()
               .Where(x => x.Date >= condition.StartDate &&
                           x.Date < condition.EndDate.AddDays(1) &&
                           x.StationName == condition.StationName).ToList();
  }
當重新查詢時:
StateHasChanged();
呼叫這個方法元件會進行更新。在 Blazor 中,StateHasChanged 是一個方法,用於通知 Blazor 框架重新渲染元件及其子元件。Blazor 元件的 UI 渲染是基於元件的狀態(state)的,當元件的狀態發生變化時,需要呼叫 StateHasChanged 方法來通知框架進行重新渲染。
var cofig = new MessageConfig()
            {
                Content = "正在更新中...",
                Duration = 0
            };
 var task = _message.Loading(cofig);
 task.Start();
是給使用者資訊提示。
4、總結 ✨
以上透過一個完整的範例,說明了在 winform 中除了可以用 gridcontrol 做資料展示外也可以使用 Ant Design Blazor 中的 Table 做資料展示。