
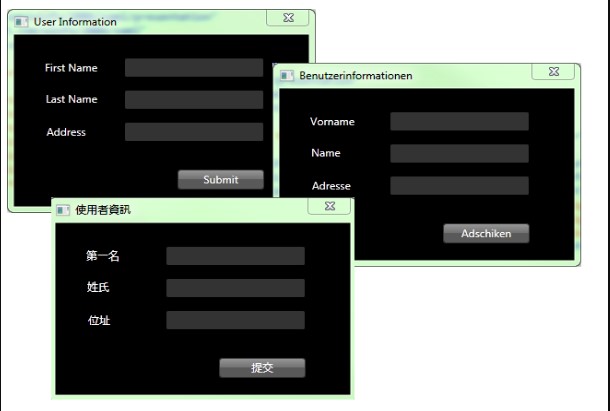
WPF 本地化介绍
WPF 本地化是将应用程序资源转换为支持该应用程序的特定区域性的本地化版本。您必须将数据转换为适合的语言,以获取适当的信息。
WPF 本地化的目的是什么?
- 当您开发应用程序并且您的应用程序只有一种语言可用时,那么您就限制了您的客户群和业务规模,因为许多用户无法使用此应用程序。
- 如果你想增加你的客户群和业务,那么你的产品必须是可用的,并且可以通过你的合适语言的简单信息让全球观众接触到。成本效益高的产品本地化是联系更多客户并加入应用程序的最佳和最经济的方法之一。
- 正如我们所知,这个世界上有那么多的人,有那么多的语言。在这种情况下,WPF 本地化将产生显著的影响
- 因为人们希望项目中的有用信息和良好的功能没有任何障碍。
- 它可以为您提供有关适当用户语言的所有信息。
WPF 本地化有哪些类型?
WPF 中有两种类型的 WPF 本地化。
- 静态 WPF 本地化。
- 动态 WPF 本地化
静态 WPF 定位
- 静态 WPF 本地化对于将静态数据转换为另一种语言非常有用。
- 它对于静态项目很有用,因为它可以定义为所有要翻译成另一种语言的信息。由于许多人利用互联网获取信息,这种情况对于另一个国家的居民来说是很有用的,因为他们可以轻松地获取信息。
动态 WPF 本地化
- 用于动态数据的动态 WPF 本地化。
- 这种类型的本地化对于以动态格式获取数据非常有用。
- 在动态格式中有太多的信息要获取,在这种情况下,根据用户的需要很容易将其翻译成另一种语言。因此,这些特性起着至关重要的作用。
- 动态 WPF 本地化利用资源字典文件来获取数据并将其从一种语言翻译到另一种语言。
资源字典文件示例
代码
<ResourceDictionary
  xmlns="http://schemas.microsoft.com/winfx/2006/xaml/presentation"
  xmlns:x="http://schemas.microsoft.com/winfx/2006/xaml"
  xmlns:sys="clr-namespace:System;assembly=mscorlib"
>
</ResourceDictionary>
通过添加命名空间使用资源字典。
命名空间
xmlns:sys="clr-namespace:System;assembly=mscorlib"
将资源字典文件中的数据添加到下面的代码中,如下所示,
代码
<ResourceDictionary
  xmlns="http://schemas.microsoft.com/winfx/2006/xaml/presentation"
  xmlns:x="http://schemas.microsoft.com/winfx/2006/xaml"
  xmlns:sys="clr-namespace:System;assembly=mscorlib"
>
  <sys:String x:Key="ResourceDictionaryName">Loc-en-US</sys:String>
  <sys:String x:Key="WindowTitle">Dynamic Localizzation in wpf</sys:String>
  <sys:String x:Key="FirstNameLabel">First Name</sys:String>
  <sys:String x:Key="LastNameLabel">Last Name</sys:String>
</ResourceDictionary>
如何在项目中使用 WPF 本地化?
第 1 步
为 WPF 本地化创建一个新项目。
第 2 步
然后安装最新版本的 WPF 本地化扩展包:WPFLocalizeExtension。

第 3 步
添加资源文件
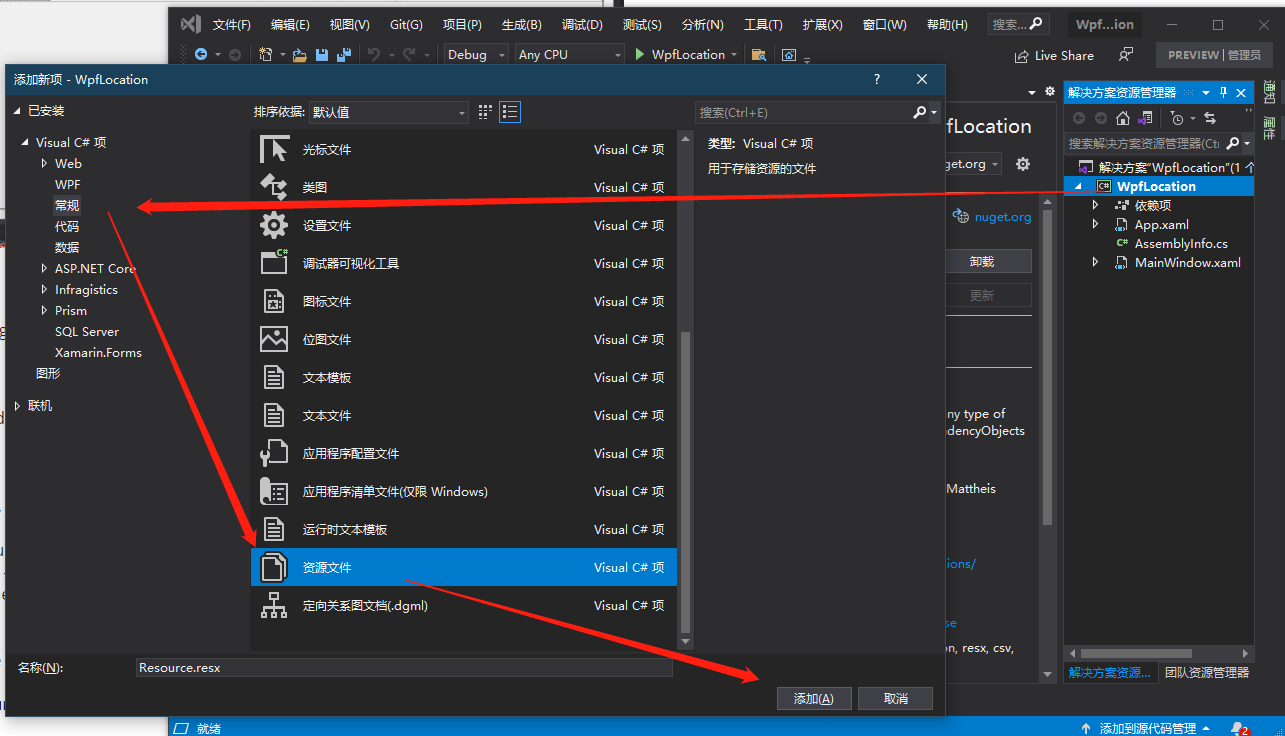
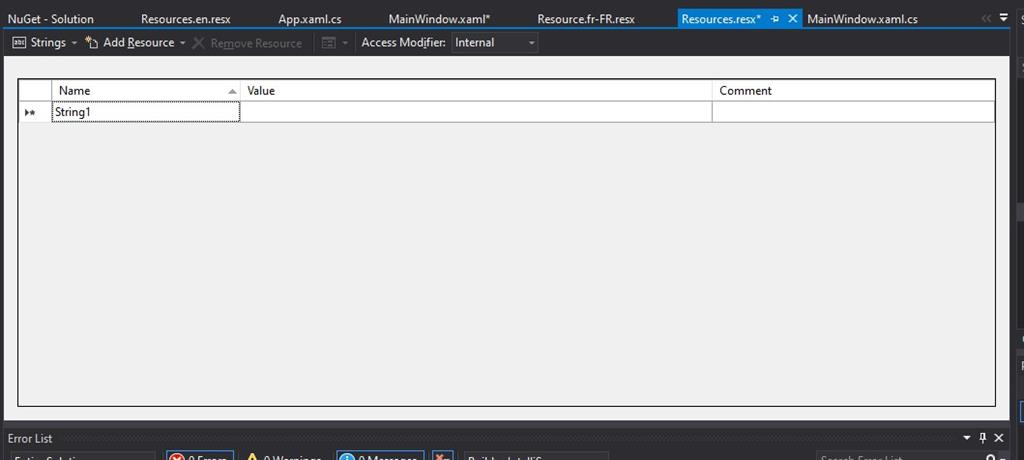
安装后,添加资源文件(如上图),打开 Resources.resx 文件。
新增加的资源文件:
第 4 步
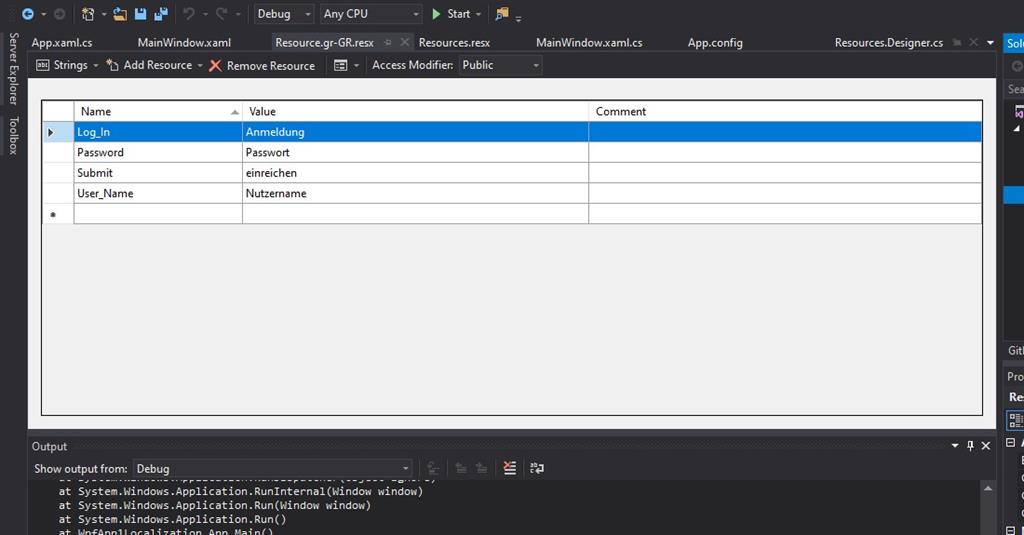
我们需要将访问修饰符更改为 public,现在您可以在主页面中使用刚添加的资源了(即右键资源文件属性,将自定义工具(Custom Tool)改为PublicResXFileCodeGenerator即可,否则运行程序报错)
第 5 步
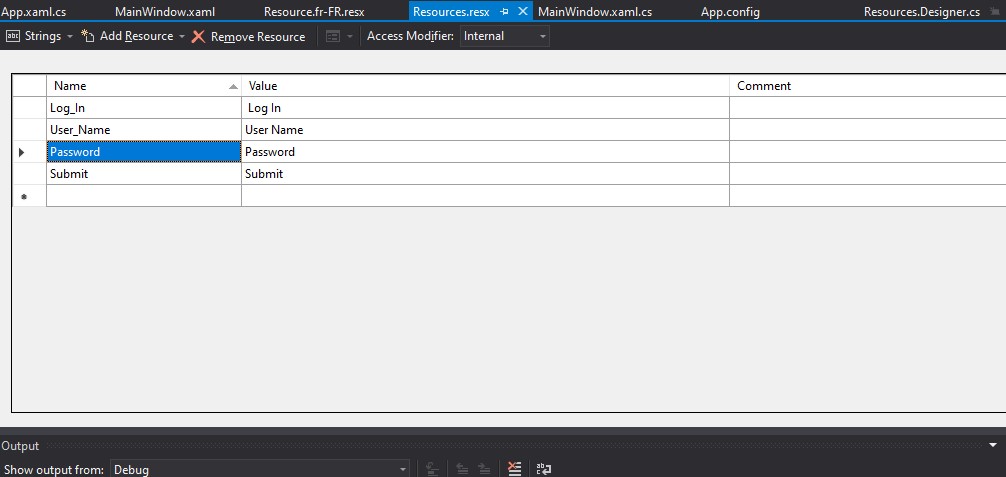
您可以在 resources.resx 文件中看到用户的设计。
第 6 步
创建一个新文件,按照步骤操作。
“右键单击项目名称->单击添加按钮->然后单击新建项->然后单击 visual C#项目->然后查找资源文件->然后定义文件名。“
注意
但要声明为 Resources.fr-FR.resx 和 Resources.gr-GR 示例的文件名。
文件名:下面的 Resources.resx 文件,
文件名:下面的 Resources.fr-FR.resx 文件。
第 7 步
现在,您可以使用下面的命名空间在 MainWindow.xaml 文件中添加该文件,
例子,
“xmlns:CC="clr-namespace:WpfApp1Localization.Properties"”
第 8 步
现在可以使用 App.xaml.cs 文件调用资源文件,即启动项目时读取本地语言,进行语言切换。
代码
namespace WpfApp1Localization {
    public partial class App: Application {
        App() {
            System.Threading.Thread.CurrentThread.CurrentUICulture = new System.Globalization.CultureInfo("gr-GR");
            //System.Threading.Thread.CurrentThread.CurrentUICulture = new System.Globalization.CultureInfo("en");
        }
    }
}
第 9 步
现在保存项目的所有文件并运行该项目。
第 10 步
在 WPF 本地化中使用 WPF 中的静态 WPF 本地化输出项目
输出
WPF 本地化示例项目
- 现在首先创建一个新的项目项目名是:WPFLocalizationDemo
- 然后创建两个文件:Resources.en.resx 和 Resources.gr-GR.resx
- 将数据字段添加到两个文件中。
Resources.en.resx
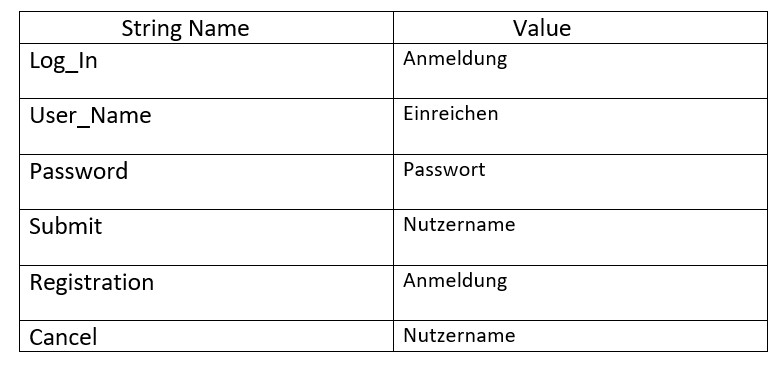
Resources.gr-Gr.resx

资源文件中表数据的说明
创建一个按钮 1–提交文本将被提交。
创建一个按钮 2–注册用户。
创建一个按钮 3–取消或重置登录表单中的数据。
创建一个标签 1-登录窗体的标题和提示。
创建一个标签 2-用于输入用户名的标签提示。
创建一个标签 3-输入密码的标签提示。
- 在下面的 XAML 文件中通过添加命名空间添加资源文件:
代码
<Window
  x:Class="WpfApp1Localization.MainWindow"
  xmlns="http://schemas.microsoft.com/winfx/2006/xaml/presentation"
  xmlns:x="http://schemas.microsoft.com/winfx/2006/xaml"
  xmlns:d="http://schemas.microsoft.com/expression/blend/2008"
  xmlns:mc="http://schemas.openxmlformats.org/markup-compatibility/2006"
  xmlns:local="clr-namespace:WpfApp1Localization"
  xmlns:CC="clr-namespace:WpfApp1Localization.Properties"
  mc:Ignorable="d"
  Title="{x:Static CC:Resources.Log_In}"
  Height="450"
  Width="800"
  Background="Chocolate"
>
  <Grid>
    <TextBox
      HorizontalAlignment="Left"
      Height="23"
      FontSize="12"
      Margin="412,152,0,0"
      TextWrapping="Wrap"
      VerticalAlignment="Top"
      Width="120"
    />
    <TextBox
      HorizontalAlignment="Left"
      Height="23"
      FontSize="12"
      Margin="412,233,0,0"
      TextWrapping="Wrap"
      VerticalAlignment="Top"
      Width="120"
    />
    <label
      x:Name="label1"
      Content="{x:Static CC:Resources.Log_In}"
      HorizontalAlignment="Left"
      FontSize="18"
      Margin="338,72,0,0"
      VerticalAlignment="Top"
      RenderTransformOrigin="0.526,2.491"
    />
    <label
      x:Name="label2"
      Content="{x:Static CC:Resources.User_Name}"
      HorizontalAlignment="Left"
      FontSize="12"
      Margin="245,152,0,0"
      VerticalAlignment="Top"
    />
    <label
      x:Name="label3"
      Content="{x:Static CC:Resources.Password}"
      HorizontalAlignment="Left"
      FontSize="12"
      Margin="245,233,0,0"
      VerticalAlignment="Top"
    />
    <button
      x:Name="button1"
      Content="{x:Static CC:Resources.Submit}"
      HorizontalAlignment="Left"
      Margin="338,330,0,0"
      VerticalAlignment="Top"
      Width="75"
    />
    <button
      x:Name="Button2"
      Content="{x:Static CC:Resources.Registration}"
      HorizontalAlignment="Left"
      Margin="245,340,0,0"
      VerticalAlignment="Top"
      Width="75"
    />
    <button
      x:Name="Button3"
      Content="{x:Static CC:Resources.Cancel}"
      HorizontalAlignment="Left"
      Margin="532,335,0,0"
      VerticalAlignment="Top"
      Width="75"
    />
  </Grid>
</Window>
使用 app.xaml.cs 文件调用资源文件
代码
namespace WpfApp1Localization {
    public partial class App: Application {
        App() {
            System.Threading.Thread.CurrentThread.CurrentUICulture = new System.Globalization.CultureInfo("gr-GR");
            //System.Threading.Thread.CurrentThread.CurrentUICulture =
            new System.Globalization.CultureInfo("en");
        }
    }
}
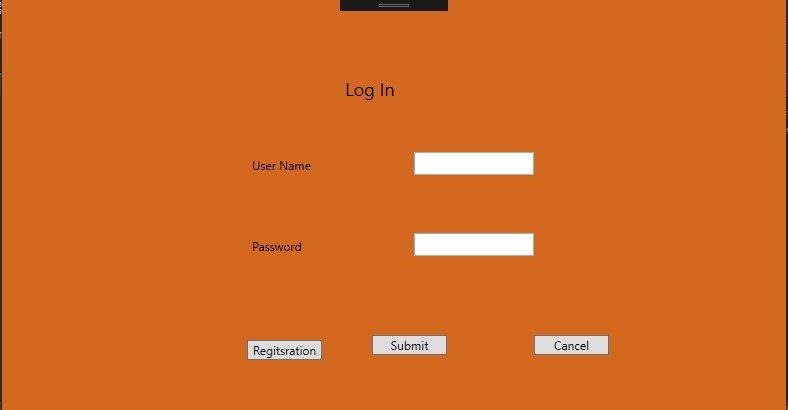
程序或项目的输出,
谈到输出设计,它看起来像下面这样。
英文登录表单如下:
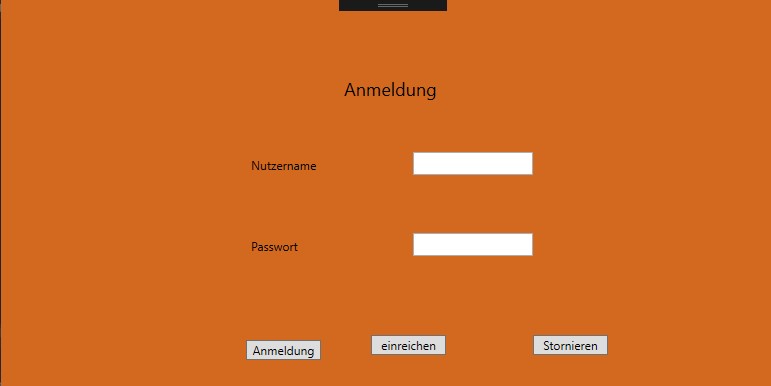
以下为德语登录表单:
结论
在这个博客中,我们了解了 WPF 本地化,它的重要性,它的类型,以及它是如何实际工作的。这是理解 WPF 概述的主要概念之一,它将有助于应用程序解决语言障碍的问题。
原文链接:https://www.c-sharpcorner.com/blogs/an-overview-of-wpf-localization-extension-with-an-example