
This article shares basic knowledge about Web API using .NET Core 3.1; other newer versions are similar.
1. Introduction
With the rise of front-end/back-end separation and microservices in recent years, .NET Core has also gained momentum. From the first release in 2016 to the 3.1 LTS version at the end of 2019, and the upcoming .NET 5, .NET Core has evolved, supporting cross-platform applications in both deployment and development tools. I have been paying attention to .NET Core but haven't applied it much in practice. After some study and understanding, I decided to share this. This article mainly takes .NET Core Web API as an example to explain the basic applications and considerations. For developers who want to build API applications using Web API, it should provide a systematic overview and understanding. I also hope to interact with more .NET Core developers, correct errors, deepen understanding, and help more people. This article focuses on practical operations; some concepts or basic steps will not be repeated. If there are any omissions, please feel free to correct them.
2. Debugging Web API with Swagger
Development environment: Visual Studio 2019
To solve the problems of inconsistent API documentation between front-end and back-end, and the time-consuming maintenance and updates, Swagger was introduced. It also solves the problem of interface testing. Without further ado, let's explain the application steps directly.
- Create a new ASP.NET Core Web API application, select version .NET Core 3.1;
- Install the NuGet package: Swashbuckle.AspNetCore (current example version 5.5.0);
- Add the following injection code in the
ConfigureServicesmethod of theStartupclass:
services.AddSwaggerGen(c =>
{
    c.SwaggerDoc("v1", new OpenApiInfo
    {
        Title = "My API",
        Version = "v1",
        Description = "API documentation description",
        Contact = new OpenApiContact
        {
            Email = "5007032@qq.com",
            Name = "Test Project",
            //Url = new Uri("http://t.abc.com/")
        },
        License = new OpenApiLicense
        {
            Name = "BROOKE License",
            //Url = new Uri("http://t.abc.com/")
        }
    });

});
Add the following code to the Configure method of the Startup class:
//Configure Swagger
            app.UseSwagger();
            app.UseSwaggerUI(c =>
            {
                c.SwaggerEndpoint("/swagger/v1/swagger.json", "My API V1");
                c.RoutePrefix = "api"; // If set to empty string, the access path is root domain/index.html; setting it to empty means direct access at the root domain; to change the path, simply write the name, e.g., c.RoutePrefix = "swagger"; then the access path would be root domain/swagger/index.html

            });
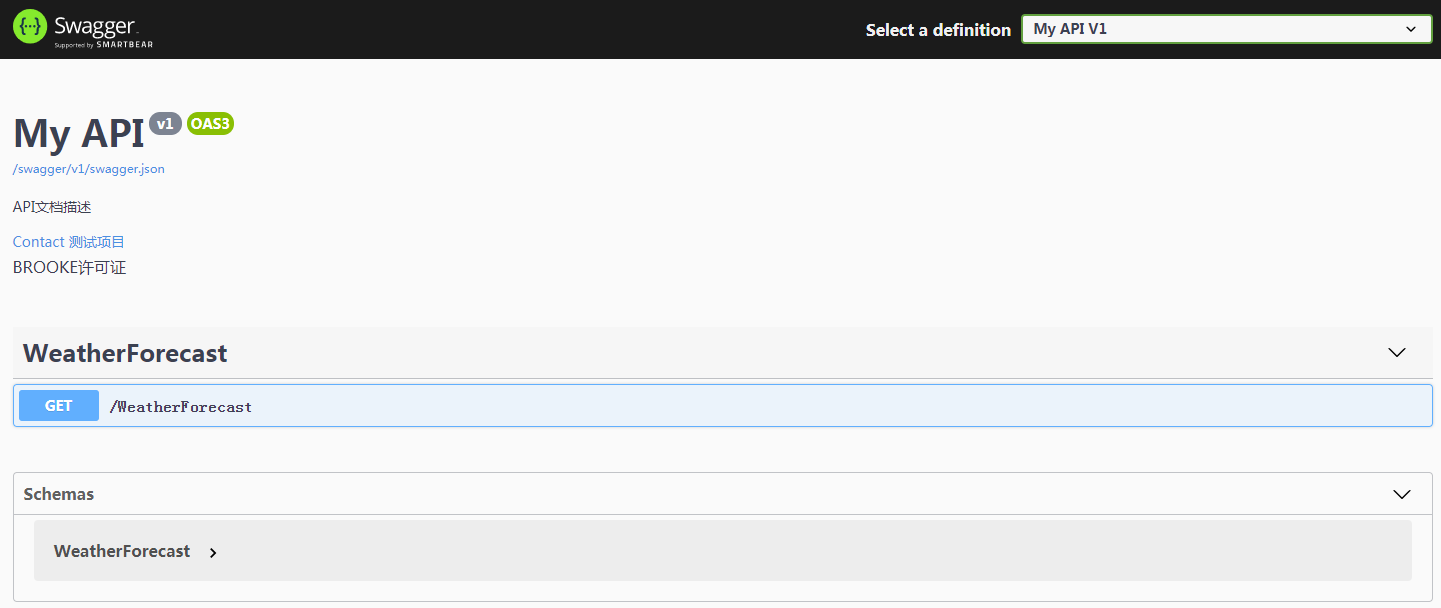
Press Ctrl+F5 to browse. Change the path according to the above configuration to: http://localhost:***/api/index.html, you will see the Swagger page:
However, we cannot see the related comments for the interfaces. Configure the XML file to continue adjusting the code. New code is shown in bold:
services.AddSwaggerGen(c =>
{
    c.SwaggerDoc("v1", new OpenApiInfo
    {
        Title = "My API",
        Version = "v1",
        Description = "API documentation description",
        Contact = new OpenApiContact
        {
            Email = "5007032@qq.com",
            Name = "Test Project",
            //Url = new Uri("http://t.abc.com/")
        },
        License = new OpenApiLicense
        {
            Name = "BROOKE License",
            //Url = new Uri("http://t.abc.com/")
        }
    });

    var xmlFile = $"{Assembly.GetExecutingAssembly().GetName().Name}.xml";
    var xmlPath = Path.Combine(AppContext.BaseDirectory, xmlFile);
    c.IncludeXmlComments(xmlPath);
});
The above code uses reflection to generate an XML file name that matches the Web API project. AppContext.BaseDirectory property constructs the path to the XML file. The configuration parameters in OpenApiInfo are used for describing the documentation; we won't explain them in detail here.
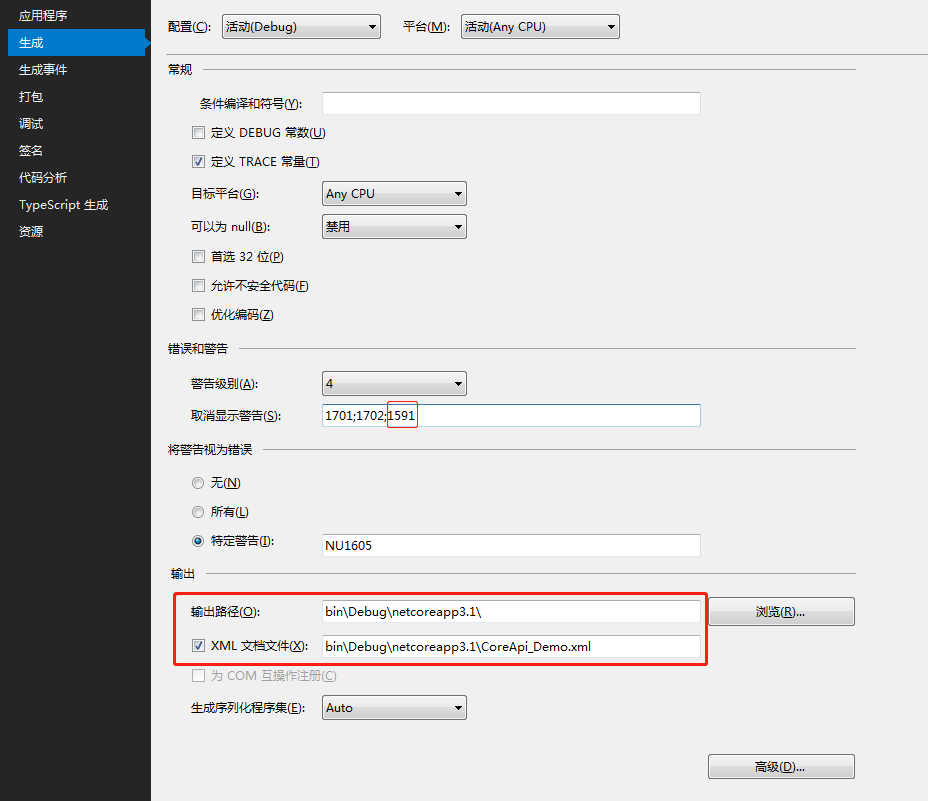
Then right-click the Web API project, select Properties, Build, configure the output path for XML documentation, and suppress unnecessary XML comment warnings (add 1591):
Now, after adding comments to class methods, properties, and other related code using triple slashes (///), refresh the Swagger page to see the comments.
If you don't want to output the XML file to the debug directory, for example, you want to place it in the project root directory (but don't modify it to an absolute disk path), you can adjust the code as follows. You can also change the name of the XML file to whatever you want:
var basePath = Path.GetDirectoryName(typeof(Program).Assembly.Location); // Get the application directory
var xmlPath = Path.Combine(basePath, "CoreAPI_Demo.xml");
c.IncludeXmlComments(xmlPath, true);
At the same time, adjust the generated XML document file path in the project properties to: ..\CoreAPI_Demo\CoreAPI_Demo.xml
Hiding certain interfaces
For interfaces you don't want to expose in Swagger, you can add the following attribute to the relevant Controller or Action header: [ApiExplorerSettings(IgnoreApi = true)]
Adjusting the default output path
When the project starts, it will access the built-in weatherforecast by default. If you want to adjust to another path, for example, to directly access the Swagger documentation, modify the launchSettings.json file in the Properties directory. Change the launchUrl value to api (the RoutePrefix value configured earlier):
{
  "$schema": "http://json.schemastore.org/launchsettings.json",
  "iisSettings": {
    "windowsAuthentication": false,
    "anonymousAuthentication": true,
    "iisExpress": {
      "applicationUrl": "http://localhost:7864",
      "sslPort": 0
    }
  },
  "profiles": {
    "IIS Express": {
      "commandName": "IISExpress",
      "launchBrowser": true,
      "launchUrl": "api",
      "environmentVariables": {
        "ASPNETCORE_ENVIRONMENT": "Development"
      }
    },
    "CoreApi_Demo": {
      "commandName": "Project",
      "launchBrowser": true,
      "launchUrl": "api",
      "applicationUrl": "http://localhost:5000",
      "environmentVariables": {
        "ASPNETCORE_ENVIRONMENT": "Development"
      }
    }
  }
}
3. Configuration Files
Take reading the appsettings.json file as an example. Of course, you can define other .json files to read; the reading method is the same. This file is similar to the Web.config file. For convenience, define the content of appsettings.json as follows:
{
  "ConnString": "Data Source=(local);Initial Catalog=Demo;Persist Security Info=True;User ID=DemoUser;Password=123456;MultipleActiveResultSets=True;",
  "ConnectionStrings": {
    "MySQLConnection": "server=127.0.0.1;database=mydemo;uid=root;pwd=123456;charset=utf8;SslMode=None;"
  },
  "SystemConfig": {
    "UploadFile": "/Files",
    "Domain": "http://localhost:7864"
  },
  "JwtTokenConfig": {
    "Secret": "fcbfc8df1ee52ba127ab",
    "Issuer": "abc.com",
    "Audience": "Brooke.WebApi",
    "AccessExpiration": 30,
    "RefreshExpiration": 60
  },
  "Logging": {
    "LogLevel": {
      "Default": "Information",
      "Microsoft": "Warning",
      "Microsoft.Hosting.Lifetime": "Information"
    }
  },
  "AllowedHosts": "*"
}
- Basic reading of configuration files
public class Startup
{
    public Startup(IConfiguration configuration)
    {
        Configuration = configuration;
    }

    public IConfiguration Configuration { get; }

    // This method gets called by the runtime. Use this method to add services to the container.
    public void ConfigureServices(IServiceCollection services)
    {
        services.AddControllers();

        // Method 1
        var ConnString = Configuration["ConnString"];
        var MySQLConnection = Configuration.GetSection("ConnectionStrings")["MySQLConnection"];
        var UploadPath = Configuration.GetSection("SystemConfig")["UploadPath"];
        var LogDefault = Configuration.GetSection("Logging").GetSection("LogLevel")["Default"];

        // Method 2
        var ConnString2 = Configuration["ConnString"];
        var MySQLConnection2 = Configuration["ConnectionStrings:MySQLConnection"];
        var UploadPath2 = Configuration["SystemConfig:UploadPath"];
        var LogDefault2 = Configuration["Logging:LogLevel:Default"];

    }

}
The above introduces two ways to read configuration information. To use them in a Controller, similarly inject and call as follows:
public class ValuesController : ControllerBase
{
    private IConfiguration _configuration;

    public ValuesController(IConfiguration configuration)
    {
        _configuration = configuration;
    }

    // GET: api/<ValuesController>
    [HttpGet]
    public IEnumerable<string> Get()
    {
        var ConnString = _configuration["ConnString"];
        var MySQLConnection = _configuration.GetSection("ConnectionStrings")["MySQLConnection"];
        var UploadPath = _configuration.GetSection("SystemConfig")["UploadPath"];
        var LogDefault = _configuration.GetSection("Logging").GetSection("LogLevel")["Default"];
        return new string[] { "value1", "value2" };
    }
}
- Reading configuration into custom objects
Take the SystemConfig node as an example. Define the class as follows:
public class SystemConfig
{
    public string UploadPath { get; set; }
    public string Domain { get; set; }

}
Adjust the code as follows:
public class Startup
{
    public Startup(IConfiguration configuration)
    {
        Configuration = configuration;
    }

    public IConfiguration Configuration { get; }

    // This method gets called by the runtime. Use this method to add services to the container.
    public void ConfigureServices(IServiceCollection services)
    {
        services.AddControllers();

        services.Configure<SystemConfig>(Configuration.GetSection("SystemConfig"));
    }

}
Then inject in the Controller:
[Route("api/[controller]/[action]")]
[ApiController]
public class ValuesController : ControllerBase
{
    private SystemConfig _sysConfig;
    public ValuesController(IOptions<SystemConfig> sysConfig)
    {
        _sysConfig = sysConfig.Value;
    }

    [HttpGet]
    public IEnumerable<string> GetSetting()
    {
        var UploadPath = _sysConfig.UploadPath;
        var Domain = _sysConfig.Domain;
        return new string[] { "value1", "value2" };
    }
}
- Binding to static class for reading
Define the relevant static class as follows:
public static class MySettings
{
    public static SystemConfig Setting { get; set; } = new SystemConfig();
}
Adjust the constructor of the Startup class as follows:
public Startup(IConfiguration configuration, IWebHostEnvironment env)
{
    var builder = new ConfigurationBuilder()
        .SetBasePath(env.ContentRootPath)
        .AddJsonFile("appsettings.json", optional: true, reloadOnChange: true);

    Configuration = builder.Build();
    //Configuration = configuration;

    configuration.GetSection("SystemConfig").Bind(MySettings.Setting); // Bind static configuration class
}
Then you can directly use: MySettings.Setting.UploadPath.
4. File Upload
APIs usually involve file uploads. Compared to the complex way of uploading files in .NET Framework Web API using byte arrays, .NET Core Web API has undergone significant changes. It defines a new IFormFile object to receive uploaded files. Directly show the Controller code:
Backend code
[Route("api/[controller]/[action]")]
[ApiController]
public class UploadController : ControllerBase
{
    private readonly IWebHostEnvironment _env;

    public UploadController(IWebHostEnvironment env)
    {
        _env = env;
    }

    public ApiResult UploadFile(List<IFormFile> files)
    {
        ApiResult result = new ApiResult();

        // Note: The parameter 'files' can also be obtained by using: var files = Request.Form.Files;

        if (files.Count <= 0)
        {
            result.Message = "Upload file cannot be empty";
            return result;
        }

        #region Upload

        List<string> filenames = new List<string>();

        var webRootPath = _env.WebRootPath;
        var rootFolder = MySettings.Setting.UploadPath;

        var physicalPath = $"{webRootPath}/{rootFolder}/";

        if (!Directory.Exists(physicalPath))
        {
            Directory.CreateDirectory(physicalPath);
        }

        foreach (var file in files)
        {
            var fileExtension = Path.GetExtension(file.FileName); // Get file extension

            var saveName = $"{rootFolder}/{Path.GetRandomFileName()}{fileExtension}";
            filenames.Add(saveName); // Relative path

            var fileName = webRootPath + saveName;

            using FileStream fs = System.IO.File.Create(fileName);
            file.CopyTo(fs);
            fs.Flush();

        }
        #endregion

        result.IsSuccess = true;
        result.Data["files"] = filenames;

        return result;
    }
}
Frontend call
Next, call the upload interface from the frontend. Create a wwwroot directory in the project root (built-in directory for .NET Core Web API), add relevant JS files, then create an index.html file with the following content:
<!DOCTYPE html>
<html>
  <head>
    <meta charset="utf-8" />
    <title></title>
    <style type="text/css"></style>
    <script src="res/scripts/jquery-1.10.2.min.js"></script>
    <script src="res/scripts/jquery.form.js"></script>
    <script type="text/javascript">
      // Method 1
      function AjaxUploadfile() {
        var upload = $("#files").get(0);
        var files = upload.files;
        var data = new FormData();
        for (var i = 0; i < files.length; i++) {
          data.append("files", files[i]);
        }

        // The construction of 'data' can also be: var data = new FormData(document.getElementById("myform"));

        $.ajax({
          type: "POST",
          url: "/api/upload/uploadfile",
          contentType: false,
          processData: false,
          data: data,
          success: function (result) {
            alert("success");
            $.each(result.data.files, function (i, filename) {
              $("#filePanel").append("<p>" + filename + "</p>");
            });
          },
          error: function () {
            alert("Error uploading file");
          },
        });
      }

      // Method 2
      function AjaxUploadfile2() {
        $("#myform").ajaxSubmit({
          success: function (result) {
            if (result.isSuccess) {
              $.each(result.data.files, function (i, filename) {
                $("#filePanel").append("<p>" + filename + "</p>");
              });
            } else {
              alert(result.message);
            }
          },
        });
      }
    </script>
  </head>
  <body>
    <form
      id="myform"
      method="post"
      action="/api/upload/uploadfile"
      enctype="multipart/form-data"
    >
      <input type="file" id="files" name="files" multiple /> <br /><br />
      <input
        type="button"
        value="FormData Upload"
        onclick="AjaxUploadfile();"
      /><br /><br />
      <input
        type="button"
        value="ajaxSubmit Upload"
        onclick="AjaxUploadfile2();"
      /><br /><br />
      <div id="filePanel"></div>
    </form>

    <script type="text/javascript">
      $(function () {});
    </script>
  </body>
</html>
The above uses two methods: constructing FormData and ajaxSubmit. Note the settings of the contentType and processData parameters. Also, to allow uploading multiple files at once, set the multiple attribute.
Before accessing static files under wwwroot, you must register it in the Configure method of the Startup class:
public void Configure(IApplicationBuilder app)
{
    app.UseStaticFiles(); // Used to access files under wwwroot
}
Start the project and access the path: http://localhost:***/index.html for upload testing. After success, you will see the uploaded files in the Files directory under wwwroot.
5. Unified Web API Response Format
Define unified response format
To facilitate front-end and back-end using a predefined data format, we usually define a unified response that includes success status, return code, specific data, etc. For illustration, define a response class as follows:
public class ApiResult
{
    public bool IsSuccess { get; set; }
    public string Message { get; set; }
    public string Code { get; set; }
    public Dictionary<string, object> Data { get; set; } = new Dictionary<string, object>();
}
Thus, we encapsulate each action interface operation into an ApiResult format for return. Create a new ProductController as an example:
[Produces("application/json")]
[Route("api/[controller]")]
[ApiController]
public class ProductController : ControllerBase
{
    [HttpGet]
    public ApiResult Get()
    {
        var result = new ApiResult();

        var rd = new Random();

        result.Data["dataList"] = Enumerable.Range(1, 5).Select(index => new
        {
            Name = $"Product-{index}",
            Price = rd.Next(100, 9999)
        });

        result.IsSuccess = true;
        return result;
    }
}
Produces: Defines the data return method. Adding[Produces("application/json")]to each Controller indicates that data is output in JSON format.ApiController: Ensure each Controller has theApiControllerattribute. Usually, we define a base class likeBaseControllerthat inherits fromControllerBaseand mark it with[ApiController]. New controllers inherit from it.Route: Routing access method. If you don't like RESTful style, you can add Action, e.g.,[Route("api/[controller]/[action]")].- HTTP methods: Combined with the previously configured Swagger, ensure each Action has a specific HTTP method, i.e., one of
HttpGet,HttpPost,HttpPut,HttpDelete. Usually,HttpGetandHttpPostare sufficient.
Thus, the unified data return is implemented.
Resolve T time format
.NET Core Web API returns data in camelCase by default. However, for DateTime types, it returns a T-format time. To resolve the T time format, define a custom time format converter class as follows:
public class DatetimeJsonConverter : JsonConverter<DateTime>
{
    public override DateTime Read(ref Utf8JsonReader reader, Type typeToConvert, JsonSerializerOptions options)
    {
        if (reader.TokenType == JsonTokenType.String)
        {
            if (DateTime.TryParse(reader.GetString(), out DateTime date))
                return date;
        }
        return reader.GetDateTime();
    }

    public override void Write(Utf8JsonWriter writer, DateTime value, JsonSerializerOptions options)
    {
        writer.WriteStringValue(value.ToString("yyyy-MM-dd HH:mm:ss"));
    }
}
Then adjust the services.AddControllers code in the ConfigureServices method of the Startup class as follows:
services.AddControllers()
    .AddJsonOptions(configure =>
    {
        configure.JsonSerializerOptions.Converters.Add(new DatetimeJsonConverter());
    });
6. Model Validation
Model validation already exists in ASP.NET MVC, and usage is essentially the same. It refers to parameter validation for data submitted to the interface, including required fields, data format, string length, range, etc. Typically, we define a data object passed via POST as an entity class. For example, define a registration class as follows:
public class RegisterEntity
{
    /// <summary>
    /// Mobile phone number
    /// </summary>
    [Display(Name = "Mobile phone number")]
    [Required(ErrorMessage = "{0} cannot be empty")]
    [StringLength(11, ErrorMessage = "{0} can have at most {1} characters")]
    public string Mobile { get; set; }

    /// <summary>
    /// Verification code
    /// </summary>
    [Display(Name = "Verification code")]
    [Required(ErrorMessage = "{0} cannot be empty")]
    [StringLength(6, ErrorMessage = "{0} can have at most {1} characters")]
    public string Code { get; set; }

    /// <summary>
    /// Password
    /// </summary>
    [Display(Name = "Password")]
    [Required(ErrorMessage = "{0} cannot be empty")]
    [StringLength(16, ErrorMessage = "{0} can have at most {1} characters")]
    public string Pwd { get; set; }
}
The Display attribute indicates the field name for prompts, Required indicates required, StringLength limits field length. There are other built-in attributes; refer to official documentation. List some common validation attributes:
[CreditCard]: Validates that the property has a credit card format. Requires additional jQuery validation methods.[Compare]: Validates that two properties in a model match.[EmailAddress]: Validates that the property has an email format.[Phone]: Validates that the property has a phone number format.[Range]: Validates that the property value is within a specified range.[RegularExpression]: Validates that the property value matches a specified regular expression.[Required]: Validates that the field is not null. See the [Required] attribute for more details.[StringLength]: Validates that the string property value does not exceed a specified length limit.[Url]: Validates that the property has a URL format.[Remote]: Validates input on the client by calling an action method on the server.
The above describes the basic usage of model validation. Combined with T4 templates, you can generate model validation entities from table objects, saving the work of writing a lot of validation code in actions. Of course, necessary complex validations or validations involving database operations should be written in actions or other application modules.
So how does model validation work in Web API? Add the following code to ConfigureServices in the Startup class:
// Model parameter validation
services.Configure<ApiBehaviorOptions>(options =>
{
options.InvalidModelStateResponseFactory = (context) =>
{
    var error = context.ModelState.FirstOrDefault().Value;
    var message = error.Errors.FirstOrDefault(p => !string.IsNullOrWhiteSpace(p.ErrorMessage))?.ErrorMessage;

    return new JsonResult(new ApiResult { Message = message });
};
});
Add a sample registration action code:
/// <summary>
/// Register
/// </summary>
/// <param name="model"></param>
/// <returns></returns>
[HttpPost]
public async Task<ApiResult> Register(RegisterEntity model)
{
    ApiResult result = new ApiResult();

    var _code = CacheHelper.GetCache(model.Mobile);
    if (_code == null)
    {
        result.Message = "Verification code expired or does not exist";
        return result;
    }
    if (!model.Code.Equals(_code.ToString()))
    {
        result.Message = "Verification code error";
        return result;
    }

    /**
    Related logic code
    **/
    return result;
}
Thus, by configuring ApiBehaviorOptions and reading the first validation error message and returning it, the validation of request parameters in the Web API action is completed. The error message Message can also be encapsulated slightly; we won't go into detail here.
7. Logging
Although .NET Core Web API has built-in logging functionality, it may not easily meet our needs. Typically, third-party logging frameworks like NLog and Log4Net are used. Briefly introduce the usage of the NLog logging component.
Using NLog
① Install the NuGet package: NLog.Web.AspNetCore (current project version 4.9.2);
② Create a NLog.config file in the project root. For detailed configuration of NLog.config, refer to official documentation. Here is a brief configuration:
<?xml version="1.0" encoding="utf-8"?>
<nlog xmlns="http://www.nlog-project.org/schemas/NLog.xsd"
      xmlns:xsi="http://www.w3.org/2001/XMLSchema-instance"
      autoReload="true"
      throwExceptions="false"
      internalLogLevel="Off"
      internalLogFile="NlogRecords.log">
  <!--NLog internal logging is turned off-->
  <extensions>
    <add assembly="NLog.Web.AspNetCore" />
  </extensions>
  <targets>
    <target name="log_file" xsi:type="File" fileName="${basedir}/logs/${shortdate}.log"
            layout="${longdate} | ${level:uppercase=false} | ${message} ${onexception:${exception:format=tostring} ${newline} ${stacktrace} ${newline}" />
  </targets>

  <rules>
    <!--Skip Microsoft components logging at all levels-->
    <logger name="Microsoft.*" final="true" />
    <!--<logger name="logdb" writeTo="log_database" />-->
    <logger name="*" minlevel="Trace" writeTo="log_file" />

  </rules>
</nlog>

<!--https://github.com/NLog/NLog/wiki/Getting-started-with-ASP.NET-Core-3-->
③ Adjust the Program.cs file as follows:
public class Program
{
    public static void Main(string[] args)
    {
        //CreateHostBuilder(args).Build().Run();

        var logger = NLog.Web.NLogBuilder.ConfigureNLog("nlog.config").GetCurrentClassLogger();
        try
        {
            logger.Debug("init main");
            CreateHostBuilder(args).Build().Run();
        }
        catch (Exception exception)
        {
            //NLog: catch setup errors
            logger.Error(exception, "Stopped program because of exception");
            throw;
        }
        finally
        {
            // Ensure to flush and stop internal timers/threads before application-exit (Avoid segmentation fault on Linux)
            NLog.LogManager.Shutdown();
        }
    }

    public static IHostBuilder CreateHostBuilder(string[] args) =>
        Host.CreateDefaultBuilder(args)
            .ConfigureWebHostDefaults(webBuilder =>
            {
                webBuilder.UseStartup<Startup>();
            }).ConfigureLogging(logging => {
                logging.ClearProviders();
                logging.SetMinimumLevel(Microsoft.Extensions.Logging.LogLevel.Trace);
            }).UseNLog(); // Dependency inject NLog
}
The exception capture code in Main can be omitted; UseNLog under CreateHostBuilder is required.
Inject in the Controller as follows:
public class WeatherForecastController : ControllerBase
{
    private static readonly string[] Summaries = new[]
    {
        "Freezing", "Bracing", "Chilly", "Cool", "Mild", "Warm", "Balmy", "Hot", "Sweltering", "Scorching"
    };

    private readonly ILogger<WeatherForecastController> _logger;

    public WeatherForecastController(ILogger<WeatherForecastController> logger)
    {
        _logger = logger;
    }

    [HttpGet]
    public IEnumerable<WeatherForecast> Get()
    {
        _logger.LogInformation("Test a log entry");

        var rng = new Random();
        return Enumerable.Range(1, 5).Select(index => new WeatherForecast
        {
            Date = DateTime.Now.AddDays(index),
            TemperatureC = rng.Next(-20, 55),
            Summary = Summaries[rng.Next(Summaries.Length)]
        })
        .ToArray();
    }
}
After local testing, you can see the generated log files in the logs directory under debug.
8. Dependency Injection
Using .NET Core inevitably involves dependency injection (DI), which is one of its design principles. We won't go into what DI is and why it's used. Let's look at a simple example.
public interface IProductRepository
{
    IEnumerable<Product> GetAll();
}

public class ProductRepository : IProductRepository
{
    public IEnumerable<Product> GetAll()
    {

    }
}
Register in the Startup class:
public void ConfigureServices(IServiceCollection services)
{
    services.AddScoped<IProductRepository, ProductRepository>();
}
Request the IProductRepository service and call the GetAll method:
public class ProductController : ControllerBase
{
    private readonly IProductRepository _productRepository;
   public ProductController(IProductRepository productRepository)
    {
        _productRepository = productRepository;
    }

    public IEnumerable<Product> Get()
    {
        return _productRepository.GetAll();
    }
}
By using the DI pattern, we implement the IProductRepository interface. In fact, we have already used constructor injection in previous examples multiple times.
Lifetime
services.AddScoped<IMyDependency, MyDependency>();
services.AddTransient<IMyDependency, MyDependency>();
services.AddSingleton<IMyDependency, MyDependency>();
Transient: Creates a new instance for every request.Scoped: Creates an instance per scope lifetime.Singleton: Singleton mode, creates only one instance throughout the application's lifetime.
Here, you need to choose the appropriate lifetime service based on specific business logic scenarios.
In practice, many services need to be registered in ConfigureServices. Writing them one by one is tedious and easy to forget. Typically, we might use reflection for batch injection through extension methods. For example:
public static class AppServiceExtensions
{
    /// <summary>
    /// Register services in the application domain
    /// </summary>
    /// <param name="services"></param>
    public static void AddAppServices(this IServiceCollection services)
    {
        var ts = System.Reflection.Assembly.Load("CoreAPI.Data").GetTypes().Where(s => s.Name.EndsWith("Repository") || s.Name.EndsWith("Service")).ToArray();
        foreach (var item in ts.Where(s => !s.IsInterface))
        {
            var interfaceType = item.GetInterfaces();
            foreach (var typeArray in interfaceType)
            {
                services.AddTransient(typeArray, item);
            }
        }
    }
}
public void ConfigureServices(IServiceCollection services)
{
    services.AddAppServices(); // Batch register services
}
Indeed, this works with the built-in DI to meet batch injection needs. However, there are more options to simplify DI registration, such as using third-party components like Scrutor, Autofac, etc.
- Using Scrutor
Scrutor is an extension library based on Microsoft's injection components. Simple example:
services.Scan(scan => scan
    .FromAssemblyOf<Startup>()
        .AddClasses(classes => classes.Where(s => s.Name.EndsWith("Repository") || s.Name.EndsWith("Service")))
        .AsImplementedInterfaces()
        .WithTransientLifetime()
    );
The above code uses the Scan method to batch register interface services ending with Repository or Service with a Transient lifetime. This is equivalent to the reflection-based batch registration mentioned earlier.
For other usages of Scrutor, refer to the official documentation. This is just an introduction.
- Autofac
Generally, using Microsoft's built-in DI or Scrutor is sufficient for practical needs. If you have higher requirements, such as property injection or replacing Microsoft's DI, you can choose Autofac. We won't go into detail about Autofac here.
9. Caching
Using MemoryCache
According to official documentation, developers should use caching reasonably and limit cache size; the Core runtime does not limit cache size based on memory pressure. The usage still follows: register first, then call in the Controller.
public void ConfigureServices(IServiceCollection services)
{
    services.AddMemoryCache(); // Cache middleware
}
public class ProductController : ControllerBase
    {
        private IMemoryCache _cache;

        public ProductController(IMemoryCache memoryCache)
        {
            _cache = memoryCache;
        }

        [HttpGet]
        public DateTime GetTime()
        {
            string key = "_timeKey";

            // Look for cache key.
            if (!_cache.TryGetValue(key, out DateTime cacheEntry))
            {
                // Key not in cache, so get data.
                cacheEntry = DateTime.Now;

                // Set cache options.
                var cacheEntryOptions = new MemoryCacheEntryOptions()
                    // Keep in cache for this time, reset time if accessed.
                    .SetSlidingExpiration(TimeSpan.FromSeconds(3));

                // Save data in cache.
                _cache.Set(key, cacheEntry, cacheEntryOptions);
            }

            return cacheEntry;
        }
    }
The above code caches a time and sets a sliding expiration (expiration after last access) of 3 seconds. To set an absolute expiration, replace SetSlidingExpiration with SetAbsoluteExpiration. Refresh the browser; the time will update every 3 seconds.
Attach a simple wrapper CacheHelper class as follows:
public class CacheHelper
{
    public static IMemoryCache _memoryCache = new MemoryCache(new MemoryCacheOptions());

    /// <summary>
    /// Cache with absolute expiration
    /// </summary>
    ///<param name="key">Cache key</param>
    ///<param name="value">Cached value</param>
    ///<param name="minute">Absolute expiration in minutes</param>
    public static void SetChache(string key, object value, int minute)
    {
        if (value == null) return;
        _memoryCache.Set(key, value, new MemoryCacheEntryOptions()
                .SetAbsoluteExpiration(TimeSpan.FromMinutes(minute)));
    }

    /// <summary>
    /// Cache with sliding expiration: expires 'minute' minutes after last access
    /// </summary>
    ///<param name="key">Cache key</param>
    ///<param name="value">Cached value</param>
    ///<param name="minute">Sliding expiration in minutes</param>
    public static void SetChacheSliding(string key, object value, int minute)
    {
        if (value == null) return;
        _memoryCache.Set(key, value, new MemoryCacheEntryOptions()
                .SetSlidingExpiration(TimeSpan.FromMinutes(minute)));
    }

    /// <summary>
    /// Set cache; will stay in memory until explicitly cleared.
    /// </summary>
    ///<param name="key">Cache key</param>
    ///<param name="value">Value for Cache[key]</param>
    public static void SetChache(string key, object value)
    {
        _memoryCache.Set(key, value);
    }

    /// <summary>
    /// Clear cache
    /// </summary>
    ///<param name="key">Cache key</param>
    public static void RemoveCache(string key)
    {
        _memoryCache.Remove(key);
    }

    /// <summary>
    /// Return the value of Cache[key] based on the key
    /// </summary>
    ///<param name="key"></param>
    public static object GetCache(string key)
    {
        //return _memoryCache.Get(key);
        if (key != null && _memoryCache.TryGetValue(key, out object val))
        {
            return val;
        }
        else
        {
            return default;
        }
    }

    /// <summary>
    /// Return generic object by key
    /// </summary>
    /// <typeparam name="T"></typeparam>
    /// <param name="key"></param>
    /// <returns></returns>
    public static T GetCache<T>(string key)
    {
        if (key != null && _memoryCache.TryGetValue<T>(key, out T val))
        {
            return val;
        }
        else
        {
            return default;
        }
    }

}
10. Exception Handling
Define exception handling middleware
Here, we mainly capture global exceptions, log them, and return a unified JSON format to the API caller. Before discussing exception handling, let's mention middleware. What middleware is won't be repeated. A basic middleware structure is as follows:
public class CustomMiddleware
{
    private readonly RequestDelegate _next;

    public CustomMiddleware(RequestDelegate next)
    {
        _next = next;
    }

    public async Task Invoke(HttpContext httpContext)
    {
        await _next(httpContext);
    }
}
Now define our global exception handling middleware:
public class CustomExceptionMiddleware
{
    private readonly RequestDelegate _next;
    private readonly ILogger<CustomExceptionMiddleware> _logger;

    public CustomExceptionMiddleware(RequestDelegate next, ILogger<CustomExceptionMiddleware> logger)
    {
        _next = next;
        _logger = logger;
    }

    public async Task Invoke(HttpContext httpContext)
    {
        try
        {
            await _next(httpContext);
        }
        catch (Exception ex)
        {
            _logger.LogError(ex,"Unhandled exception...");
            await HandleExceptionAsync(httpContext, ex);
        }
    }

    private Task HandleExceptionAsync(HttpContext httpContext, Exception ex)
    {
        var result = JsonConvert.SerializeObject(new { isSuccess = false, message = ex.Message });
        httpContext.Response.ContentType = "application/json;charset=utf-8";
        return httpContext.Response.WriteAsync(result);
    }
}

/// <summary>
/// Extension method to add middleware
/// </summary>
public static class CustomExceptionMiddlewareExtensions
{
    public static IApplicationBuilder UseCustomExceptionMiddleware(this IApplicationBuilder builder)
    {
        return builder.UseMiddleware<CustomExceptionMiddleware>();
    }
}
Then add the extension middleware in the Configure method of the Startup class (see bold section):
public void Configure(IApplicationBuilder app, IWebHostEnvironment env)
{
    if (env.IsDevelopment())
    {
        app.UseDeveloperExceptionPage();
    }

    // Global exception handling
    app.UseCustomExceptionMiddleware();
}
In HandleExceptionAsync, for the convenience of development and testing, we return the system error to the API caller. In production, you can return a fixed error message.
Handling exception status codes
Regarding HTTP status codes, common ones include 200 for success, 401, 403, 404, 502, etc. The system may not always return 200. For non-200 exception status codes, Web API should handle them appropriately so that the API caller can receive them correctly. For example, in the following JWT authentication, when the authentication token expires or there is no permission, the system returns 401 or 403, but the interface does not provide an effective response. Therefore, here we list some common exception status codes and return them in a 200 format to the API caller. Add the following code to the Configure method of the Startup class:
app.UseStatusCodePages(async context =>
{
    //context.HttpContext.Response.ContentType = "text/plain";
    context.HttpContext.Response.ContentType = "application/json;charset=utf-8";

    int code = context.HttpContext.Response.StatusCode;
    string message =
        code switch
        {
            401 => "Not logged in",
            403 => "Access denied",
            404 => "Not found",
            _ => "Unknown error",
        };

    context.HttpContext.Response.StatusCode = StatusCodes.Status200OK;
    await context.HttpContext.Response.WriteAsync(Newtonsoft.Json.JsonConvert.SerializeObject(new
    {
        isSuccess = false,
        code,
        message
    }));

});
The code is simple, using the built-in UseStatusCodePages middleware. Of course, you can also customize filters to handle exceptions, but that is not recommended. Simplicity and efficiency are what we need.
There are other .NET Core exception handling middleware such as UseExceptionHandler, UseStatusCodePagesWithRedirects, etc. Different middleware are suitable for different environments. Find the one that fits.
Side note: You can also encapsulate the UseStatusCodePages operation for handling exception status codes into the global exception handling middleware mentioned earlier.
11. Application Security and JWT Authentication
What JWT is won't be explained here. In practice, for the security of some interfaces, such as those requiring identity authentication to access resources, Web API typically uses token-based authentication, combined with server-side caching.
Why choose JWT authentication? Reasons include: no server-side storage, stateless, suitable for mobile, suitable for distributed systems, standardized, etc. The usage of JWT is as follows:
Install the NuGet package: Microsoft.AspNetCore.Authentication.JwtBearer (current example version 3.1.5);
Inject in ConfigureServices. The default name is Bearer. You can change it, but keep it consistent. Note the bold parts. The code is as follows:
Add JWT configuration nodes to appsettings.json (see the [Configuration Files] section above). Add related JWT authentication classes:
public static class JwtSetting
{
    public static JwtConfig Setting { get; set; } = new JwtConfig();
}

public class JwtConfig
{
    public string Secret { get; set; }
    public string Issuer { get; set; }
    public string Audience { get; set; }
    public int AccessExpiration { get; set; }
    public int RefreshExpiration { get; set; }
}
Read the JWT configuration using the static class binding method mentioned earlier and inject:
public Startup(IConfiguration configuration, IWebHostEnvironment env)
{
    //Configuration = configuration;

    var builder = new ConfigurationBuilder()
        .SetBasePath(env.ContentRootPath)
        .AddJsonFile("appsettings.json", optional: true, reloadOnChange: true);

    Configuration = builder.Build();

    configuration.GetSection("SystemConfig").Bind(MySettings.Setting); // Bind static configuration class
    configuration.GetSection("JwtTokenConfig").Bind(JwtSetting.Setting); // Same

}

public IConfiguration Configuration { get; }

// This method gets called by the runtime. Use this method to add services to the container.
public void ConfigureServices(IServiceCollection services)
{

    #region JWT authentication injection

    JwtSecurityTokenHandler.DefaultInboundClaimTypeMap.Clear();
    services.AddAuthentication("Bearer")
        .AddJwtBearer("Bearer", options =>
        {
            options.RequireHttpsMetadata = false;

            options.TokenValidationParameters = new TokenValidationParameters
            {
                ValidateIssuer = true,
                ValidateAudience = true,
                ValidateLifetime = true,
                ValidateIssuerSigningKey = true,
                ValidIssuer = JwtSetting.Setting.Issuer,
                ValidAudience = JwtSetting.Setting.Audience,
                IssuerSigningKey = new SymmetricSecurityKey(System.Text.Encoding.UTF8.GetBytes(JwtSetting.Setting.Secret))
            };
        });

    #endregion

}
Add JWT authentication support to Swagger. After completion, a lock icon will appear on the Swagger page. Obtain the token, fill in the Value field (Bearer token format) and click Authorize to log in. The Swagger JWT configuration is shown in bold:
services.AddSwaggerGen(c =>
{
    c.SwaggerDoc("v1", new OpenApiInfo
    {
        Title = "My API",
        Version = "v1",
        Description = "API documentation description",
        Contact = new OpenApiContact
        {
            Email = "5007032@qq.com",
            Name = "Test Project",
            //Url = new Uri("http://t.abc.com/")
        },
        License = new OpenApiLicense
        {
            Name = "BROOKE License",
            //Url = new Uri("http://t.abc.com/")
        }
    });


    // Set the XML documentation comment path for Swagger JSON and UI
    //var basePath = Path.GetDirectoryName(typeof(Program).Assembly.Location); // Get the application directory (not affected by the working directory)
    //var xmlPath = Path.Combine(basePath, "CoreAPI_Demo.xml");
    //c.IncludeXmlComments(xmlPath, true);

    var xmlFile = $"{Assembly.GetExecutingAssembly().GetName().Name}.xml";
    var xmlPath = Path.Combine(AppContext.BaseDirectory, xmlFile);
    c.IncludeXmlComments(xmlPath);

    #region JWT authentication Swagger authorization

    c.AddSecurityDefinition("Bearer", new OpenApiSecurityScheme
    {
        Description = "JWT authorization (data will be transmitted in the request header) Directly enter Bearer {token} in the box below (with a space in between)",
        Name = "Authorization",
        In = ParameterLocation.Header,
        Type = SecuritySchemeType.ApiKey,
        BearerFormat = "JWT",
        Scheme = "Bearer"
    });

    c.AddSecurityRequirement(new OpenApiSecurityRequirement()
    {
        {
            new OpenApiSecurityScheme
            {
                Reference = new OpenApiReference {
                    Type = ReferenceType.SecurityScheme,
                    Id = "Bearer"
                }
            },
            new string[] { }
        }
    });

    #endregion

});
Register in the Configure method of the Startup class. Note: it must be placed before app.UseAuthorization();:
public void Configure(IApplicationBuilder app, IWebHostEnvironment env)
{
    app.UseAuthentication(); // JWT authentication

    app.UseAuthorization();

}
Now JWT is basically configured. Next, implement authentication login and authorization. Simulate the operation as follows:
[HttpPost]
public async Task<ApiResult> Login(LoginEntity model)
{
    ApiResult result = new ApiResult();

    // Verify username and password
    var userInfo = await _memberService.CheckUserAndPwd(model.User, model.Pwd);
    if (userInfo == null)
    {
        result.Message = "Username or password is incorrect";
        return result;
    }
    var claims = new Claim[]
    {
        new Claim(ClaimTypes.Name,model.User),
        new Claim(ClaimTypes.Role,"User"),
        new Claim(JwtRegisteredClaimNames.Sub,userInfo.MemberID.ToString()),

    };

    var key = new SymmetricSecurityKey(System.Text.Encoding.UTF8.GetBytes(JwtSetting.Setting.Secret));
    var expires = DateTime.Now.AddDays(1);
    var token = new JwtSecurityToken(
                issuer: JwtSetting.Setting.Issuer,
                audience: JwtSetting.Setting.Audience,
                claims: claims,
                notBefore: DateTime.Now,
                expires: expires,
                signingCredentials: new SigningCredentials(key, SecurityAlgorithms.HmacSha256));

    // Generate Token
    string jwtToken = new JwtSecurityTokenHandler().WriteToken(token);

    // Update last login time
    await _memberService.UpdateLastLoginTime(userInfo.MemberID);

    result.IsSuccess= 1;
    result.ResultData["token"] = jwtToken;
    result.Message = "Authorization successful!";
    return result;

}
The above code simulates a login operation (account/password login, sets validity to one day), generates a token, and returns it. The frontend caller stores the token, e.g., in localStorage, and when calling authorized interfaces, adds the token to the header (Bearer token) for the API request. Next, add the [Authorize] attribute to Controllers or Actions that require identity authorization:
[Authorize]
[Route("api/[controller]/[action]")]
public class UserController : ControllerBase
{
}
To add role-based authorization, restrict operations as follows:
[Authorize(Roles = "user")]
[Route("api/[controller]/[action]")]
public class UserController : ControllerBase
{
}

// Multiple roles can be separated by commas
[Authorize(Roles = "Administrator,Finance")]
[Route("api/[controller]/[action]")]
public class UserController : ControllerBase
{
}
Different role information can be configured via ClaimTypes.Role during login. This is just a simple example of role service usage. Complex scenarios can be implemented by registering policy services combined with database dynamic configuration.
Thus, a simple JWT-based authentication and authorization workflow is complete.
12. Cross-Origin Resource Sharing (CORS)
Front-end and back-end separation involves cross-origin issues. Simple CORS support operations are as follows:
Add extension support
public static class CrosExtensions
{
    public static void ConfigureCors(this IServiceCollection services)
    {

        services.AddCors(options => options.AddPolicy("CorsPolicy",
            builder =>
            {
                builder.AllowAnyMethod()
                    .SetIsOriginAllowed(_ => true)
                    .AllowAnyHeader()
                    .AllowCredentials();
            }));

        //services.AddCors(options => options.AddPolicy("CorsPolicy",
        //builder =>
        //{
        //    builder.WithOrigins(new string[] { "http://localhost:13210" })
        //        .AllowAnyMethod()
        //        .AllowAnyHeader()
        //        .AllowCredentials();
        //}));


    }
}
Add related registration in the Startup class:
public void ConfigureServices(IServiceCollection services)
{
    services.ConfigureCors();
}
public void Configure(IApplicationBuilder app, IWebHostEnvironment env)
{
    app.UseCors("CorsPolicy"); // CORS
}
This completes a simple CORS operation. You can also limit request source addresses and methods by setting WithOrigins, WithMethods, etc.
That concludes the entire article. The source code involved in this article can be found at: https://github.com/Brooke181/CoreAPI_Demo
The next article will introduce the use of Dapper in .NET Core. Thank you for your support!