
本文来自转载
原文作者:RyzenAdorer
原文标题:.NET Core 3 WPF MVVM 框架 Prism 系列之对话框服务
原文链接:https://www.cnblogs.com/ryzen/p/12771986.html
本文将介绍如何在.NET Core3 环境下使用 MVVM 框架 Prism 的对话框服务,这也是 prism 系列的最后一篇完结文章,下面是 Prism 系列文章的索引:
.NET Core 3 WPF MVVM 框架 Prism 系列之文章索引
1. 对话框服务
在 Prism 中,通过一个 IDialogAware 接口来实现对话框服务:
public interface IDialogAware
{
    bool CanCloseDialog();
    void OnDialogClosed();
    void OnDialogOpened(IDialogParameters parameters);
    string Title { get; set; }
    event Action<IDialogResult> RequestClose;
}
- CanCloseDialog()函数是决定窗体是否关闭
- OnDialogClosed()函数是窗体关闭时触发,触发条件取决于 CanCloseDialog()函数
- OnDialogOpened()函数时窗体打开时触发,比窗体 Loaded 事件早触发
- Title 为窗体的标题
- RequestClose 为关闭事件,可由此控制窗体的关闭
2.1. 创建对话框的 View 和 ViewModel
AlertDialog.xaml:
<UserControl
  x:Class="PrismMetroSample.Shell.Views.Dialogs.AlertDialog"
  xmlns="http://schemas.microsoft.com/winfx/2006/xaml/presentation"
  xmlns:x="http://schemas.microsoft.com/winfx/2006/xaml"
  xmlns:mc="http://schemas.openxmlformats.org/markup-compatibility/2006"
  xmlns:d="http://schemas.microsoft.com/expression/blend/2008"
  xmlns:local="clr-namespace:PrismMetroSample.Shell.Views.Dialogs"
  mc:Ignorable="d"
  xmlns:prism="http://prismlibrary.com/"
  Width="350"
  Height="120"
  prism:ViewModelLocator.AutoWireViewModel="True"
>
  <Grid Margin="5">
    <Grid.RowDefinitions>
      <RowDefinition />
      <RowDefinition Height="Auto" />
    </Grid.RowDefinitions>
    <Grid Margin="0,0,0,10">
      <Grid.ColumnDefinitions>
        <ColumnDefinition Width="70" />
        <ColumnDefinition />
      </Grid.ColumnDefinitions>
      <image
        Source="pack://application:,,,/PrismMetroSample.Infrastructure;Component/Assets/Photos/alter.png"
        Height="40"
        UseLayoutRounding="True"
        RenderOptions.BitmapScalingMode="HighQuality"
      />
      <TextBlock
        Grid.Column="1"
        Text="{Binding Message}"
        HorizontalAlignment="Left"
        VerticalAlignment="Center"
        Grid.Row="0"
        TextWrapping="Wrap"
        FontSize="15"
        FontFamily="Open Sans"
      />
    </Grid>
    <Grid Grid.Row="1">
      <Grid.ColumnDefinitions>
        <ColumnDefinition />
        <ColumnDefinition />
      </Grid.ColumnDefinitions>
      <button
        Margin="5"
        Foreground="White"
        FontSize="12"
        Background="#5cb85c"
        Command="{Binding CloseDialogCommand}"
        CommandParameter="true"
        Content="Yes"
        Width="64"
        Height="28"
        HorizontalAlignment="Right"
        Grid.Row="1"
      />
      <button
        Grid.Column="1"
        Margin="5"
        Foreground="White"
        FontSize="12"
        Background="#d9534f"
        Command="{Binding CloseDialogCommand}"
        CommandParameter="false"
        Content="No"
        Width="64"
        Height="28"
        HorizontalAlignment="Left"
        Grid.Row="1"
      />
    </Grid>
  </Grid>
</UserControl>
AlertDialogViewModel.cs:
public class AlertDialogViewModel : BindableBase, IDialogAware
{
    private DelegateCommand<string> _closeDialogCommand;
    public DelegateCommand<string> CloseDialogCommand =>
        _closeDialogCommand ?? (_closeDialogCommand = new DelegateCommand<string>(ExecuteCloseDialogCommand));

    void ExecuteCloseDialogCommand(string parameter)
    {
        ButtonResult result = ButtonResult.None;
        if (parameter?.ToLower() == "true")
            result = ButtonResult.Yes;
        else if (parameter?.ToLower() == "false")
            result = ButtonResult.No;
         RaiseRequestClose(new DialogResult(result));
     }

     //触发窗体关闭事件
     public virtual void RaiseRequestClose(IDialogResult dialogResult)
     {
         RequestClose?.Invoke(dialogResult);
     }

     private string _message;
     public string Message
     {
         get { return _message; }
         set { SetProperty(ref _message, value); }
     }

     private string _title = "Notification";
     public string Title
     {
         get { return _title; }
         set { SetProperty(ref _title, value); }
     }

     public event Action<IDialogResult> RequestClose;

     public bool CanCloseDialog()
     {
         return true;
     }

     public void OnDialogClosed()
     {

     }

     public void OnDialogOpened(IDialogParameters parameters)
     {
         Message = parameters.GetValue<string>("message");
     }
 }
2.2. 注册对话框
App.cs:
protected override void RegisterTypes(IContainerRegistry containerRegistry)
{
     containerRegistry.RegisterDialog<AlertDialog, AlertDialogViewModel>();
}
还可以注册时起名字:

Copy
containerRegistry.RegisterDialog<AlertDialog, AlertDialogViewModel>(“alertDialog”);
2.3. 使用对话框服务
CreateAccountViewModel.cs(修改部分):
public CreateAccountViewModel(IRegionManager regionManager, IDialogService dialogService)
{
_regionManager = regionManager;
_dialogService = dialogService;
}
public void ConfirmNavigationRequest(NavigationContext navigationContext, Action<bool> continuationCallback)
{
if (!string.IsNullOrEmpty(RegisteredLoginId) && this.IsUseRequest)
{
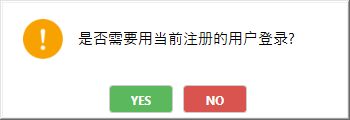
_dialogService.ShowDialog("AlertDialog", new DialogParameters($"message={"是否需要用当前注册的用户登录?"}"), r =>
{
if (r.Result == ButtonResult.Yes)
navigationContext.Parameters.Add("loginId", RegisteredLoginId);
});
}
continuationCallback(true);
}
效果如下:

我们是通过调用 IDialogService 接口的 ShowDialog 函数来调用,下面是该接口的定义:
public interface IDialogService : Object
{
    Void Show(String name, IDialogParameters parameters, Action<IDialogResult> callback);
    Void ShowDialog(String name, IDialogParameters parameters, Action<IDialogResult> callback);

 }
我们可以发现 show 和 ShowDialog 函数都是一样形参,无非就是使用场景不一样
- name:所要调用对话框 view 的名字,当注册别名时,只能使用别名来调用
- parameters:IDialogParameters 接口类型参数,传入的提示消息,通常是$"message="格式,然后再 ViewModel 的 OnDialogOpened 函数通过 IDialogParameters 接口的 GetValue 函数来获取
- callback:用于传入无返回值回调函数
2. 自定义对话框窗体
我们在上述可以看到,对话框的窗体时一个 WPF 自带的窗体,但是当我们要用自己自定义窗体,例如,去掉 window 的 Icon,保留最大化,最小化和关闭,或者使用一些第三方的窗体控件,prism 支持通过注册一个对话框窗体,然后通过再不同对话框的 View 指定其对话框窗体的 style,则可以很灵活的实现不一样的对话框,下面让我们来看看如何操作:
2.1. 注册自定义对话框窗体
新建一个窗体,DialogWindow.xaml:
<Window
  x:Class="PrismMetroSample.Shell.Views.Dialogs.DialogWindow"
  xmlns="http://schemas.microsoft.com/winfx/2006/xaml/presentation"
  xmlns:x="http://schemas.microsoft.com/winfx/2006/xaml"
  xmlns:d="http://schemas.microsoft.com/expression/blend/2008"
  xmlns:mc="http://schemas.openxmlformats.org/markup-compatibility/2006"
  xmlns:local="clr-namespace:PrismMetroSample.Shell.Views.Dialogs"
  mc:Ignorable="d"
  xmlns:prism="http://prismlibrary.com/"
>
  <Grid> </Grid>
</Window>
DialogWindow.xaml.cs:
public partial class DialogWindow : Window, IDialogWindow
{
    public DialogWindow()
    {
        InitializeComponent();
    }

    protected override void OnSourceInitialized(EventArgs e)
    {
        WindowHelp.RemoveIcon(this);//使用win32函数去除Window的Icon部分
    }

    public IDialogResult Result { get; set; }
}
App.cs:
protected override void RegisterTypes(IContainerRegistry containerRegistry)
{
     containerRegistry.RegisterDialogWindow<DialogWindow>();//注册自定义对话框窗体
}
2.2. 自定义对话框窗体 Style
AlertDialog.xaml:
<prism:Dialog.WindowStyle>
  <style TargetType="Window">
    <Setter Property="prism:Dialog.WindowStartupLocation" Value="CenterScreen" />
    <Setter Property="ShowInTaskbar" Value="False"/>
    <Setter Property="SizeToContent" Value="WidthAndHeight"/>
  </style>
</prism:Dialog.WindowStyle>
效果如下:

如何我们要将窗体样式全部去掉,改动 AlertDialog.xaml:
<prism:Dialog.WindowStyle>
  <style TargetType="Window">
    <Setter Property="prism:Dialog.WindowStartupLocation" Value="CenterScreen" />
    <Setter Property="ShowInTaskbar" Value="False"/>
    <Setter Property="SizeToContent" Value="WidthAndHeight"/>
    <Setter Property="WindowStyle" Value="None"/>
  </style>
</prism:Dialog.WindowStyle>
那么就变成了下面这样:
最终,我们的最后效果为这样:

3. 小结
通过 Prism 的对话框服务,我们可以很好的通过一个 IDialogService 接口来统一管理对话框的弹出逻辑,而且可以使用依赖注入的模式,如果换成之前要定义一些自定义的对话框,那么也要强依赖 View 部分,而且可以通过自定义不同对话框的窗体样式,达到一定的灵活性(例如最终效果演示,用了两个不同的对话框样式),至此, .NET Core3.x Prism 系列文章已经全部写完
4. 源码
最后,附上整个 demo 的源代码:PrismDemo 源码