
昨天做的验证只针对Identity 系统,没有包含到我们的日志,如果在未登录状态下于地址栏输入https://localhost:5018/Blog,还是可以看到博客,让我们整合验证。
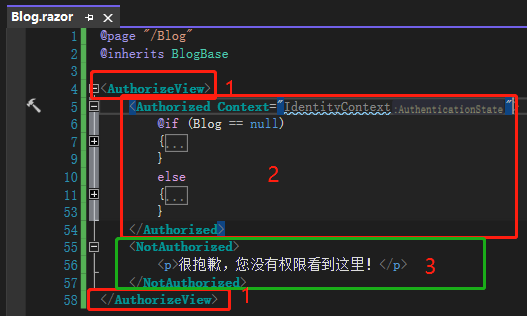
首先在Blog.razor外层加上<AuthorizeView>,这表示包在其中的内容呈现与否的条件为用户是否获得验证,接着在 Blog 内容外加上<Authorized>,顾名思义就是通过验证才能看到内容,另外新增一段未通过验证的<NotAuthorized>代码 。这边要记得加上Context="IdentityContext",否则会跟 Blog 的<EditForm>本身的context产生冲突。
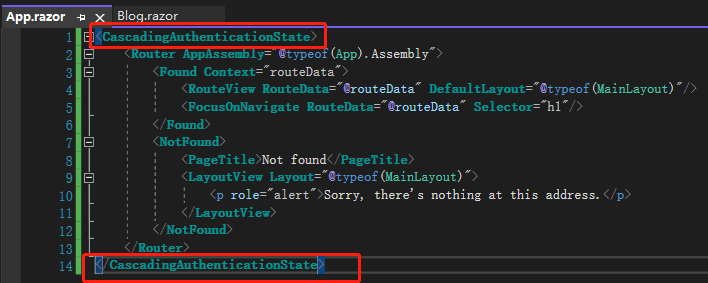
再去App.razor用<CascadingAuthenticationState>将原本的<Router>包裹,告诉Blazor 所有Component 都必须经过验证。
然后是NavMenu.razor,<Authorized>Component 加上注销链接,登录链接则移到<NotAuthorized>,icon 也改一下。

这时候要重新启动系统,验证机制才会生效,可以看到确实挡住了未验证访问。

在登录前,先打开Dev Tool 的Application 页签去看Cookies,目前只有一个Cookie。

登录后看到新的Cookie,这就是我们的Authentication Cookie。

接着来试试看注销,点击左边的Logout,并没有如想像中注销,而是来到一个 Log out 页面,右上角还是登录状态,Authentication Cookie 也还在。

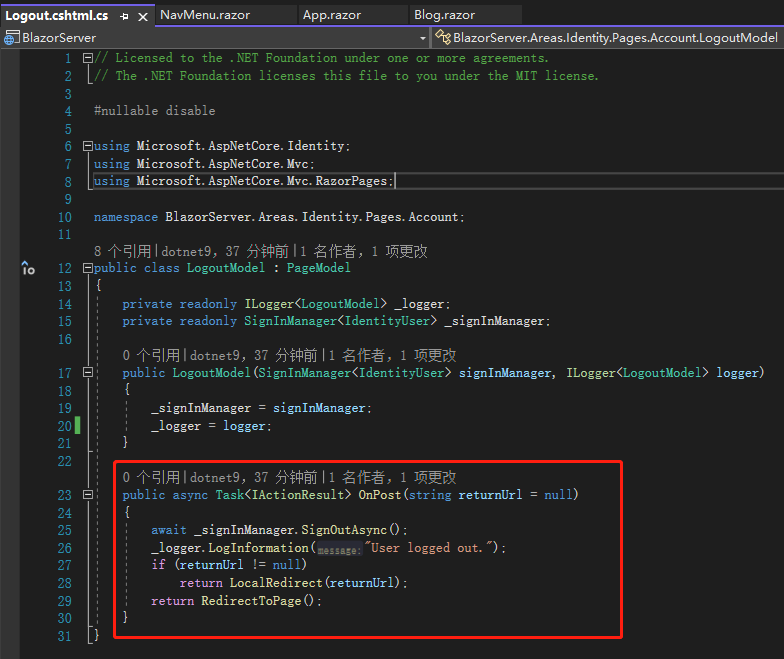
我们去看Logout.cshtml.cs,里面有OnGet()(站长注:.NET 6 Blazor server 中没有该方法,请对比)跟OnPost()分别对应HttpGet及HttpPost,我们从链接点过来的做法是HttpGet,但OnGet()这里什么事都没做,OnPost()则调用ASP.NET Core Identity API 将用户注销。
原文原图:多了一个 OnGet()方法

站长.NET 6 项目截图:和上面对比,少了一个 OnGet()方法
Logout.cshtml也找到了一个<form>元素,asp-page这些asp-开头的代码是ASP.NET Core 的Tag Helper (标签协助代码),类似Angular 的*ngFor,这边先略过不提,我们看到这里用了method="post",还有个<button type="submit">,对应了刚才的OnPost()。

通常不会有用户点了注销后还要再点一次注销,所以我们这边改动一下,先给<form>加上id="LogoutFormInLogout",再加上一段<script>,这里用到IIFE(Immediately Invoked Functions Expressions),意即不需要调用就会执行的函式,一旦用户进入这页面就会将<form>提交,如此一来,只要点击NavMenu左边的 Logout 链接,就可以顺利注销了。

如果不想要加上id="LogoutFormInLogout"这么长的 id,也可以用id="logoutForm"就好,根目录下的Pages/Shared/_LoginPartial.cshtml里面有个注销的<form>已经定义了id="logoutForm"这个 id。

不过现在注销后还停留在Log out页面似乎没有意义,所以将OnPost()的 else 区块改成return LocalRedirect("~/Blog");,这样注销后就会回到未验证的Blog 页面。


这样一来就完成了单一项目的登录验证机制,而且各种功能、页面一应俱全,如果只是小型项目的话可以这么做,明天就来说明这些 ASP.NET Core 的验证原理。
引用:
注:本文代码通过 .NET 6 + Visual Studio 2022 重构,可点击原文链接与重构后代码比较学习,谢谢阅读,支持原作者