
不是全文翻译,部分翻译自认为可能不准确,就原文照搬了。
创建一个 Blazor TabControl 组件,有两个目标知识点:
- Pass data into a RenderFragment to give it context.
- Use a CascadingParameter to pass the parent TabControl component into its child TabPage components.
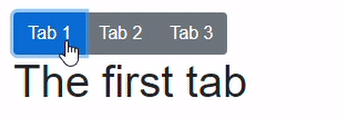
下面看最终效果图:
实操开始:
请先创建一个 Blazor 项目(Blazor Client 或者 Server 皆可,我们以 Blazor Server 为例),
第一步,创建两个组件:TabControl和TabPage。TabPage组件有一个父TabControl属性引用(属性名Parent,添加CascadingParameter特性)。
TabControl 组件:
文件路径:./Shared/TabControl.razor
<div>这是一个TabControl</div>
<CascadingValue Value="this"> @ChildContent </CascadingValue>

@code { // 如果我们想以<TabPage
  >标签的形式使用TabPage,那么下面的代码是必须的 [Parameter] public
  RenderFragment? ChildContent { get; set; } }</TabPage
>
TabPage 组件:
文件路径:./Shared/TabPage.razor
<div>这是一个TabPage</div>
@ChildContent @code { [CascadingParameter] private TabControl? Parent { get;
set; } [Parameter] public RenderFragment? ChildContent { get; set; } protected
override void OnInitialized() { if (Parent == null) throw new
ArgumentNullException(nameof(Parent), "TabPage必须包含TabControl引用");
base.OnInitialized(); } }
TabControl 关联 TabPage
在TabPage的OnInitialized方法中添加下面这一行代码,使TabPage关联上TabControl:
Parent.AddPage(this);
AddPage方法见下面的代码,在TabControl调用AddPage方法保存引用后,我们在TabControl中添加ActivePage属性,同样看下面的代码:
public TabPage? ActivePage { get; set; }
readonly List<TabPage> _pages = new();

internal void AddPage(TabPage tabPage)
{
    _pages.Add(tabPage);
    if (_pages.Count == 1)
        ActivePage = tabPage;
    StateHasChanged();
}
给AddPage组件添加一个Text属性用于展示。
[Parameter]
public string? Text { get; set; }
在TabControl中添加以下标签(在ChildContent渲染之前),这些标签会一次性全部渲染出来,当点击某个TabPage时会改变TabControl的选择项。
<div class="btn-group" role="group">
  @foreach (TabPage tabPage in Pages)
  {
    <button type="button"
      class="btn @GetButtonClass(tabPage)"
      @onclick=@( ()=>ActivatePage(tabPage) )>
      @tabPage.Text
    </button>
  }
</div>
上面这些标签会创建标准的 Bootstrap 按钮组,每个TabPage会创建一个有以下特征的按钮:
- CSS 类设置为"btn",并通过
GetButtonClass方法追加 CSS 类名,如果当前TabPage为ActivePage,添加 CSS 类btn-primary,否则添加btn-secondary。 - 当点击按钮时会激活点击的
TabPage。
注意:@onclick需要关联一个无参的方法,所以 lambda 表达式用一个内联的@( )来设置点击的TabPage为ActivatePage。
- 按钮的文字通过
TabPage的Text属性设置。
下面的代码添加到TabControl的代码区域。
string GetButtonClass(TabPage page)
{
  return page == ActivePage ? "btn-primary" : "btn-secondary";
}
void ActivatePage(TabPage page)
{
  ActivePage = page;
}
使用TabControl
添加一个TabControlTest组件:
文件名:./Pages/TabControlTest.razor
@page "/tabcontroltest"

<TabControl>
  <TabPage Text="Tab 1">
    <h1>The first tab</h1>
  </TabPage>
  <TabPage Text="Tab 2">
    <h1>The second tab</h1>
  </TabPage>
  <TabPage Text="Tab 3">
    <h1>The third tab</h1>
  </TabPage>
</TabControl>

@code { }
在./Shared/NavMenu 中添加TabControlTest路由
省略部分代码
<div class="nav-item px-3">
  <NavLink class="nav-link" href="tabcontroltest">
    <span class="oi oi-plus" aria-hidden="true"></span> TabControl Test
  </NavLink>
</div>
省略部分代码
这样就完了吗?我们看看现在的效果:
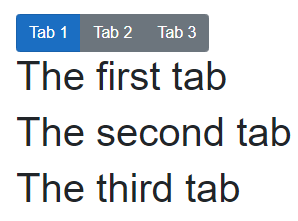
不对吧,三个TabPage的内容全部显示出来了,解决这个问题只需要在TabPage渲染ChildContent时判断当前TabPage是否为TabControl选中的页,选中项才进行渲染:
@if (Parent.ActivePage == this)
{
  @ChildContent
}
OK 代码完,效果见本文开头。
文中代码已放:GitHub