
本文是使用 WPF 做个 PowerPoint 系列的博客,本文来告诉大家如何解析 PPT 里面的文本描边效果,在 WPF 应用中绘制出来,实现像素级相同
背景知识
在开始之前,期望你了解了 PPT 解析的入门知识。如对 PPT 解析了解很少,请参阅 C# dotnet 使用 OpenXml 解析 PPT 文件
在 PPT 里面可以给文本的某些文字设置描边效果,描边效果从 OpenXML 层上是不属于特效的,只是属于边框属性。在 PPT 里面,可以给文本加上 Outline 边框属性,从而让文字描边
效果
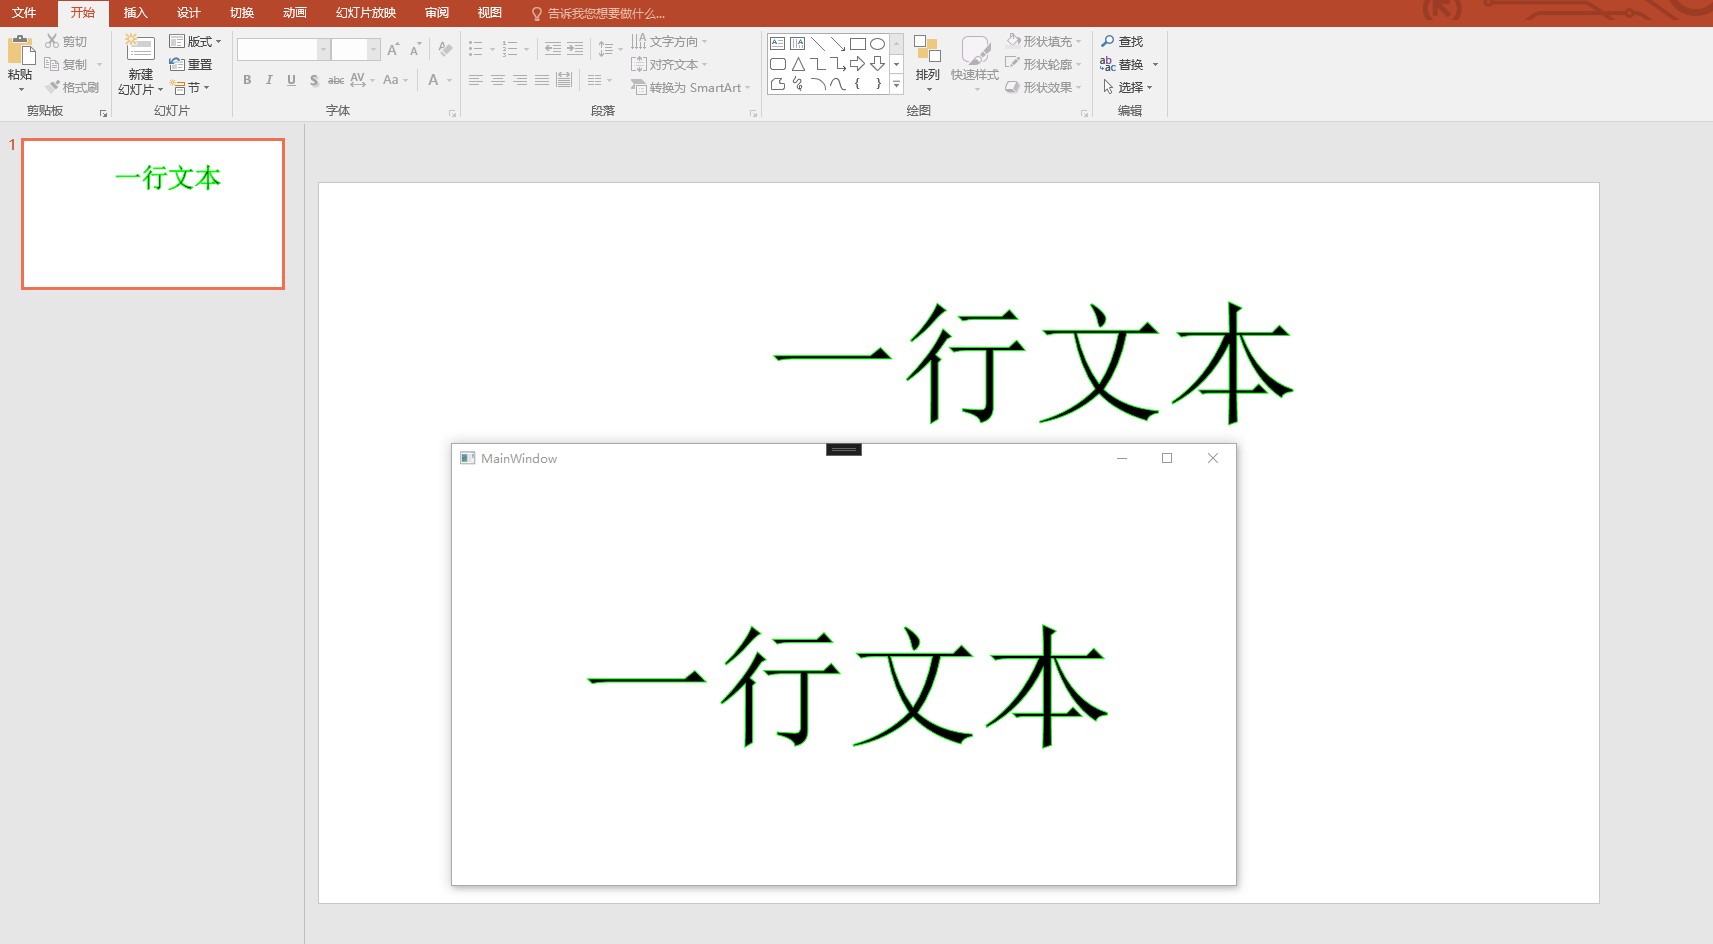
开始之前,先让大家看一下效果
解析
开始之前,先进行读取文档,代码如下。以下代码和测试文件,都可以在本文末尾获取
var file = new FileInfo("Test.pptx");

using var presentationDocument = PresentationDocument.Open(file.FullName, false);
var slide = presentationDocument.PresentationPart!.SlideParts.First().Slide;
本文以下代码,为了方便告诉大家核心部分逻辑,将根据 Test.pptx 文档进行忽略很多参数的判断。在实际项目中,还请大家自行进行参数判断逻辑
此测试文档在第一页只有一个元素,就是本文的加文本描边的元素,获取的代码如下
var shape = slide.CommonSlideData!.ShapeTree!.GetFirstChild<Shape>()!;
此 Shape 的 OpenXML 内容大概如下
<p:sp>
<p:spPr>
    <a:prstGeom prst="rect">
    </a:prstGeom>
    <a:noFill />
</p:spPr>
<p:txBody>
    <a:bodyPr wrap="square" rtlCol="0">
    <a:spAutoFit />
    </a:bodyPr>
    <a:lstStyle />
    <a:p>
    <a:r>
        <a:rPr lang="zh-CN" altLang="en-US" sz="10000">
        <a:ln w="9525">
            <a:solidFill>
            <a:srgbClr val="00FF00" />
            </a:solidFill>
        </a:ln>
        </a:rPr>
        <a:t>一行文本</a:t>
    </a:r>
    <a:endParaRPr lang="en-US" sz="10000" dirty="0" />
    </a:p>
</p:txBody>
</p:sp>
在 PPT 里面的文本框也是形状,是默认的矩形
var shapeProperties = shape.ShapeProperties!;
var presetGeometry = shapeProperties.GetFirstChild<PresetGeometry>()!;
// 这是一个文本框
Debug.Assert(presetGeometry.Preset?.Value == ShapeTypeValues.Rectangle);
Debug.Assert(shapeProperties.GetFirstChild<NoFill>() is not null);
以上只是告诉大家可以如何获取形状,需要在自己的业务代码里面,进行判断
获取文本框的文本,可以使用如下代码
var textBody = shape.TextBody!;
Debug.Assert(textBody != null);
一个文本里面有很多段落,段落里面,文本有不同的样式,如一段可以有不同加粗的文本。相同的样式的文本放在一个 TextRun 里面。不同的样式的文本放在不同的 TextRun 里面
因此解析需要先遍历段落,再遍历 TextRun 元素
foreach (var paragraph in textBody.Elements<DocumentFormat.OpenXml.Drawing.Paragraph>())
{
    // 这个文本段落是没有属性的,为了方便样式,就不写代码
    //if (paragraph.ParagraphProperties != null)

    foreach (var run in paragraph.Elements<DocumentFormat.OpenXml.Drawing.Run>())
    {
    }
}
获取 TextRun 的属性如下
var runProperties = run.RunProperties!;
此属性上可以拿到当前文本的字号等信息,代码如下
var fontSize = new PoundHundredfold(runProperties.FontSize!.Value).ToPound();
接下来是本文的核心,获取 Outline 属性,代码如下
var outline = runProperties.Outline!;
对应的 OpenXML 代码如下
<a:ln w="9525">   <a:solidFill>
     <a:srgbClr val="00FF00" />
   </a:solidFill>
 </a:ln>
咱所关注基本只有粗细和颜色,获取方法分别如下
var outlineWidth = new Emu(outline.Width!.Value);
获取颜色的代码如下
var solidFill = outline.GetFirstChild<SolidFill>()!;
var rgbColorModelHex = solidFill.GetFirstChild<RgbColorModelHex>()!;
var colorText = rgbColorModelHex.Val!;
通过 win10 uwp 颜色转换 的方法可以将 colorText 转换为 SolidColorBrush 对象
再获取文本内容,大概就完成了
// 默认字体前景色是黑色

var text = run.Text!.Text;
接下来就是在界面绘制
绘制
如 WPF 文字描边 博客,先通过 FormattedText 构建出 Geometry 对象,再通过 Geometry 对象进行绘制
代码如下
var formattedText = new FormattedText(text, CultureInfo.CurrentCulture,
FlowDirection.LeftToRight,
new Typeface
(
    // 默认是宋体
    new FontFamily("宋体"),
    FontStyles.Normal,
    FontWeights.Normal,
    FontStretches.Normal
),
// 在 WPF 里面,采用的是 EM 单位,约等于像素单位
    fontSize.ToPixel().Value,
Brushes.Black, 96);
通过 FormattedText 构建出 Geometry 对象代码如下
var geometry = formattedText.BuildGeometry(new ());
接着通过 System.Windows.Shapes.Path 将 Geometry 绘制到界面上
var path = new System.Windows.Shapes.Path
{
    Data = geometry,
    Fill = Brushes.Black,
    Stroke = BrushCreator.CreateSolidColorBrush(colorText),
    StrokeThickness = outlineWidth.ToPixel().Value,

    HorizontalAlignment = HorizontalAlignment.Center,
    VerticalAlignment = VerticalAlignment.Center,
};

Root.Children.Add(path);
通过以上代码,即可在界面画出和 PPT 一样的界面
代码
本文所有代码和测试文件放在github 和 gitee 欢迎访问
可以通过如下方式获取本文的源代码,先创建一个空文件夹,接着使用命令行 cd 命令进入此空文件夹,在命令行里面输入以下代码,即可获取到本文的代码
git init
git remote add origin https://gitee.com/lindexi/lindexi_gd.git
git pull origin 71af5b0e47493ff7f5f43be33583265805da9d84
以上使用的是 gitee 的源,如果 gitee 不能访问,请替换为 github 的源
git remote remove origin
git remote add origin https://github.com/lindexi/lindexi_gd.git
获取代码之后,进入 Pptx 文件夹
参考
博客园博客只做备份,博客发布就不再更新,如果想看最新博客,请到 https://blog.lindexi.com/
知识共享许可协议
本作品采用 知识共享署名-非商业性使用-相同方式共享 4.0 国际许可协议 进行许可。欢迎转载、使用、重新发布,但务必保留文章署名林德熙(包含链接:http://blog.csdn.net/lindexi_gd ),不得用于商业目的,基于本文修改后的作品务必以相同的许可发布。如有任何疑问,请与我联系。