站长工作中会使用到该技术,所以转载该篇文章,大家一起了解 workflow,能够用它做什么。
文章正文如下:
最近想做一个 OA 相关的网站开发,一直都听说有 workflow 的东西,之前也断断续续学习过 Workflow Foundation 4.0,还是没有搞明白到底能够用它做什么。
但还是觉得 workflow 在某种情形下应该可以适用,虽然还没有答案,网上搜楼了一通,发现一个 workflow-core 的东西,觉得挺有意思,遂停下来,琢磨一下,现分享与大家。
简介
workflow core 的 GitHub 主页:https://github.com/danielgerlag/workflow-core
如主页上介绍的,workflow core 作为一个轻量级 workflow 引擎,可以嵌入到项目中,其底层是用.net standard 2.0 开发,可以用来追踪长时间运行的任务状态,功能也比较强大,支持插件形式持久化,和多节点并行处理,貌似很牛。并且目前有给一个 Conductor 项目,就是使用 workflow core 作为内核的 workflow 服务器(原来运行 workflow,需要单独的一个服务器啊),Conductor 这里就不展开了。workflow core 支持 fluent 语法,写起来也非常美观,虽然没有 WF 那样有图形化的操作界面,但感觉代码比较干净。
- 插播.Net Standard 2.0 简介
开始的时候不了解什么是.Net Standard 2.0,这篇文章讲得比较清楚,.Net Standard 与 .NET Framework 关系,还有这个.NET Core 2.0 是您的最好选择吗,原来微软为了统一.Net 的各种平台,出了一个.Net Standard 标准库,基于这个库开发的,可以应用于.net framework 4.6.1 以上版本,也可以应用于.net core 2.0 以上。
了解了相关内容后,直接打开说明,照着例子走一遭了。
示例 1
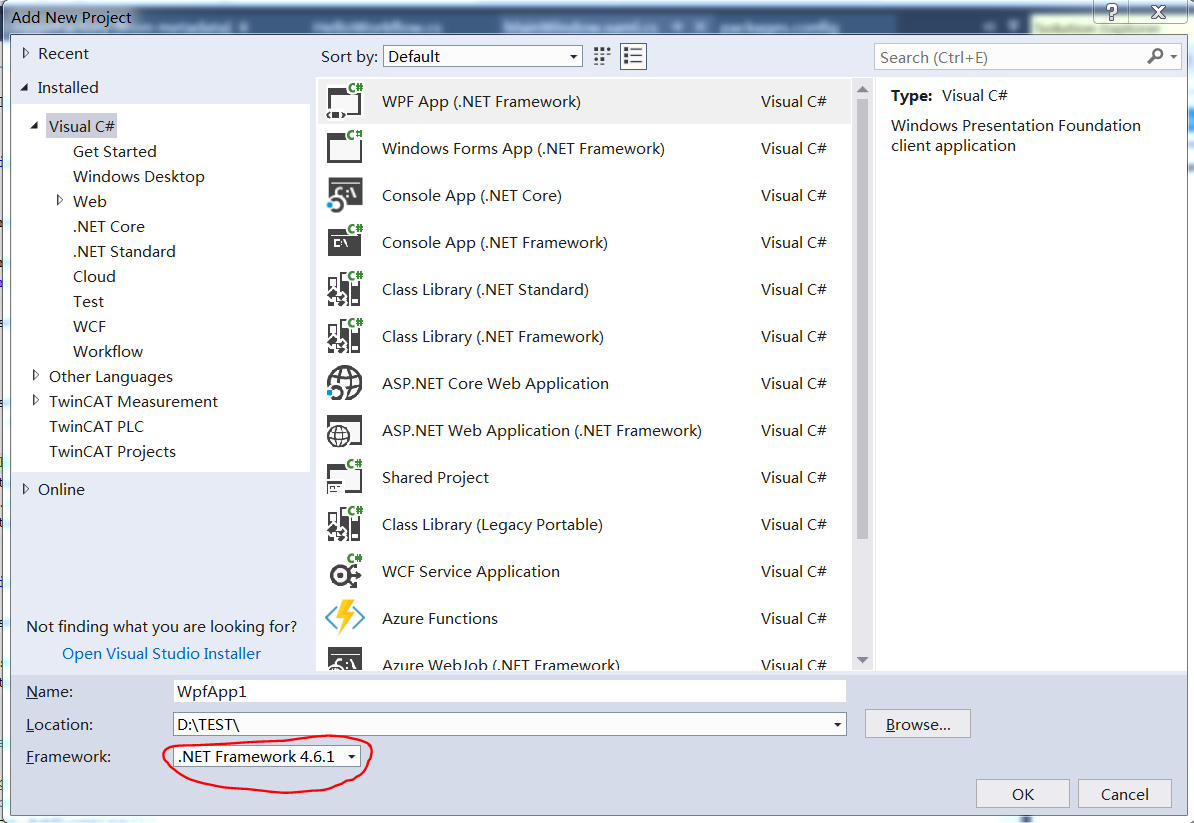
新建一个项目,指明使用.net framework 4.6.1 以上,新建项目后,在 Package Manager Console 中,安装 workflow core:Install-Package WorkflowCore,安装这个包会默认安装一系列的依赖包。
可能由于版本的关系,还需要另外安装两个包:Microsoft.Extensions.Logging 和 Microsoft.Extensions.Logging.Debug。这样就可以按照 Sample 01 开始编写代码了。
Sample01 是一个 helloworld,包含了几部分内容:
- 构建 StepBody,就是 workflow 中需要执行的内容,每个类继承自 StepBody 这个虚拟类,重载
ExecutionResult Run(IStepExecutionContext context),这个函数中完成所需的工作
public class HelloWorld : StepBody
{
    private ILogger logger;

    public HelloWorld(ILoggerFactory loggerFactory)
    {
        logger = loggerFactory.CreateLogger<HelloWorld>();
    }

    public override ExecutionResult Run(IStepExecutionContext context)
    {
        Console.WriteLine("Hello world, workflow");
        logger.LogInformation("Helloworld workflow");

        return ExecutionResult.Next();
    }
}


public class GoodbyeWorld : StepBody
{
    private ILogger logger;

    public GoodbyeWorld(ILoggerFactory loggerFactory)
    {
        logger = loggerFactory.CreateLogger<GoodbyeWorld>();
    }

    public override ExecutionResult Run(IStepExecutionContext context)
    {
        Console.WriteLine("Workflow, Goodbye");
        logger.LogInformation("Goodbye workflow");

        return ExecutionResult.Next();
    }
}

public class SleepStep : StepBody
{
    private ILogger logger;

    public SleepStep(ILoggerFactory loggerFactory)
    {
        logger = loggerFactory.CreateLogger("SleepStep");
    }

    public override ExecutionResult Run(IStepExecutionContext context)
    {
        Thread.Sleep(1000);

        logger.LogInformation("Sleeped");

        return ExecutionResult.Next();
    }
}
- 构建 workflow,实现 IWorkflow 接口,每个 workflow 有一个 Id 和一个 Version,标明这个 workflow 的身份,这里通过两种方法构建了 HelloWorkflow,
public class HelloWorkflow : IWorkflow
{
    public string Id => "HelloWorkflow";

    public int Version => 1;

    public void Build(IWorkflowBuilder<object> builder)
    {
        builder.StartWith(context =>
            {
                Console.WriteLine("Hello world");
                return ExecutionResult.Next();
            })
            .Then(context =>
            {
                Thread.Sleep(500);
                Console.WriteLine("sleeped");
                return ExecutionResult.Next();
            })
            .Then(context =>
            {
                Console.WriteLine("Goodbye world");
                return ExecutionResult.Next();
            });
    }
}

public class HelloWorkflow2 : IWorkflow
{
    public string Id => "HelloWorkflow";

    public int Version => 2;

    public void Build(IWorkflowBuilder<object> builder)
    {
        builder.StartWith<HelloWorld>()
            .Then<SleepStep>()
            .Then<GoodbyeWorld>();
    }
}
- 万事俱备,准备让 workflow 运行起来。第一步当然是需要搭建 service,Workflow Core 通过 Injection 命名空间的 ServiceCollection 添加了 Workflow 相关的服务,对于有参数的 StepBody,需要先通过 service 的 AddTransient 函数注册,这样才能正确的构造对象:
/// <summary>
/// 配置workflow
/// </summary>
/// <returns></returns>
private IServiceProvider ConfigureServices()
{
    //setup dependency injection
    IServiceCollection services = new ServiceCollection();
    services.AddLogging();
    services.AddWorkflow();
    //services.AddWorkflow(x => x.UseMongoDB(@"mongodb://localhost:27017", "workflow"));

    // 这些个构造函数带参数的,需要添加到transient中
    services.AddTransient<HelloWorld>();
    services.AddTransient<GoodbyeWorld>();
    services.AddTransient<SleepStep>();

    var serviceProvider = services.BuildServiceProvider();

    //config logging
    var loggerFactory = serviceProvider.GetService<ILoggerFactory>();
    loggerFactory?.AddProvider(new DebugLoggerProvider());

    return serviceProvider;
}
接下来,启动 workflow 主机,并启动一次 workflow,将整个窗体代码贴一下,这样比较清晰
using Microsoft.Extensions.DependencyInjection;
using System.Windows;
using Microsoft.Extensions.Logging;
using Microsoft.Extensions.Logging.Debug;
using WorkflowCore.Interface;

namespace WorkflowTest;

public partial class MainWindow : Window
{
    IServiceProvider? _serviceProvider = null;
    bool _serviceStarted = false;

    public MainWindow()
    {
        InitializeComponent();
    }

    private void StartWorkflow()
    {
        if (_serviceProvider == null)
        {
            _serviceProvider = ConfigureServices();
            var host1 = _serviceProvider.GetService<IWorkflowHost>();

            host1?.RegisterWorkflow<HelloWorkflow>();
            host1?.RegisterWorkflow<HelloWorkflow2>();
        }


        var host = _serviceProvider.GetService<IWorkflowHost>();
        var wd = host.Registry.GetDefinition("HelloWorkflow");

        // 如果host启动了,不能再次启动,但没有判断方法
        if (!_serviceStarted)
        {
            host.Start();
            _serviceStarted = true;
        }


        // 启动workflow工作流
        host.StartWorkflow("HelloWorkflow", 1, data: null); //
        //host.StartWorkflow("HelloWorkflow");//, 2, data: null, 默认会启用版本高的
    }

    private void StopWorkflow()
    {
        var host = _serviceProvider.GetService<IWorkflowHost>();

        host?.Stop();
        _serviceStarted = false;
    }

    /// <summary>
    /// 配置workflow
    /// </summary>
    /// <returns></returns>
    private IServiceProvider ConfigureServices()
    {
        //setup dependency injection
        IServiceCollection services = new ServiceCollection();
        services.AddLogging();
        services.AddWorkflow();
        //services.AddWorkflow(x => x.UseMongoDB(@"mongodb://localhost:27017", "workflow"));

        // 这些个构造函数带参数的,需要添加到transient中
        services.AddTransient<HelloWorld>();
        services.AddTransient<GoodbyeWorld>();
        services.AddTransient<SleepStep>();

        var serviceProvider = services.BuildServiceProvider();

        //config logging
        var loggerFactory = serviceProvider.GetService<ILoggerFactory>();
        loggerFactory?.AddProvider(new DebugLoggerProvider());

        return serviceProvider;
    }

    private void startButton_Click(object sender, RoutedEventArgs e)
    {
        StartWorkflow();
    }

    private void stopButton_Click(object sender, RoutedEventArgs e)
    {
        StopWorkflow();
    }
}
就这样一个简单的 Workflow Core 例子就完成了,总体来说,还是很简单,清晰的。
本文来自转载。
作者:Jimmy.Tang
原文标题:一个适合于.NET Core 的超轻量级工作流引擎:Workflow-Core
原文链接:https://www.cnblogs.com/keep-study-to-die/p/12001408.html
站长注:文中代码其实引用了不少包,但原文未说全,站长测试时已将包补全,测试代码见:https://github.com/dotnet9/TerminalMACS.ManagerForWPF/tree/master/src/Demo/WorkflowTest