
昨天看到FetchData.razor的代码太长了,为求方便,我们把@code的部分抽取出来另成一个文件。
Blazor 提供了两个方法:partial class跟ComponentBase,同样两者各有优缺点,笔者偏好ComponentBase,看个人使用习惯。
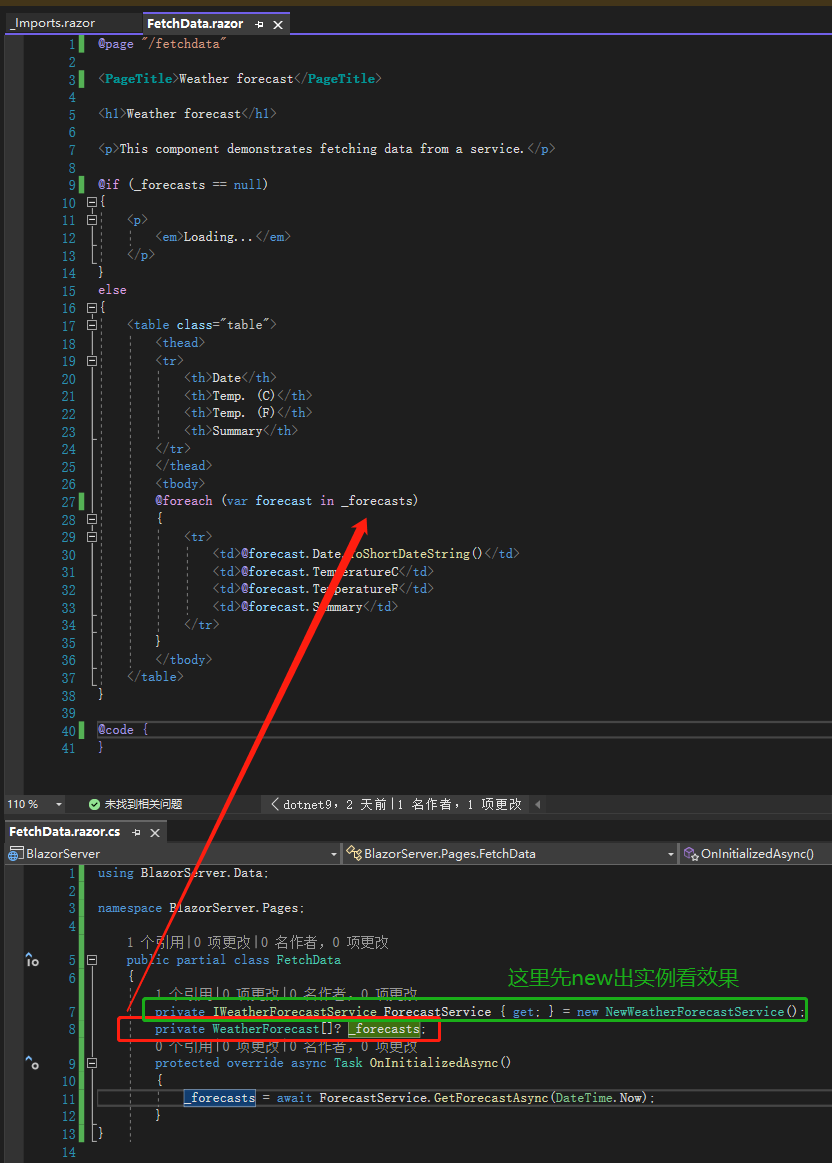
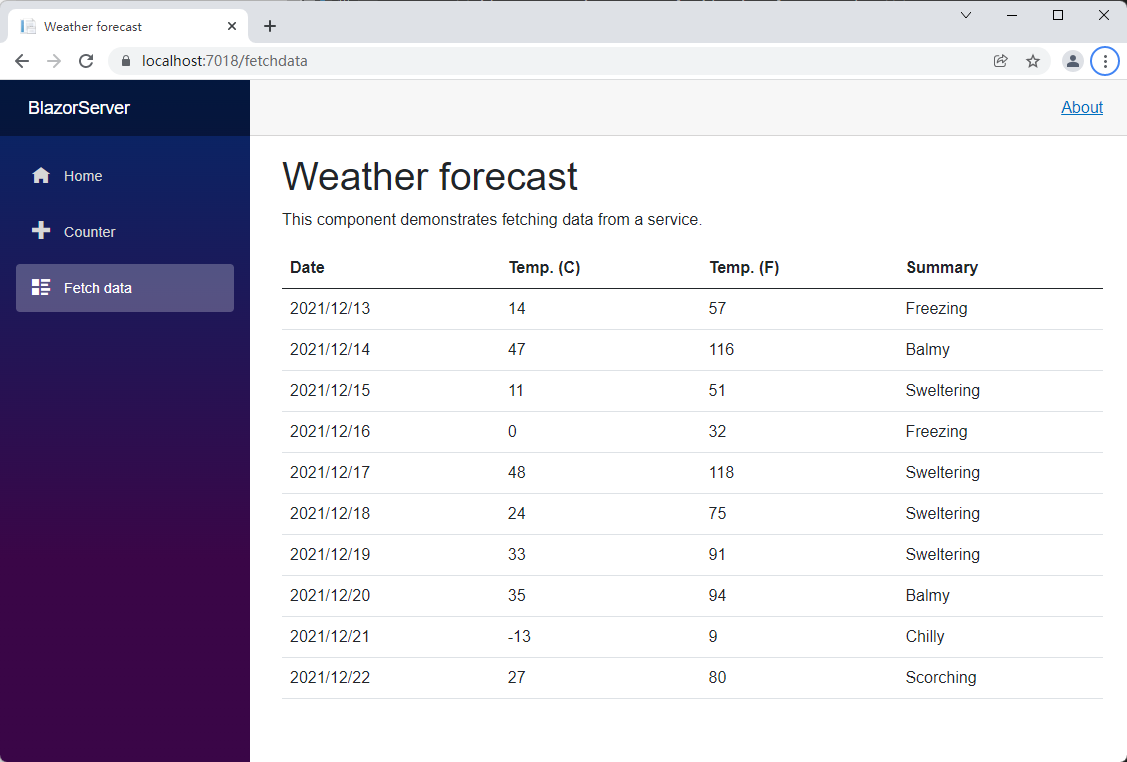
先来看partial class,我们打开FetchData.razor,把前面提到的@using BlazorServer.Data移到_Imports.razor,再建立一个class叫做FetchData.razor.cs,在public跟class中间加上partial修饰词,接着把FetchData.razor的@code区块剪切贴到FetchData.razor.cs后稍作修改,可以看出跟旧的 C#代码没什么差别。我们按下 F5,一样看到 10 条天气数据。
原 FetchData.razor:

提取 C#代码后代码截图:
页面展示不变:
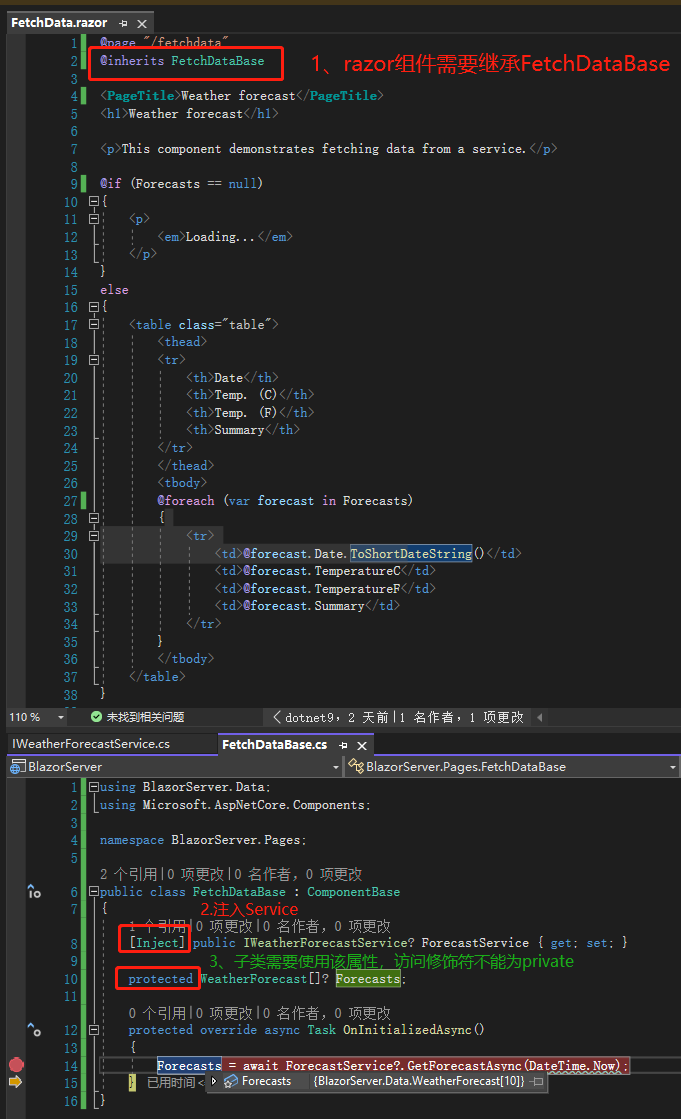
接着来看ComponentBase,先把partial class里面的代码复制下来,接着建立一个新 class 取名为FetchDataBase.cs,将刚刚的代码贴上后稍做修改,再删除FetchData.razor.cs这个 partial class,因为两种模式不能并存。可以看到除了继承ComponentBase跟加上[Inject]外,几乎没有差别,这里的[Inject]相当于在FetchData.razor.cs使用@inject WeatherForecastService ForecastService,我们按下 F5 启动调试模式,在 14 行左边按一下点击中断点,可以看到一样取得了天气数据。
使用 ComponentBase:
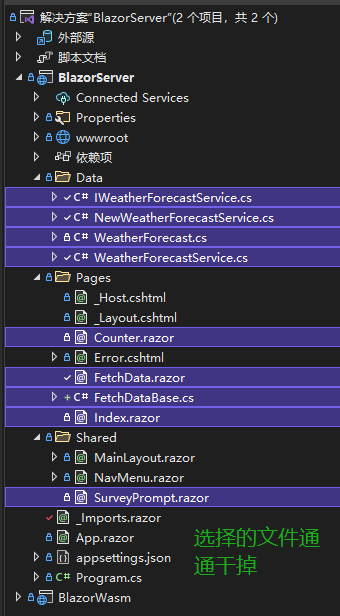
接着开始做自己的 Component 吧!先将不必要的 Component 删除,Program.cs 和_Import.razor 里面跟天气有关的 using 及注册同样删除,如果忘记这两个文件在哪里,可以在删除 Component 后将滑鼠移到项目 BlazorServer 点右键,选取重建项目,Visual Studio 就会告诉你哪里出错了。
删除多余组件等文件:
之前说过要完成让使用者写日志的网站,所以需要最基本的输入框,而日志的单位就以一篇计算。首先建立 Models 文件夹,建立PostModel类型,里面很简单只有 3 个属性,接着在 Pages 文件夹建立Post.razor跟PostBase.razor.cs,最后将NavMenu.razor的连接留下一个,href属性的值改为Post。
/Models/PostModel.cs
namespace BlazorServer.Models;

public class PostModel
{
	public int Id { get; set; }

	public string? Title { get; set; }

	public string? Content { get; set; }
}
/Shared/NavMenu.razor:
<div class="@NavMenuCssClass" @onclick="ToggleNavMenu">
  <nav class="flex-column">
    <div class="nav-item px-3">
      <NavLink class="nav-link" href="/Post" Match="NavLinkMatch.All">
        <span class="oi oi-home" aria-hidden="true"></span> Post
      </NavLink>
    </div>
  </nav>
</div>
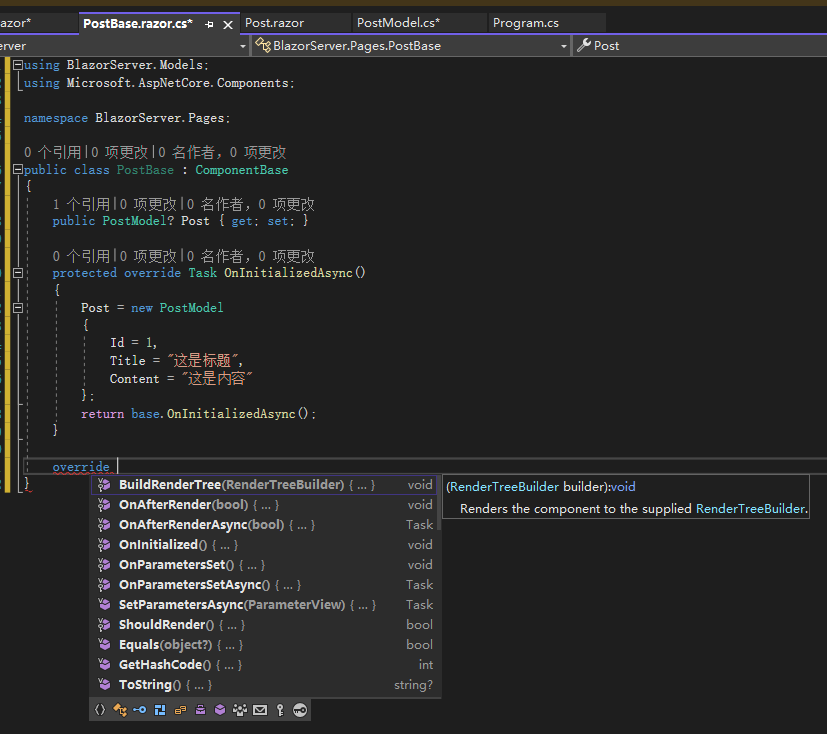
PostModel是用来承接数据的容器,目前没有 Service,所以在PostBase.razor.cs放一笔假数据,这边可以看到一个方法OnInitializedAsync(),代表当这个 Component 生命周期开始,里面的事情就会先做,其他还有OnAfterRenderAsync、OnParametersSetAsync等等,只要先输入 override 再按一下空白键,就可以看到这些方法,且也有同步跟异步两种模式,这些方法有机会再说明。
而Post.razor用了EditForm这个 Component,编译过后相当于 html 的 form 元素,里面还有 3 个 input 元素,Blazor 也有提供相对应的 Input Component,可以从官方文件看到分别编译后的 html 元素。
@page "/Post" @inherits PostBase

<EditForm Model="@Post">
  <input type="number" value="@Post!.Id" />
  <input type="text" value="@Post!.Title" />
  <textarea value="@Post!.Content"></textarea>

  <button type="submit">Submit</button>
</EditForm>
上下两种写法对比:
@page "/Post" @inherits PostBase

<EditForm Model="@Post">
  <InputNumber @bind-Value="Post!.Id"></InputNumber>
  <InputText @bind-Value="Post!.Title"></InputText>
  <InputTextArea @bind-Value="Post!.Content"></InputTextArea>

  <button type="submit">Submit</button>
</EditForm>
Blazor 提供相对应的 Input Component:

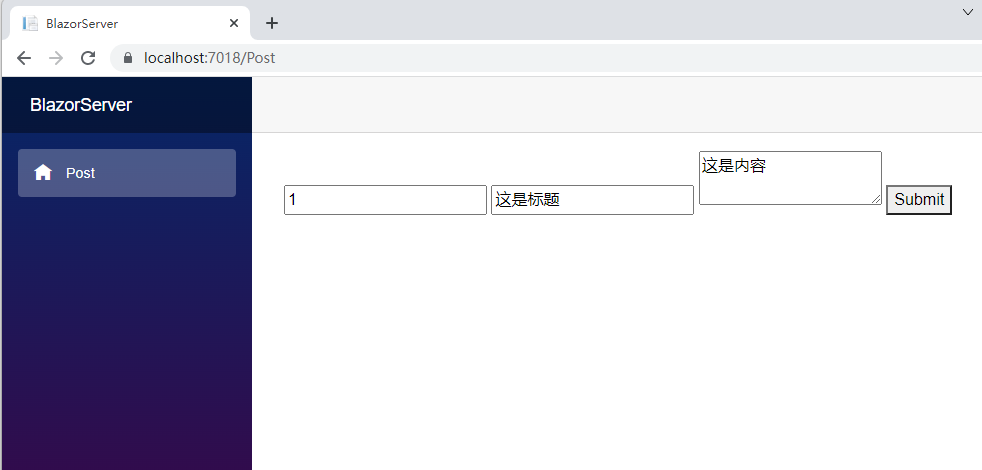
这时候打开网页来看,可以看到上面出现了我们定义在PostBase.razor.cs的值,但这是怎么连接起来的呢?原因就是 EditForm 的 Model 属性及 3 个<Input>Component 的属性@bind-Value,这里在告诉 Blazor:我的 Model 跟里面的值要跟这个 EditForm 绑在一起,如果这里有跟后端代码连接,网页上输入的内容经过事件触发后,就会提交后端处理。
不过<Input>预设的 CSS 样式不太好看,我们先套用基本的 boostrap 样式;因为 Id 通常不会让使用者输入,所以这边先注释,然后再加入表格验证机制,毕竟不能让使用者随便输入就提交表格,但如果不想自己写一堆验证机制呢?可以试试看 Blazor 的DataAnnotationsValidator及ValidationSummary两个 Component。

我们先在 PostModel 的 Title 跟 Content 加上两个 Attribute,Required 代表必填,MaxLength 及 MinLength 则是限制最大及最小字数,还可以自定义错误信息。接着在 EditForm 里面加上那两个 ComponentDataAnnotationsValidator 及 ValidationSummary,第一个是验证各个 Input,第二个则是将错误信息显示在表格上方。

但如果不喜欢验证机制预设的 CSS 样式呢?Blazor 也提供了定制化的方法。先建立一个class名为CustomFieldClassProvider且继承FieldCssClassProvider,重载方法GetFieldCssClass,里面的内容待会再说。
using Microsoft.AspNetCore.Components.Forms;

namespace BlazorServer;

public class CustomFieldClassProvider : FieldCssClassProvider
{
	public override string GetFieldCssClass(EditContext editContext, in FieldIdentifier fieldIdentifier)
	{
		var isValid = !editContext.GetValidationMessages(fieldIdentifier).Any();

		return isValid ? "text-primary" : "text-danger";
	}
}
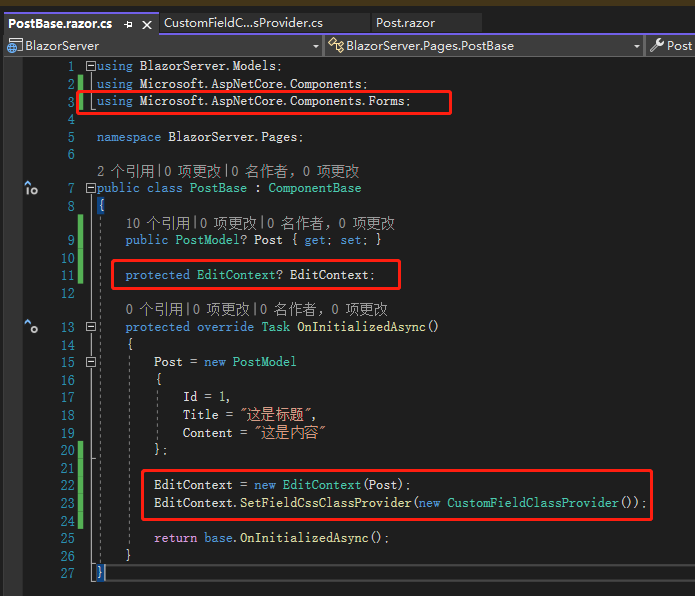
接着在PostBase.razor.cs加入一个类型为EditContext的字段EditContext,初始化字段EditContext,将原本的Post字段丢进去,然后调用EditContext的方法SetFieldCssClassProvider,添加CustomFieldClassProvider实例。
最后最重要的一步,在Post.razor将EditForm的Model参数移除,改为EditContext参数,里面的值就是刚刚的EditContext字段。
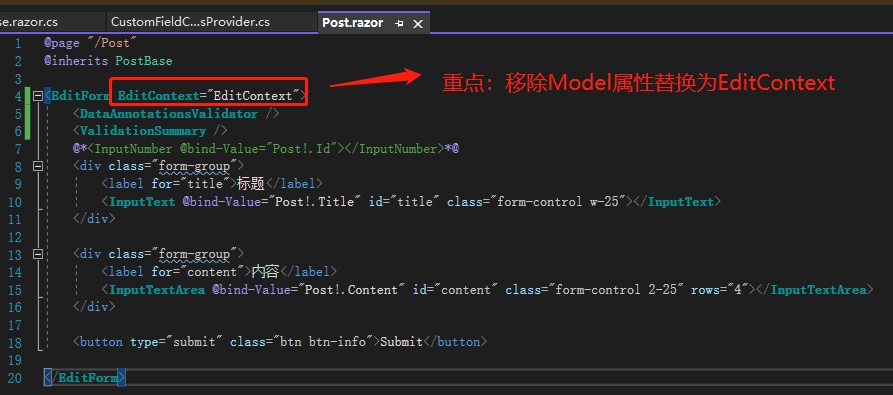
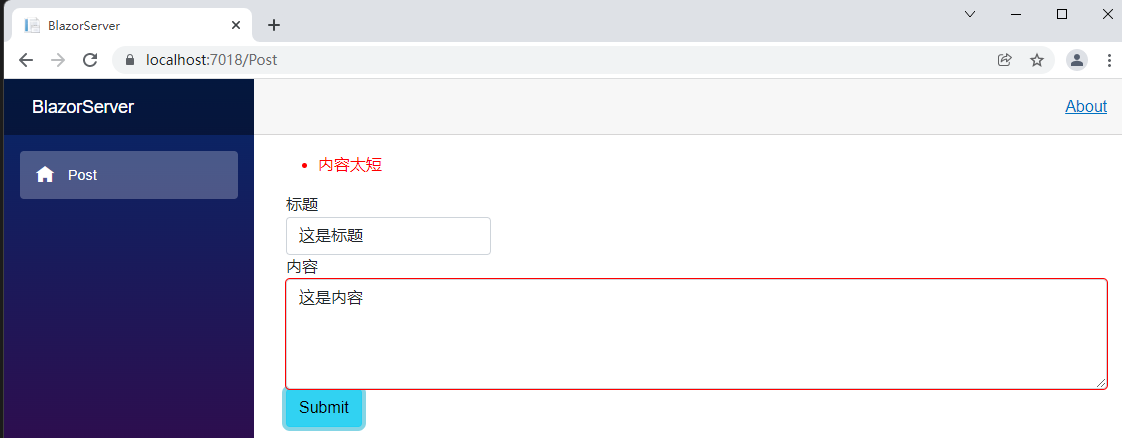
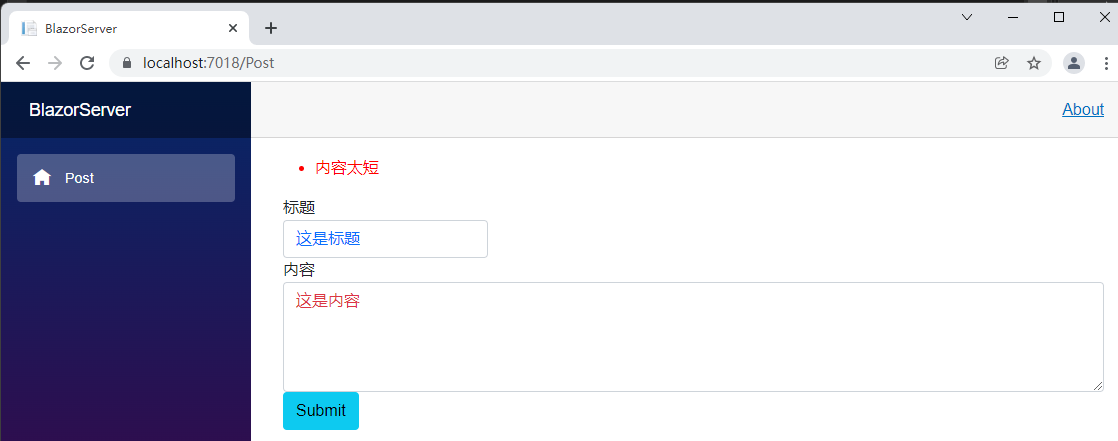
这时候再提交表单一次,可以看到 textarea 的红色外框消失了,字体也变成text-danger的红色,而正确的字段值则是变成text-primary的蓝色。我们再回头看CustomFieldClassProvider,原来EditContext指的就是EditForm的内容,fieldIdentifier则是当前验证的Input标签,如果EditContext调用的方法GetValidationMessages有在fieldIdentifier取得任何信息,代表这是错误的字段值,没有则是正确字段值,这就是 Blazor 帮我们定制化 Form 的作法。
引用:
- Split HTML And C# Code In Blazor Using Either Partial Class Or ComponentBase Class
- ASP.NET Core Blazor forms and validation
- Custom validation CSS class attributes
注:本文代码通过 .NET 6 + Visual Studio 2022 重构,可点击原文链接与重构后代码比较学习,谢谢阅读,支持原作者
- 本文 Markdown:点击浏览