
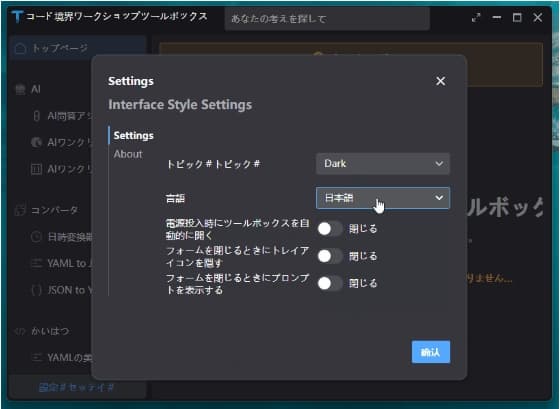
在软件开发日益全球化的今天,Avalonia 的国际化实现策略成为了众多开发者关注的焦点。继上一篇 Avalonia 国际化之路:Resx 资源文件的深度应用与探索 之后,本文将引领大家深入探究如何运用自定义 XML 文件来达成 Avalonia 国际化的目标,开启一段全新的技术探索之旅。
1. XML 实现 Avalonia UI 国际化的优势剖析
1.1. 突破维护局限,拥抱用户定制
Resx 资源文件往往将维护权限局限于开发端,而自定义 XML 语言文件则以其独特的灵活性脱颖而出。它能够与可执行程序一同输出,这一特性为用户侧的语言文件修改开辟了广阔的空间。用户不仅可以根据自身需求对已有语言内容进行调整,还能够轻松地扩展更多语言种类,使软件的国际化适应能力得到极大的提升,真正实现了从开发主导到用户参与的转变。
1.2. 命名空间加持,结构清晰有序
自定义 XML 文件采用命名空间的方式来组织语言内容,这一设计理念与类的结构形成了精准的对应关系。通过这种方式,整个翻译文件的架构变得清晰明了,易于管理与维护。无论是在大型项目中进行团队协作开发,还是在后期的代码维护与升级过程中,都能够显著提高工作效率,减少因结构混乱而可能引发的错误与困扰。
1.3. AI 翻译便捷,助力语言转换
在当今人工智能蓬勃发展的时代,XML 文件在 AI 翻译方面展现出了得天独厚的优势。借助特定的工具或平台,我们可以方便地利用 AI 技术对 XML 翻译文件进行处理。例如,只需提供简单的提示词,就能快速获取多种语言版本的翻译结果,为跨语言交流与软件全球化推广提供了强有力的支持。
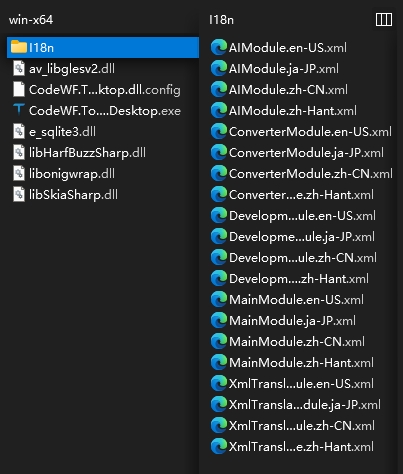
下图为输出的 XML 语言文件:
2. XML 文件的创建与架构设计
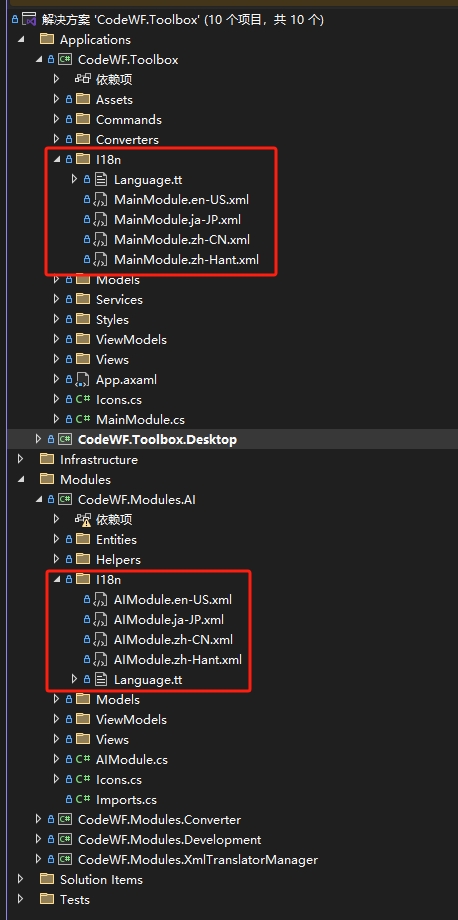
2.1. 精心规划语言文件夹
首先,我们需要创建一个专门用于存放语言文件的文件夹,例如命名为 “i18n”。在这个过程中,需要特别注意的是,相同输出路径下不同模块的 XML 文件名必须保持唯一性。因为在程序编译输出时,如果存在同名的 XML 文件,将会导致文件替换,进而造成语言信息的丢失,这无疑会给国际化进程带来严重的阻碍。
文件前缀可以工程名命名(方便区分),后缀为语言文化名
以下是创建语言文件夹后的工程结构示例图:
编译输出后文件列表如下:
AIModule.en-US.xml
AIModule.ja-JP.xml
AIModule.zh-CN.xml
AIModule.zh-Hant.xml
ConverterModule.en-US.xml
ConverterModule.ja-JP.xml
ConverterModule.zh-CN.xml
ConverterModule.zh-Hant.xml
DevelopmentModule.en-US.xml
DevelopmentModule.ja-JP.xml
DevelopmentModule.zh-CN.xml
DevelopmentModule.zh-Hant.xml
MainModule.en-US.xml
MainModule.ja-JP.xml
MainModule.zh-CN.xml
MainModule.zh-Hant.xml
XmlTranslatorManagerModule.en-US.xml
XmlTranslatorManagerModule.ja-JP.xml
XmlTranslatorManagerModule.zh-CN.xml
XmlTranslatorManagerModule.zh-Hant.xml
2.2. 严谨构建 XML 文件内容
以下是上面一个 XML 文件内容(AIModule.zh-CN.xml):
<?xml version="1.0" encoding="utf-8"?>

<Localization language="Chinese (Simplified)" description="中文简体" cultureName="zh-CN">
	<AIModule>
		<Title>AI</Title>
	</AIModule>
	<AskBotView>
		<Title>智能问答助手</Title>
		<Description>一键提问,即刻获取答案,智能问答助手为您解惑。</Description>
	</AskBotView>
	<PolyTranslateView>
		<Title>AI一键多语种翻译神器</Title>
		<Description>轻松实现一键翻译,支持多种语言互译,让沟通无界限!</Description>
	</PolyTranslateView>
	<Title2SlugView>
		<Title>AI一键转URL Slug</Title>
		<Description>轻松将中文、英文等文章标题一键转换成英文URL Slug。</Description>
	</Title2SlugView>
	<ChoiceLanguagesView>
		<LanguageKey>语言</LanguageKey>
		<Selectable>可选择的</Selectable>
		<Selected>已选择</Selected>
	</ChoiceLanguagesView>
</Localization>
XML 文件的内容结构遵循一定的规范与层次。推荐采用三层结构来组织信息:
2.2.1. 第一层:Localization 节点
此节点包含三个重要的子属性:
- language:用于明确指定语言的名称,例如 “Chinese (Simplified)” 表示简体中文。
- description:对该语言的简要描述,如 “中文简体”,以便于开发者和用户快速了解语言的基本特征。
- cultureName:语言的文化名,这是一个在国际化处理中非常关键的标识,例如 “zh-CN” 代表简体中文的文化区域。如果对文化名不太清楚,可以通过百度搜索等方式获取准确信息。
以下是一个基本的 XML 文件框架示例:
<?xml version="1.0" encoding="utf-8"?>

<Localization language="Chinese (Simplified)" description="中文简体" cultureName="zh-CN">
  <!-- 此处将填充具体的模块和语言键值对 -->
</Localization>
2.2.2. 第二层:功能名或类名节点
这一层以功能名或类名来命名节点,其目的在于对翻译文件进行有效的功能归类。例如,在一个包含 AI 模块、转换模块等的项目中,可以分别创建 “AIModule”、“ConverterModule” 等节点,将与各个模块相关的翻译内容分别放置在对应的节点下,使整个文件的结构更加清晰,便于管理与查找。
以下是一个包含多个模块节点的 XML 文件示例:
<?xml version="1.0" encoding="utf-8"?>

<Localization language="Chinese (Simplified)" description="中文简体" cultureName="zh-CN">
  <AIModule>
    <!-- AI 模块相关的翻译内容 -->
  </AIModule>
  <ConverterModule>
    <!-- 转换模块相关的翻译内容 -->
  </ConverterModule>
</Localization>
2.2.3. 第三层:语言 Key 节点
最后一层为语言 Key 节点,这些节点直接存储了具体的翻译文本内容。例如:
<?xml version="1.0" encoding="utf-8"?>

<Localization language="Chinese (Simplified)" description="中文简体" cultureName="zh-CN">
  <AIModule>
    <Title>AI</Title>
  </AIModule>
  <AskBotView>
    <Title>智能问答助手</Title>
    <Description>一键提问,即刻获取答案,智能问答助手为您解惑。</Description>
  </AskBotView>
</Localization>
在实际应用中,虽然推荐采用三层结构,但 XML 节点的嵌套层数并没有严格的限制,开发者可以根据项目的实际需求和复杂程度进行灵活调整。例如:
<?xml version="1.0" encoding="utf-8"?>

<Localization language="Chinese (Simplified)" description="中文简体" cultureName="zh-CN">
	<AIModule>
		<Title>AI</Title>
	</AIModule>
    <AI>
        <AskBotView>
            <Title>智能问答助手</Title>
            <Description>一键提问,即刻获取答案,智能问答助手为您解惑。</Description>
        </AskBotView>
    </AI>
    <Translate>
        <Baidu>
            <PolyTranslateView>
                <Title>AI一键多语种翻译神器</Title>
                <Description>轻松实现一键翻译,支持多种语言互译,让沟通无界限!</Description>
            </PolyTranslateView>
        </Baidu>
        <Google>
        	<PolyTranslateView>
                <Title>AI一键多语种翻译神器</Title>
                <Description>轻松实现一键翻译,支持多种语言互译,让沟通无界限!</Description>
            </PolyTranslateView>
        </Google>
    </Translate>
</Localization>
3. 语言文件的强类型生成策略
为了在代码中更加方便、高效地使用 XML 翻译文件,我们采用 T4 文件将 XML 转换为 C# 的强类型。具体操作如下:
在 “i18n” 目录下创建一个 T4 文件,例如命名为 “Language.tt”,并在其中填入以下代码:
<#@ template debug="false" hostspecific="true" language="C#" #>
<#@ assembly name="System.Core" #>
<#@ assembly name="System.Xml" #>
<#@ assembly name="System.Xml.Linq" #>
<#@ import namespace="System.Linq" #>
<#@ import namespace="System.Text" #>
<#@ import namespace="System.Collections.Generic" #>
<#@ import namespace="System.Xml.Linq" #>
<#@ import namespace="System.IO" #>
<#@ output extension=".cs" #>
//------------------------------------------------------------------------------
// <auto-generated>
//     This code was generated by a tool.
//     Changes to this file may cause incorrect behavior and will be lost if
//     the code is regenerated.
// </auto-generated>
//------------------------------------------------------------------------------
<#
    string templateDirectory = Path.GetDirectoryName(Host.TemplateFile);
    string xmlFilePath = Directory.GetFiles(templateDirectory, "*.xml").FirstOrDefault();
    if (xmlFilePath!= null)
    {
        XDocument xdoc = XDocument.Load(xmlFilePath);
        var classNodes = xdoc.Nodes().OfType<XElement>().DescendantsAndSelf().Where(e => e.Descendants().Count() == 0).Select(e => e.Parent).Distinct().ToList();
        foreach (var classNode in classNodes)
        {
            var namespaceSegments = classNode.Ancestors().Reverse().Select(node => node.Name.LocalName);
            string namespaceName = string.Join(".", namespaceSegments);
            GenerateClasses(classNode, namespaceName);
        }
    }
    else
    {
        Write("XML file not found, please ensure that there is an XML file in the current directory");
    }

    void GenerateClasses(XElement element, string namespaceName)
    {
        string className = element.Name.LocalName;
        StringBuilder classBuilder = new StringBuilder();
        classBuilder.AppendLine($"namespace {namespaceName}");
        classBuilder.AppendLine("{");
        classBuilder.AppendLine($"    public static class {className}");
        classBuilder.AppendLine("    {");
        var fieldNodes = element.Elements();
        foreach (var fieldNode in fieldNodes)
        {
            var propertyName = fieldNode.Name.LocalName;
            var languageKey = $"{namespaceName}.{className}.{propertyName}";
            classBuilder.AppendLine($"        public static readonly string {propertyName} = \"{languageKey}\";");
        }
        classBuilder.AppendLine("    }");
        classBuilder.AppendLine("}");
        Write(classBuilder.ToString());
    }
#>
每次对 XML 文件进行修改后,只需打开该 T4 文件并执行一次保存操作,系统将会自动生成或更新对应的 C# 类。例如:
//...
namespace Localization
{
    public static class AIModule
    {
        public static readonly string Title = "Localization.AIModule.Title";
    }
}
namespace Localization
{
    public static class AskBotView
    {
        public static readonly string Title = "Localization.AskBotView.Title";
        public static readonly string Description = "Localization.AskBotView.Description";
    }
}
//...
这些生成的强类型类将为我们在后续的代码编写中提供极大的便利,使我们能够更加准确、便捷地获取和使用翻译文本。
4. XML 文件在 Avalonia 中的具体应用实践
4.1. 安装必备 NuGet 包
Install-Package AvaloniaXmlTranslator
这一步骤将为我们的项目引入必要的功能组件,为后续的国际化操作奠定基础。
4.2. 动态获取语言列表
在 Avalonia 应用中,动态获取程序配置的语言列表是实现国际化界面切换的关键步骤之一。通过以下代码,我们可以轻松地获取语言列表:
List<LocalizationLanguage> languages = I18nManager.Instance.Resources.Select(kvp => kvp.Value).ToList();
其中,“LocalizationLanguage” 类定义如下:
public class LocalizationLanguage
{
    public string Language { get; set; } = (string) null;

    public string Description { get; set; } = (string) null;

    public string CultureName { get; set; } = (string) null;

    //...
}
获取到语言列表后,我们可以将其用于界面绑定,例如在下拉菜单中显示可供用户选择的语言选项,或者在其他需要展示语言信息的界面元素中进行数据绑定。
4.3. 动态切换语言
当用户在界面中选择了不同的语言后,我们需要在代码中实现语言的动态切换。以下是实现语言切换的代码示例:
var culture = new CultureInfo(language);
I18nManager.Instance.Culture = culture;
这里的 “language” 参数为 “LocalizationLanguage” 类的 “CultureName” 属性值,通过设置当前线程的文化信息,我们可以实现界面语言的即时切换,为用户提供无缝的国际化体验。
4.4. 代码中使用翻译字符串
在代码中,我们可以根据强类型 Key 方便地获取当前语言文化的翻译字符串。例如:
var title = I18nManager.GetString(Localization.AskBotView.Title); // 获取当前语言
var titleZhCN = I18nManager.Instance.GetResource(Localization.Main.MainView.Title, "zh-CN");	// 获取中文简体
var titleEnUS = I18nManager.Instance.GetResource(Localization.Main.MainView.Title, "en-US");	// 获取英文
通过这种方式,我们可以在代码的任何地方灵活地使用翻译文本,确保界面显示的内容与用户选择的语言相匹配。
下面是代码中绑定使用:
//...
 var header = item is UserControl { DataContext: ITabItemBase tabItem }
     ? tabItem.TitleKey
     : item?.GetType().ToString();
 var newTabItem = new TabItem { Content = item };
 newTabItem.Bind(TabItem.HeaderProperty, new I18nBinding(header));
 regionTarget.Items.Add(newTabItem);
//...
4.5. Axaml 界面中的应用
在 Axaml 界面中使用 XML 翻译文件也非常便捷。首先,需要引入相应的命名空间:
xmlns:language="clr-namespace:Localization"
xmlns:markup="https://codewf.com"
其中,“markup” 为前面安装的辅助库命名空间,它提供了 “I18n” 标记扩展帮助类,用于在界面中绑定翻译文本;“language” 为 T4 文件生成的 C# 强类型语言 Key 关联类命名空间,通过它可以与 XML 语言文件的语言 Key 进行关联。
以下是在控件中使用翻译文本的示例:
<Button
    Grid.Row="3"
    Grid.Column="1"
    Margin="10,0,0,0"
    HorizontalAlignment="Stretch"
    VerticalAlignment="Center"
    Command="{Binding RaiseChoiceLanguagesCommand}"
    Content="{markup:I18n {x:Static language:ChoiceLanguagesView.LanguageKey}}" />
在上述示例中,“Button” 控件的 “Content” 属性通过 “I18n” 标记扩展绑定到了 “ChoiceLanguagesView.LanguageKey” 对应的翻译文本上。这样,当界面语言发生变化时,按钮的显示文本也会自动更新为相应语言的翻译内容。
当然也支持指定语言:
<SelectableTextBlock u:FormItem.Label="Current Thread" Text="{markup:I18n {x:Static developModuleLanguage:Title2SlugView.Title}}" />
<SelectableTextBlock u:FormItem.Label="en-US" Text="{markup:I18n {x:Static developModuleLanguage:Title2SlugView.Title}, CultureName=en-US}" />
<SelectableTextBlock u:FormItem.Label="ja-JP" Text="{markup:I18n {x:Static developModuleLanguage:Title2SlugView.Title}, CultureName=ja-JP}" />
<SelectableTextBlock u:FormItem.Label="zh-CN" Text="{markup:I18n {x:Static developModuleLanguage:Title2SlugView.Title}, CultureName=zh-CN}" />
<SelectableTextBlock u:FormItem.Label="zh-Hant" Text="{markup:I18n {x:Static developModuleLanguage:Title2SlugView.Title}, CultureName=zh-Hant}" />
此外,Axaml 界面还支持动态 Key 的绑定,例如:
<u:Banner
    Classes.Bordered="{Binding Bordered}"
    Content="{markup:I18n {Binding SelectedMenuItem.Description}}"
    Header="{markup:I18n {Binding SelectedMenuItem.Name}}"
    Type="{Binding SelectedType}" />
在这个示例中,“Banner” 控件的 “Content” 和 “Header” 属性分别绑定到了动态的 “SelectedMenuItem.Description” 和 “SelectedMenuItem.Name” 属性上,通过 “I18n” 标记扩展实现了动态翻译文本的显示。
5. 语言管理功能的深度解析
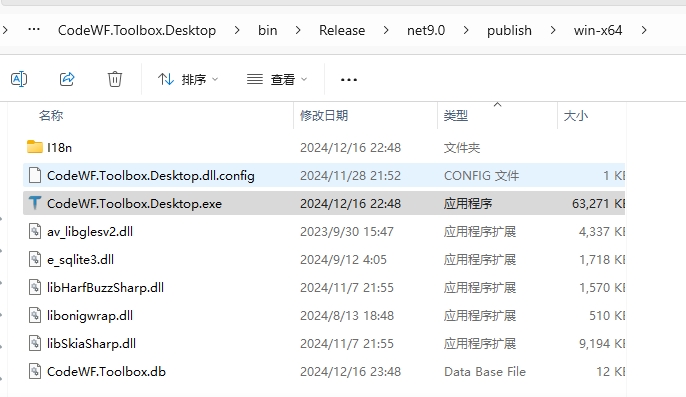
为了更好地管理 XML 语言文件,站长开发了部分管理功能,包括多模块 XML 文件合并与 XML 文件编辑,可点击下载 管理工具或自行编译 工具源码,工具程序结构如下:
5.1. 多模块 XML 文件合并
运行工具箱后,选择 “XML 国际化管理” 下的 “XML 多模块文件合并” 节点。默认情况下,将会打开工具箱自己的 “I18n” 目录(点击 “A” 可选择其他语言目录)。在界面的左侧,将会显示 XML 文件列表,点击文件即可浏览其详细内容。
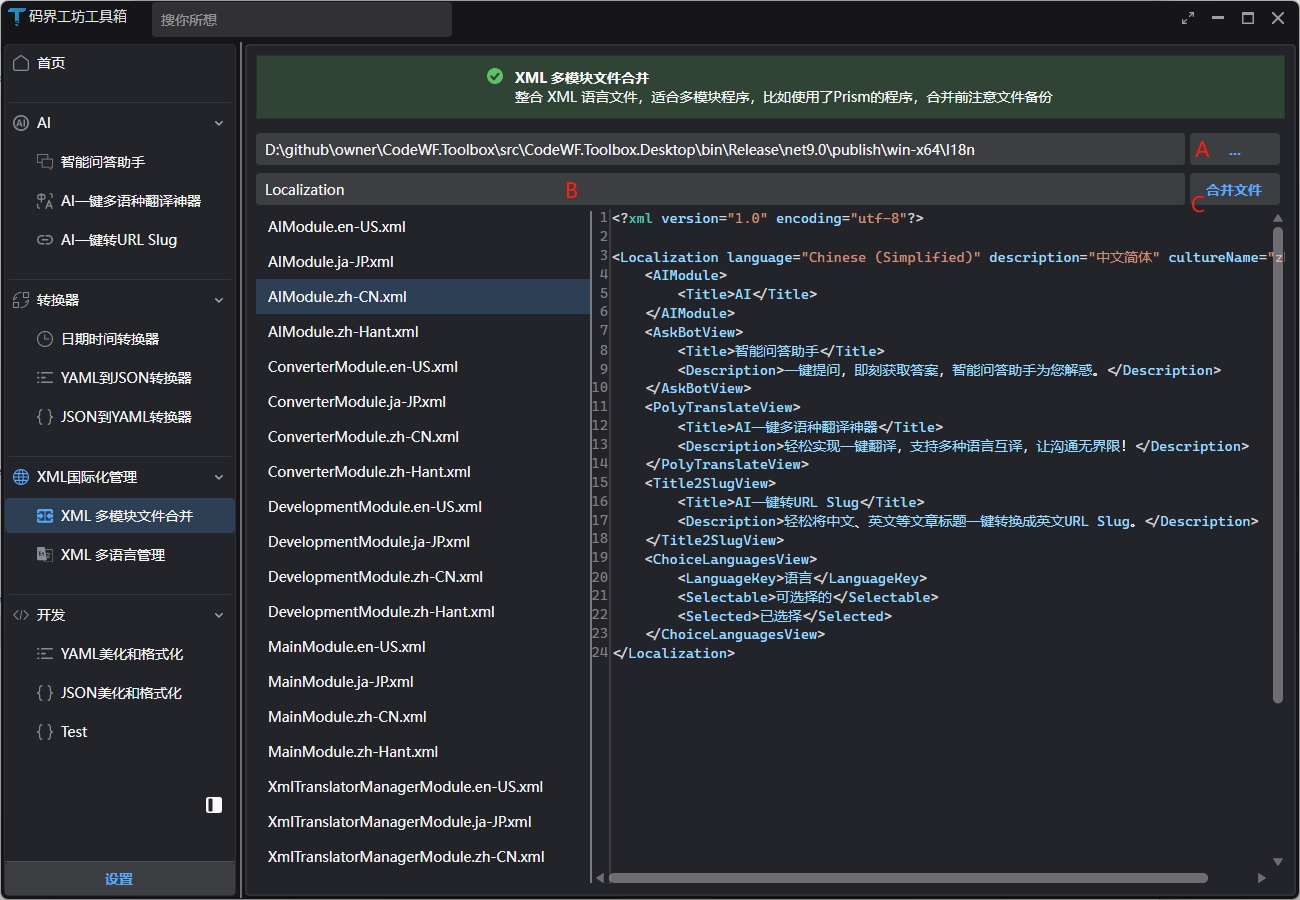
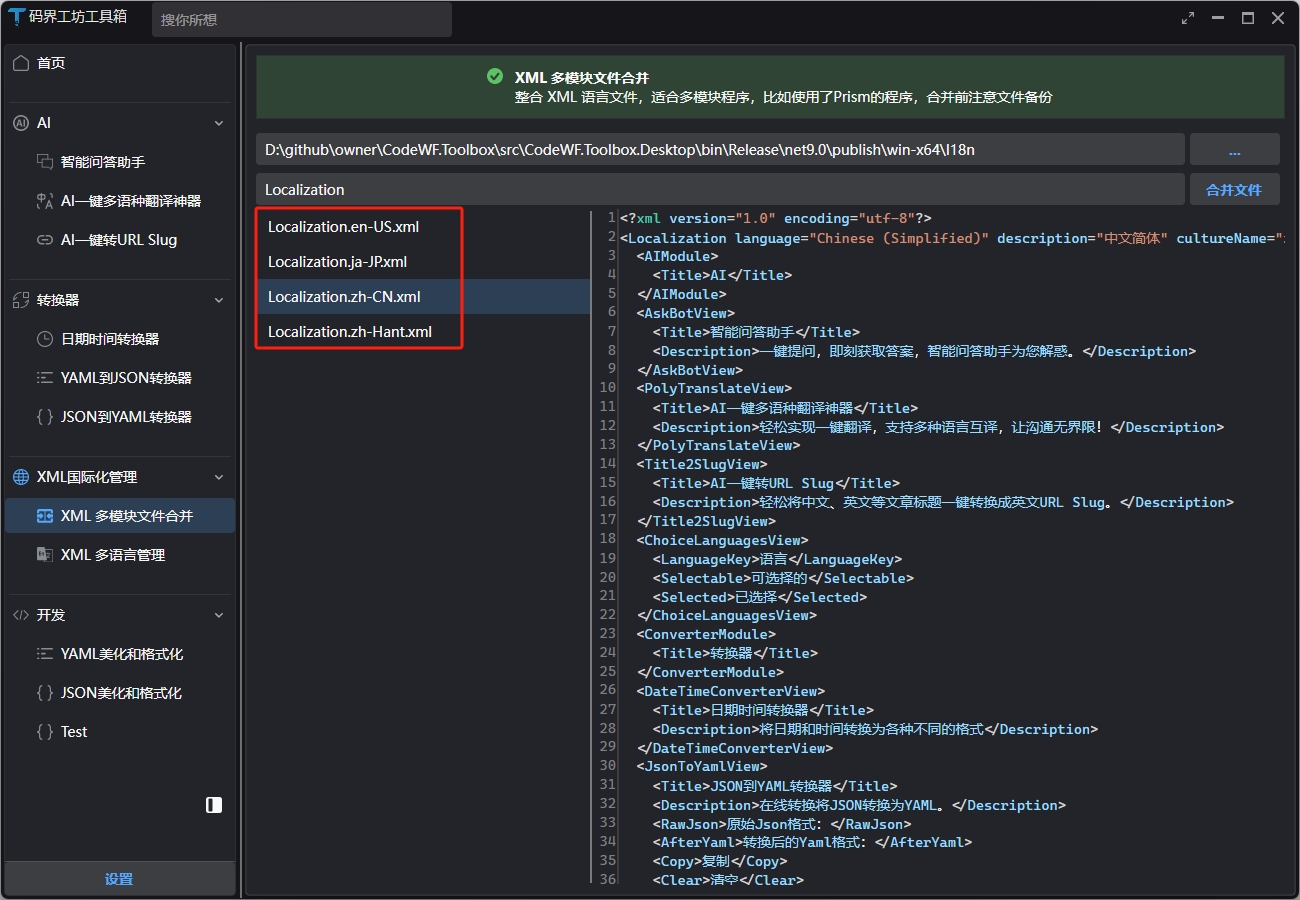
在 “B” 处输入合并后的 XML 文件前缀,默认值为 “Localization”。然后,点击 “C” 按钮即可执行文件合并操作。以下是合并后的效果示例图:
在进行多模块 XML 文件合并时,需要特别注意以下几点:
- 合并前务必进行数据备份,以防止因合并操作失误而导致数据丢失或损坏。
- 建议在合并前确保每个 XML 根节点相同,例如都命名为 “Localization”,这样可以保证合并后的文件结构更加规范和统一。
- 不同模块的 XML 节点应避免重复,否则可能会在合并过程中出现数据冲突或覆盖的问题。
多模块 XML 文件合并的原理其实非常简单,即将相同语言后缀下的 XML 文件合并到一个根节点下,从而实现语言数据的整合与集中管理。
5.2. XML 文件编辑
目前,XML 文件编辑功能相对较为基础,仅支持对现有的语言进行修改。
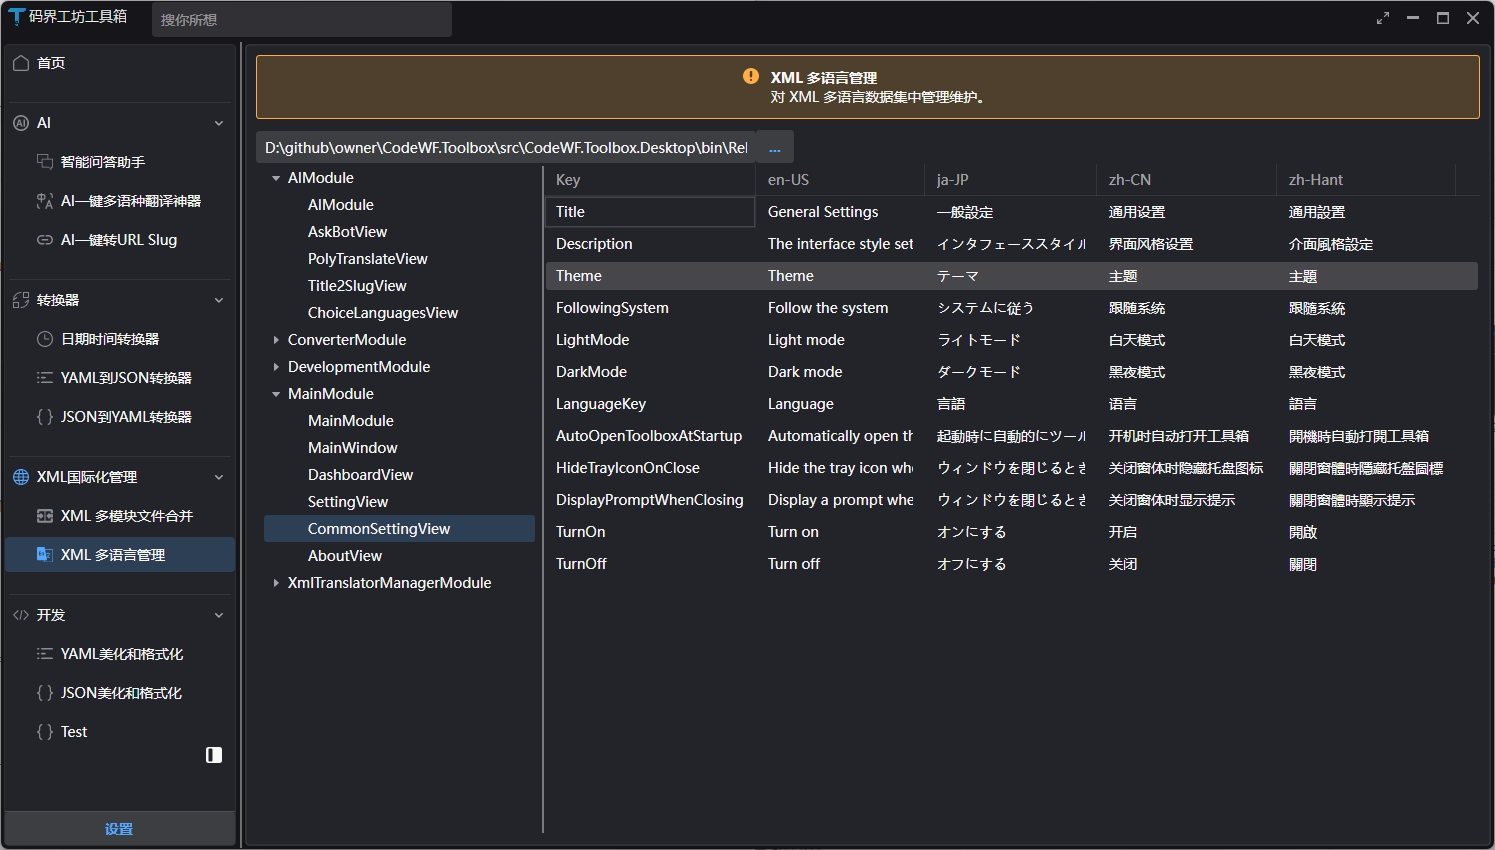
在后续的开发计划中,站长将进一步完善 XML 文件编辑功能,预计将会支持以下操作:
- 可修改 Key:允许用户对已有的语言 Key 进行修改,以适应项目需求的变化或修正错误的 Key 命名。
- 可添加 Key、删除 Key:提供灵活的 Key 管理功能,用户可以根据实际需要添加新的语言 Key 或删除不再使用的 Key,使 XML 文件的内容更加精准和高效。
- 可添加语言、删除语言:除了对 Key 的管理外,还将支持添加新的语言种类以及删除不再需要的语言,进一步拓展 XML 文件的国际化支持范围。
- 一键翻译:借助先进的 AI 翻译技术,实现一键将 XML 文件中的内容翻译成多种语言,大大提高翻译效率,减少人工翻译的工作量和成本。
5.3. AI 翻译的巧妙应用
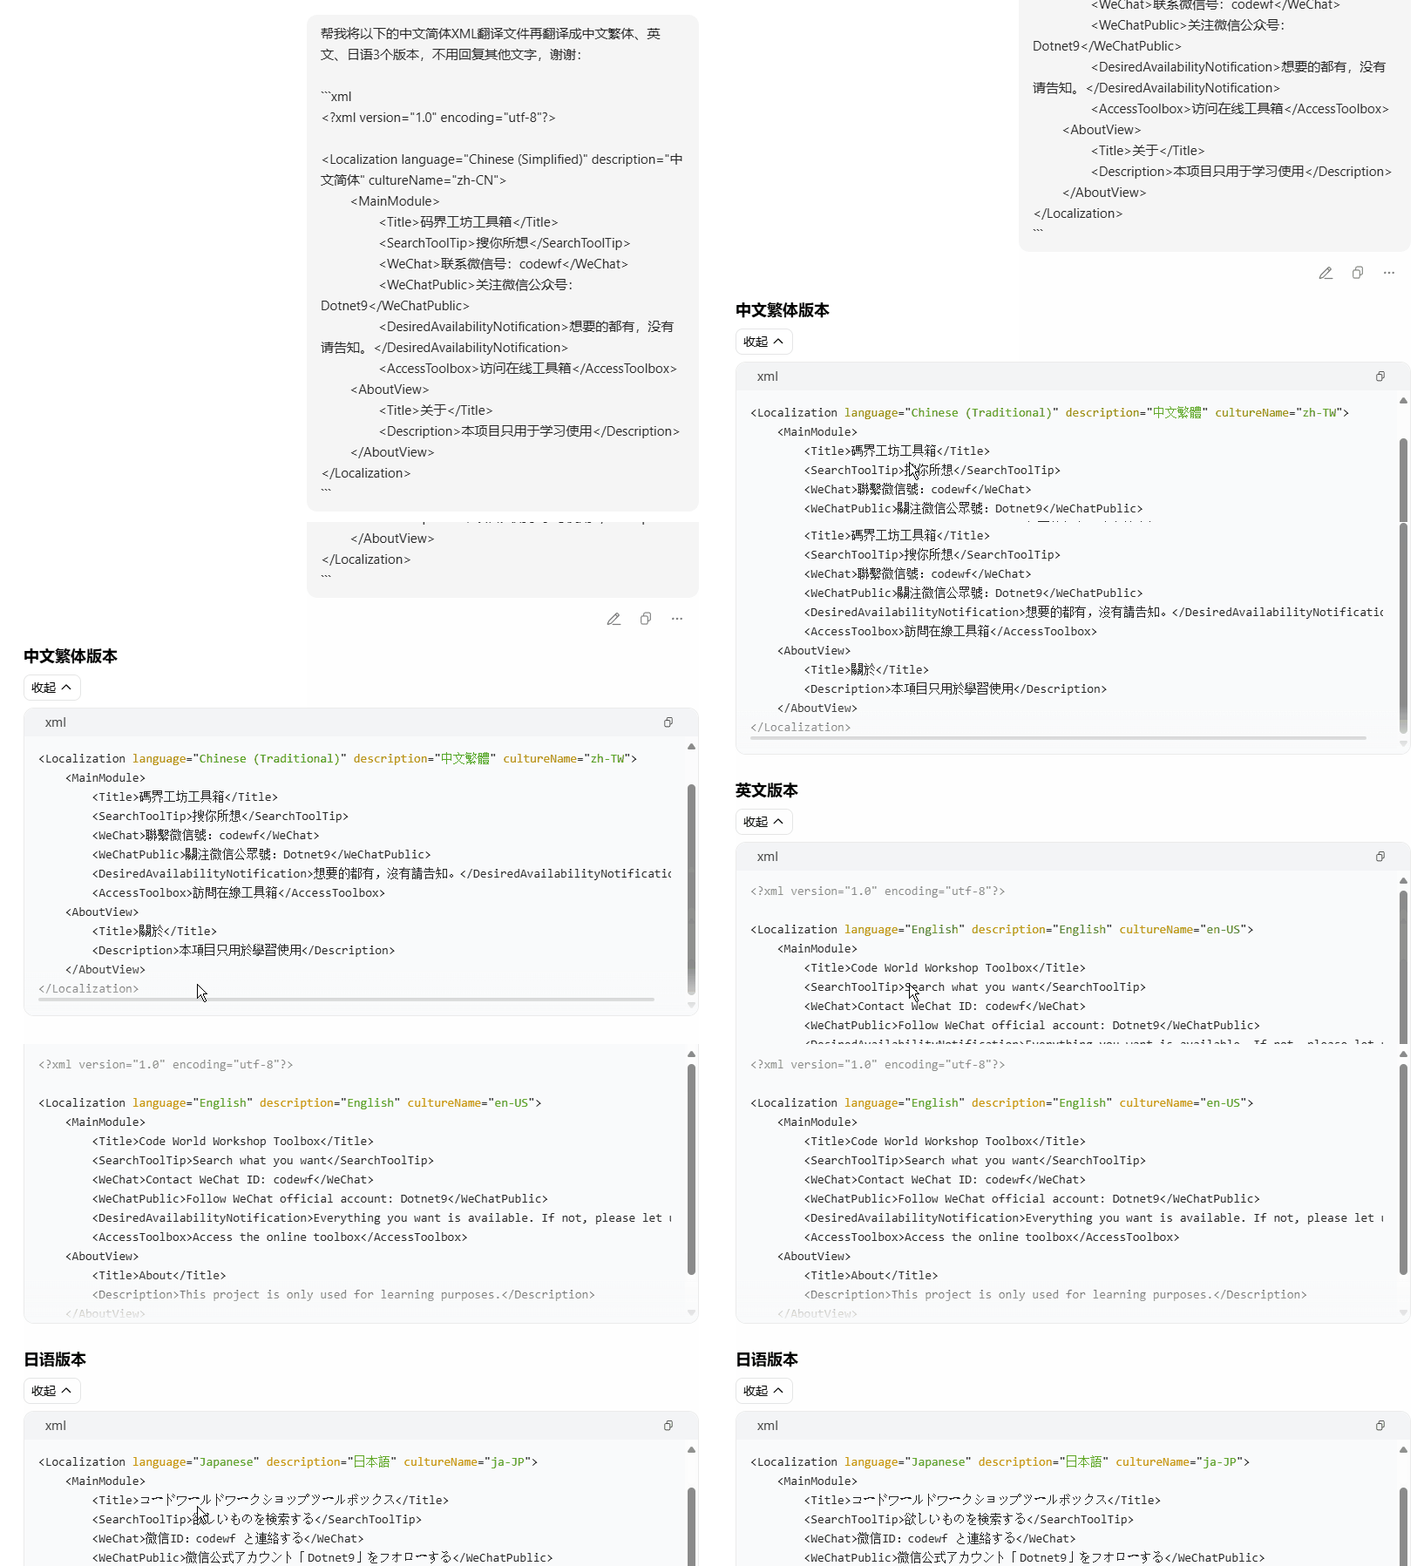
在 XML 文件的翻译过程中,我们可以巧妙地利用 AI 翻译技术来提高效率。例如,通过编写如下提示词:
帮我将以下的中文简体 XML 翻译文件再翻译成中文繁体、英文、日语 3 个版本,不用回复其他文字,谢谢:

```xml
<?xml version="1.0" encoding="utf-8"?>

<Localization language="Chinese (Simplified)" description="中文简体" cultureName="zh-CN">
	<MainModule>
		<Title>码坊工具箱</Title>
		<SearchToolTip>搜你所想</SearchToolTip>
		<WeChat>联系微信号:codewf</WeChat>
		<WeChatPublic>关注微信公众号:Dotnet9</WeChatPublic>
		<DesiredAvailabilityNotification>想要的都有,没有请告知。</DesiredAvailabilityNotification>
		<AccessToolbox>访问在线工具箱</AccessToolbox>
	<AboutView>
		<Title>关于</Title>
		<Description>本项目只用于学习使用</Description>
	</AboutView>
</Localization>
```
将上述 XML 内容提供给 AI,即可获取相应的中文繁体、英文、日语翻译版本,为国际化工作提供了快速且便捷的翻译途径,效果显著,如同以下示例图展示:
6. 总结与展望
在 Avalonia 国际化的征程中,Resx 资源文件和自定义 XML 文件是两种重要的实现方式,开发者应根据具体需求进行合理选择。
6.1. Resx 资源文件的适用场景
- 当项目无用户侧修改需求时,Resx 资源文件凭借其在开发环境中的便捷管理性,可通过 Resx Manager 等工具进行高效操作,是较为理想的选择。
- 对于那些注重开发过程中资源文件管理效率,且不需要用户参与语言内容调整的项目,Resx 资源文件能够很好地满足需求,确保项目的国际化进程顺利推进。
6.2. 自定义 XML 文件的优势领域
- 若项目存在用户侧修改需求,自定义 XML 文件则能够大放异彩。它允许用户根据自身使用场景和语言习惯对软件的语言内容进行灵活调整,极大地提升了用户体验和软件的适应性。
- 在需要借助 AI 编辑进行语言处理的情况下,XML 文件的格式更易于与 AI 工具进行交互,能够充分利用 AI 技术的优势,实现高效的翻译和语言管理。
- 对于追求清晰、有序的语言结构管理,以便于团队协作、代码维护和项目扩展的项目,自定义 XML 文件的命名空间组织方式和灵活的节点结构能够提供强有力的支持。
本文详细阐述了 Avalonia 使用自定义 XML 文件实现国际化的全过程,包括 XML 文件的创建、强类型生成、在 Avalonia 中的具体应用以及语言管理功能等方面。同时,为开发者提供了丰富的代码示例、详细的操作步骤以及相关的图片说明,旨在帮助开发者快速上手并熟练运用这一国际化方案。文中涉及的相关资源如下:
- XML 语言管理包:AvaloniaXmlTranslator
- 案例 Demo 及语言管理工具:CodeWF.Toolbox
- Resx 资源管理扩展:Resx Manager
展望未来,随着技术的不断发展和应用场景的日益丰富,Avalonia 国际化的实现方式也将不断演进和完善。我们期待能够看到更多便捷、高效的工具和技术涌现,进一步简化国际化开发流程,提升软件的全球化品质,为用户带来更加卓越的跨语言使用体验。无论是 Resx 资源文件还是自定义 XML 文件,都将在各自的适用领域继续发挥重要作用,共同推动 Avalonia 国际化进程的不断前进。